Blog

  • Mini-TFM-Player

    Mini TFM-Player

    A player for the TruckersFM audio stream as pop-up window inspired by the TruckersFM pop-up.

    Special thanks to TruckersFM for making the API usable on other sites.

    Features

    • play and pause the audio stream
    • set audio volume
    • resync audio with station
    • showing song details and cover image
    • showing current presenter
    • dark and light mode support
    • automatic pausing TFM API requests when page not visible (exluding music playback)
    • all-in-one page

    Missing features compared to the TFM pop-up

    • send requests, shoutouts, …
    • upcoming presenters / shows
    • recently played songs
    • social media links

    I use icons from Google Fonts.
    To avoid sending multiple requests per minute to the TruckersFM API, I use a self modified version of Icecast MetadataJS.
    The custom images are designed by me. (inspired by TruckersFM)

    Tip

    If you have Always On Top in PowerToys activated, you can use it to pin the pop-up window to the top of the screen.
    You can download and install it from the Github Releases or from the Microsoft Store. Then activate the Always On Top module and use the key combination of this module on the pop-up window.
    Alternatively, you can also use any other program that pins a window to the top of the screen.

    Visit original content creator repository
    https://github.com/Appstun/Mini-TFM-Player

  • rethinking_code

    Code boxes in Statistical Rethinking

    This repo contains the code boxes in the book Statistical Rethinking, converted to .ipynb, making it convenient to load the code into Kaggle’s Notebook environment (it’s free).

    Why

    The rethinking R package requires rstan, which is not easy to install and may cause problems on some computers. Kaggle’s R notebook has Rstan installed already, thus making the setup of the environment fast and easy (you only need to install rethinking from github, which can be done by just running the first code chunk in the notebooks).

    Usage

    The code from book_code_boxes.txt is split into several notebooks by chapter, which can be found in /notebooks.

    You can load a notebook in this repo into Kaggle’s Notebook environment by clicking File > Load from URL in the notebook interface (also, make sure to set the language to R on the right panel). The URL is in the form of:

    https://raw.githubusercontent.com/liao961120/rethinking_code/main/notebooks/ch{dd}.ipynb
    

    So, for instance, if you want to load the code in chapter 4, the URL would be:

    https://raw.githubusercontent.com/liao961120/rethinking_code/main/notebooks/ch04.ipynb
    

    Visit original content creator repository
    https://github.com/liao961120/rethinking_code

  • small-retail-management

    Small Retail Management

    A simple-to-use dashboard for tracking revenue, expenses, and salaries for every
    employee of your small business. Gain insights, see trends and make informed
    decisions.

    Project description and screenshots

    Video demo

    Features

    • Conveniently enter data for the day or entire week from your phone or desktop
    • See total revenue, expenses and salary for each employee for the month, year
      or all time
    • Easily jump between dates to see historical data
    • Add employees, set revenue share percentage and base salary – total salary
      will be calculated automatically

    Installation

    1. Clone this repository:

      git clone https://github.com/maxpatiiuk/small-retail-management
    2. Install dependencies:

      npm i
    3. Create a Firebase project and a Firestore database.

    4. Use security rules in ./firestore.rules for the
      Firestore database. Modify the isAuthenticated function to match your
      security needs – for example allow only users with certain email addresses to
      access your application.

    5. Generate your Firebase config object.

    6. Copy ./example.env.local into .env.local and fill it
      in with values generated in the previous step.

    7. Enable Firebase authentication and enable Google authentication provider.

    8. Enable daily and weekly backups of the database

    Development

    npm run dev # start development server

    This would start the development server at
    http://locahlost:3000.

    Production

    npm run build # begin the build process
    npm run start # start production server

    This would start the production server at
    http://locahlost:3000.

    Afterward, you can deploy this site at https://vercel.com.

    Alternatively, you can configure a reverse proxy (e.x Nginx) that would handle
    the SSL certificate and forward the requests to port 80, which should be made
    externally available.

    Visit original content creator repository
    https://github.com/maxpatiiuk/small-retail-management

  • didcomm-mediator-socketdock

    SocketDock

    A WebSocket Relay Service

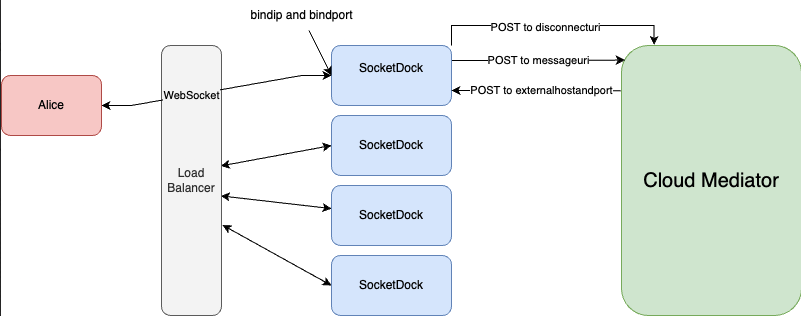
    SocketDock serves as a relay between WebSocket-oriented agents and backends that don’t support WebSockets natively. Arbitrarily many instances of SocketDock can be spun up behind a load balancer, which serves WebSocket connections to a specific instance of SocketDock. SocketDock will receive messages addressed to the backend and transport them across HTTP to the backend. No state is shared between instances of SocketDock, allowing for easy scaling.

    Messages are forwarded unmodified, with some additional metadata to allow the backend to associate the sender of the message with the SocketDock instance it’s connected to (see messageuri below). When a WebSocket is terminated, SocketDock will send a message to the disconnecturi, informing the backend that the connection has been terminated.

    SocketDock

    Configuration

    bindip and bindport

    These reference what the instance of SocketDock is running on. This is where inbound WebSockets connect.

    messageuri

    This is the HTTP endpoint of whatever backend that SocketDock is in front of. SocketDock will pass messages, along with some metadata, to this endpoint.

    Note: message is sent as a string, not a JSON object

    {
        "meta": {
                    "connection_id": <socket_id>,
                    "send": "http://<externalhostandport>/socket/<socket_id>/send",
                }, 
        "message": message
    }
    

    disconnecturi

    When a WebSocket is terminated, SocketDock will inform the backend of the disconnect. This allows the backend to proactively adjust its behavior—queueing messages instead of attempting live delivery, in case of a mediator, for example.

    If a SocketDock instance fails, the backend won’t know of the terminated connection and will attempt to behave normally. In that case, an error will be thrown when attempting to POST to the endpoint, and the backend should adjust its behavior at that time.

    externalhostandport

    This is the endpoint on which SocketDock is expecting responses from the backend. This information is used to construct the callback URI (see messageuri above).

    backend

    This variable currently has 2 options: loopback and http. This determines which backend SocketDock is expecting. loopback turns SocketDock into an echo server, where any message sent to it SocketDock is immediately sent directly back. This option is primarily used for local testing and demoing. http is used when an HTTP-enabled backend implementation is being used, as in many production scenarios.

    Additional backends may be added in the future, as need arises.

    Visit original content creator repository https://github.com/openwallet-foundation/didcomm-mediator-socketdock
  • character-entities-html4

    character-entities-html4

    Build Coverage Downloads Size

    Map of named character references from HTML 4.

    Contents

    What is this?

    This is a map of named character references in HTML 4 to the characters they represent.

    When should I use this?

    Maybe when you’re writing an HTML parser or minifier, but otherwise probably never! Even then, it might be better to use parse-entities or stringify-entities.

    Install

    This package is ESM only. In Node.js (version 14.14+, 16.0+), install with npm:

    npm install character-entities-html4

    In Deno with esm.sh:

    import {characterEntitiesHtml4} from 'https://esm.sh/character-entities-html4@2'

    In browsers with esm.sh:

    <script type="module">
      import {characterEntitiesHtml4} from 'https://esm.sh/character-entities-html4@2?bundle'
    </script>

    Use

    import {characterEntitiesHtml4} from 'character-entities-html4'
    
    console.log(characterEntitiesHtml4.AElig) // => 'Æ'
    console.log(characterEntitiesHtml4.aelig) // => 'æ'
    console.log(characterEntitiesHtml4.amp) // => '&'
    console.log(characterEntitiesHtml4.apos) // => undefined

    API

    This package exports the identifier characterEntitiesHtml4. There is no default export.

    characterEntitiesHtml4

    Map of case sensitive named character references from HTML 4.

    See w3.org for more info.

    Types

    This package is fully typed with TypeScript. It exports no additional types.

    Compatibility

    This package is at least compatible with all maintained versions of Node.js. As of now, that is Node.js 14.14+ and 16.0+. It also works in Deno and modern browsers.

    Security

    This package is safe.

    Related

    Contribute

    Yes please! See How to Contribute to Open Source.

    License

    MIT © Titus Wormer

    Visit original content creator repository https://github.com/wooorm/character-entities-html4
  • number-uint32-base-to-int32

    About stdlib…

    We believe in a future in which the web is a preferred environment for numerical computation. To help realize this future, we’ve built stdlib. stdlib is a standard library, with an emphasis on numerical and scientific computation, written in JavaScript (and C) for execution in browsers and in Node.js.

    The library is fully decomposable, being architected in such a way that you can swap out and mix and match APIs and functionality to cater to your exact preferences and use cases.

    When you use stdlib, you can be absolutely certain that you are using the most thorough, rigorous, well-written, studied, documented, tested, measured, and high-quality code out there.

    To join us in bringing numerical computing to the web, get started by checking us out on GitHub, and please consider financially supporting stdlib. We greatly appreciate your continued support!

    toInt32

    NPM version Build Status Coverage Status

    Convert an unsigned 32-bit integer to a signed 32-bit integer.

    Installation

    npm install @stdlib/number-uint32-base-to-int32

    Alternatively,

    • To load the package in a website via a script tag without installation and bundlers, use the ES Module available on the esm branch (see README).
    • If you are using Deno, visit the deno branch (see README for usage intructions).
    • For use in Observable, or in browser/node environments, use the Universal Module Definition (UMD) build available on the umd branch (see README).

    The branches.md file summarizes the available branches and displays a diagram illustrating their relationships.

    To view installation and usage instructions specific to each branch build, be sure to explicitly navigate to the respective README files on each branch, as linked to above.

    Usage

    var uint32ToInt32 = require( '@stdlib/number-uint32-base-to-int32' );

    uint32ToInt32( x )

    Converts an unsigned 32-bit integer to a signed 32-bit integer.

    var float64ToUint32 = require( '@stdlib/number-float64-base-to-uint32' );
    
    var y = uint32ToInt32( float64ToUint32( 4294967295 ) );
    // returns -1
    
    y = uint32ToInt32( float64ToUint32( 3 ) );
    // returns 3

    Examples

    var randu = require( '@stdlib/random-base-randu' );
    var MAX_UINT32 = require( '@stdlib/constants-uint32-max' );
    var float64ToUint32 = require( '@stdlib/number-float64-base-to-uint32' );
    var uint32ToInt32 = require( '@stdlib/number-uint32-base-to-int32' );
    
    var uint32;
    var int32;
    var i;
    
    for ( i = 0; i < 100; i++ ) {
        // Generate a random unsigned 32-bit integer:
        uint32 = float64ToUint32( randu()*MAX_UINT32 );
    
        // Convert the unsigned integer to a signed 32-bit integer:
        int32 = uint32ToInt32( uint32 );
    
        console.log( 'uint32: %d => int32: %d', uint32, int32 );
    }

    Notice

    This package is part of stdlib, a standard library for JavaScript and Node.js, with an emphasis on numerical and scientific computing. The library provides a collection of robust, high performance libraries for mathematics, statistics, streams, utilities, and more.

    For more information on the project, filing bug reports and feature requests, and guidance on how to develop stdlib, see the main project repository.

    Community

    Chat


    License

    See LICENSE.

    Copyright

    Copyright © 2016-2025. The Stdlib Authors.

    Visit original content creator repository https://github.com/stdlib-js/number-uint32-base-to-int32
  • wxDraw

    wxDraw

    「已经开始支持图形创建」

    轻量的小程序canvas动画库

    是什么

    canvas 是HTML5的一个重要元素,它能够高效的绘制图形,但是过于底层,且粗糙的Api,导致开发者很难使用它来做较为复杂的图形, 而且它的即时绘制无记忆特性,使得它内部的图形并不支持动画更不支持一切交互事件。

    这样的问题出现在所有支持canvas的客户端上同样出现在 微信小程序中的canvas中, 由于小程序由jsCore支持,并没有window对象,并且canvas的Api与标准的canvas的Api有所出入,所以市面上绝大部分canvas库与它无缘

    而wxDraw也就应运而生,专门用于处理小程序上canvas的图形创建图形动画,以及交互问题的。

    特性

    • 简单 不需要你会canvas,会用jQuery就会使用wxDraw。
    • 灵活 所有图形,随时随地都可以进行属性修改、图形添加以及图形销毁。
    • 事件支持 小程序支持的事件只要是合理的都支持。
    • 缓动动画支持 wxDraw支持链式调用动画『就像jQuery的animate一样』,并且支持几乎所有的缓动函数

    支持图形

    这里只做演示 详细文档 点这里

    这些图形都可以在演示文件里看到 点这里

    rect

     var rect = new Shape('rect', {x: 60, y: 60, w: 40, h: 40, fillStyle: "#2FB8AC", rotate: Math.PI/2 },'mix', true);

    rect

    circle

     let circle = new Shape('circle', { x: 100, y: 100, r: 40, sA: Math.PI/4, 
                                 fillStyle: "#C0D860",
                                strokeStyle: "#CC333F", rotate: 20, lineWidth: 0, needGra: 'line', 
                                  gra: [[0, '#00A0B0'], [0.2, '#6A4A3C'], [0.4, '#CC333F'], [0.6, '#EB6841'], [1, '#EDC951']]}, 
                               'fill', true)

    polygon

    let polygon = new Shape('polygon', { x: 200, y: 200, r: 40, sides: 9, //9边形
                              fillStyle: "#FC354C", rotate: Math.PI / 4 }, 'mix', true)

    ellipse

        let ellipse = new Shape('ellipse', { x: 200, y: 200, a: 40, b: 100, 
                                 fillStyle: "#00A0B0", rotate: Math.PI / 7 }, 'mix', true)

    image

    图形对象

    示例

    let img = new Shape('image', { x: 100, y: 300,w:100,h:100, file:"./1.png"}, 'fill', true)
      

    cshape 「自定义图形」

      let cshape = new Shape('cshape', {
          rotate: Math.PI / 2,
          points: [[70, 85], [40, 20], [24, 46], [2, 4], [14, 6], [4, 46]],
          lineWidth: 5,
          fillStyle: "#00A0B0",
          rotate: Math.PI / 7,
          needGra: 'circle',
          smooth:false,
          gra: [[0, '#00A0B0'], [0.2, '#6A4A3C'], [0.4, '#CC333F'], [0.6, '#EB6841'], [1, '#EDC951']]
        }, 'fill', true)

    line

    let line = new Shape('line', { points:[[240,373],[11,32],[28,423],[12,105],[203,41],[128,0.06]], 
                   strokeStyle: "#2FB8AC",lineWidth:1, rotate: 0, needShadow: true,smooth:false },  
                   'fill', true)

    text

      let text = new Shape('text', { x: 200, y: 200, text: "我是测试文字", 
                          fillStyle: "#E6781E", rotate: Math.PI / 3}
                          'fill', true)

    wxDraw创作的动画演示

    这些动画都可以在演示文件里看到 点这里

    Google

    贪吃蛇

    logo演绎

    rect舞蹈

    吃豆人

    wxDraw事件

    这些事件都可以在演示文件里看到 点这里

    支持

    • tap
    • touchStart
    • touchEnd
    • touchMove
    • longPress
    • drag「自定义的事件」

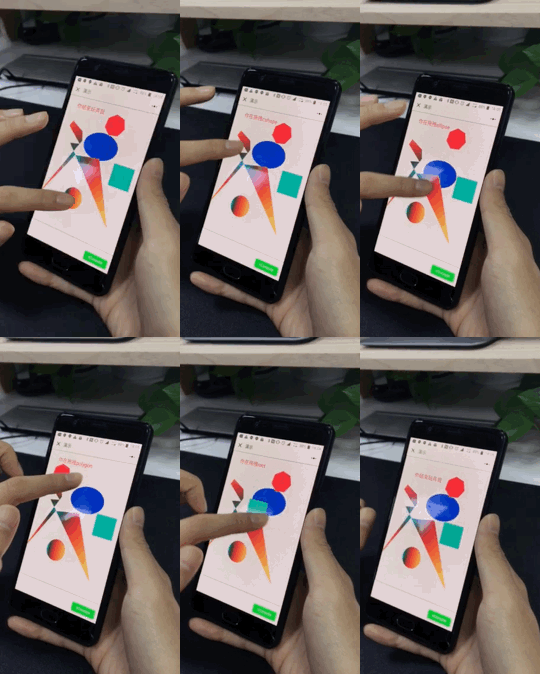
    事件演示

    旁边UI小妹妹亲自示范 😜

    第一视角

    是不是特别简单,特别方便!!! 来,老铁们,star走一波!!!

    TODO

    • 图形创建

      • rect
      • arc
        • 扇形
      • polygon
        • 正n边形
        • 用户自己加的形状
        • 光滑版用户自己加的形状
      • image
      • 线条
        • 贝塞尔曲线『用的较少,绘制出来后 没法事件检测』
        • 普通线条
        • 光滑曲线
      • svg path
      • 椭圆
        • 事件
        • 动画
        • 样式
      • 字体
        • 事件
        • 动画
        • 样式
      • 粒子动画元素『我觉得这个算另外一种系统 不属于形状』
    • 样式

      • 阴影
      • 渐变
      • 线宽
      • 线连接
      • 透明度
    • 选中检测

      • rect
      • arc
        • 整个圆形
        • 扇形区域
      • polygon 区域
        • 正多边形
        • 非规则多边形
      • 线条点击
      • 点 点击
      • 椭圆
      • 层级区分
    • 动画

      • requestAnimationFrame垫片
      • 时间扭曲函数
      • 运动
        • 移动
          • x
          • y
        • 放大缩小 使用矩阵暂时搁浅
        • 旋转
          • [x]原点旋转
          • [x]自身中心点旋转
        • 变色
        • 循环动画
        • 连续动画
        • 暂停动画
      • 精灵图『小程序 所支持的drawImage功能太低级 所以取消』
    • 矩阵变换

    • 层级修改

    • 事件

      • touchstart
      • touchmove
      • touchend
      • 拖拽事件
      • tap事件
      • longpress事件
      • 划入划出「划入划出是鼠标的事件吧」
    • 取消事件绑定

    • clone

    Visit original content creator repository https://github.com/bobiscool/wxDraw
  • intro-to-security-for-developers

    Intro to Security for Developers

    An incomplete introduction to security for developers. Topics include device security, account security, developer tools security, and application security (SSL/TLS, cross-site scripting, authentication systems, information disclosure, and common security headers).

    Also check out my personal security checklist for handy checklist to secure your devices and accounts.

    Presentation

    Slides are available on my website at www.alexandraulsh.com/intro-to-security-for-developers/slides. They are hosted on the gh-pages branch of this repo.

    View slides locally

    If you’d like to view the presentation locally:

    git clone git@github.com:alulsh/intro-to-security-for-developers.git
    git checkout gh-pages
    cd slides
    npm install
    npm start

    Your default web browser should open the slides on http://localhost:8000/#/ automatically.

    Presentation History

    I’ve given this presentation at the following events. I’ve tagged each presentation as a release in this repo.

    Event Date Release
    Women Who Code DC Tech Talk Feburary 9th, 2017 wwcdc-tech-talk
    Mapbox Miniconf October 8th, 2016 mapbox-miniconf
    Tech Lady Hackathon #4 October 22nd, 2016 techlady-hackathon-2016

    Code Samples

    This presentation uses code samples written in Node.js to interactively teach security concepts. The code samples are hosted in the default code-samples branch.

    I do not host these demos on my website since it uses GitHub Pages (can’t run a web server) and I don’t want live cross-site scripting vulnerabilities on my domain. These demos must be run locally on your machine or on a cloud IDE such as Cloud9.

    Prerequisites

    You will need to install node.js and npm in order to use these code samples. I recommend installing node.js with nvm (Node Version Manager).

    I used node 4.6.0 and npm 2.15.9 to create these code samples, but they may work on earlier or later versions of node/npm. If the samples don’t work on your machine, try them with Node 4.6.0 (nvm install 4.6.0 if you use nvm) and npm 2.15.9 before opening up an issue.

    Installation

    To install the code samples:

    git clone git@github.com:alulsh/intro-to-security-for-developers.git
    cd <code sample directory>
    npm install
    npm start

    For example, to run the cross-site scripting demos:

    git clone git@github.com:alulsh/intro-to-security-for-developers.git
    cd xss
    npm install
    npm start

    License

    These slides and code samples are open source so I can more easily share them with the world. If you want to re-use them, give me credit or a shout out and let me know! I’d love to hear how you are using them.

    Questions?

    Create a new GitHub issue or Tweet at me – @AlexUlsh.

    Visit original content creator repository
    https://github.com/alulsh/intro-to-security-for-developers

  • Minestom

    Visit original content creator repository
    https://github.com/R077A6r1an/Minestom