funckey is a simple go cli program that wraps lower level linux cli apps that are commonly mapped to function keys on laptops.
I made this so I could easily map my volume and brightness function keys on my laptop to work when running xmonad and xmobar (see config examples below). If you’re using gnome/kde you probably don’t need something like this.
Setup / Install
go get github.com/jacktasia/funckey
then go install github.com/jacktasia/funckey
required packages
Ensure you have pactl installed
and
that the /sys/class/backlight/intel_backlight/brightness file exists.
brightness file permissions
By default the brightness file is owned by root.
Your user needs to be able to edit the brightness file, change jack to your username:
This library provides a way to quickly create the menu for your GoLang console app.
Overview
Classes
Menu
This is the type that you use to make your menus.
It has two constructors one for if the menu items can be updated (shown or hidden) and another for if they can’t.
These should be called like this:
Display() this starts this menu. This only needs to be called on the root menu in your system, as all sub-menus are handled by this library.
AddMenuItem(GoConsoleMenu.NewSubmenuItem(id, description, subMenu)) this adds a submenu item to the menu.
AddMenuItem(GoConsoleMenu.NewActionItem(id, description, action)) this adds a action item to the menu.
AddHiddenMenuItem this is a helper method that adds a menu item, which is then hidden.
ShowMenuItem(id) this can be used to show hidden menu items, most commonly in the method above. This uses the unique id given to the menu item.
HideMenuItem(id) this can be used to hide menu items.
MenuItem
This is the class used to define items for the menus in your system.
It has two constructors one for if the item is a sub menu and another for if its an action.
These should be called like this:
Hide() which is used on menu items, to hide them from the list.
Show() which is used on hidden menu items, to show them in the list.
SetAsExitOption() which is used to set menu items as the exit option for a menu, either going to the parent menu, or exiting the application.
Example
funcmain() {
mainMenu:=GoConsoleMenu.NewMenu("Welcome to the main menu.", func(menu*GoConsoleMenu.Menu) {})
mainMenu.AddMenuItem(GoConsoleMenu.NewActionItem(100, "Exit menu", func() {}).SetAsExitOption())
mainMenu.AddMenuItem(GoConsoleMenu.NewActionItem(101, "Print Hello World", func()
{
fmt.Println("Hello World!")
}))
mainMenu.Display()
}
Output
Welcome to the main menu
0. Exit menu
1. Print Hello World
Select option: 1
Hello World!

Welcome to the main menu
0. Exit menu
1. Print Hello World
Select option: 0

Process finished with exit code 0
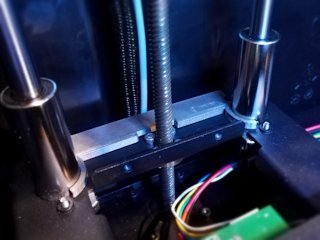
This is a remix of “Z-Axis Shim in 3mm/4mm/5mm Versions for Flashforge Creator Pro Variant Models Glass Bed Powerspec Pro” by Atomist (Thingiverse thing:557994), and “Z-Axis Shim for Flashforge Creator Pro (for glass bed sold by flashforge-eu.com)” by ben8p (Thingiverse thing:1475239).
If you want to install a glass bed or another print surface of considerable thickness on your printer, you need to adjust the height at which the Z endstop is triggered, because the extra thickness of the glass is added to the platform. If you don’t do this, the platform will level too high and you are likely to run out of adjustment length of the levelling springs and be unable to level the plate, or even risk ramming the nozzle into the glass and breaking it.
The easiest way to do this, is to add a shim to the rear of the platform at the location of the Z endstop, to raise this part with roughly the same amount as the thickness of the extra plate. There are many shims available but I couldn’t find any for the 2016 FlashForge Creator Pro, which seems to have screws in different places than other models, so here’s a remix that fits. Ready-to-use models are available in thicknesses from 2 to 6 mm (0.08 to 0.24 inch).
For those who want to make a custom shim of any thickness between 1 and 10 mm, a customizable OpenSCAD model is provided. Open the .scad file in OpenSCAD and use the OpenSCAD Customizer to create a model with your own desired specifications.
The shims are designed to slightly clamp themselves between the rods, but if you print them in PLA and often do prints with a hot enclosed chamber, they may lose their ‘springiness’ over time and become a little wiggly. This is not a problem and does not affect their function.
Hints for Printing
Print at 0.1 mm layers if you want a reasonably accurate thickness, although this would only matter if you regularly swap between glass plates and things of other thicknesses and don’t want to have to make large readjustments each time.
Use proper cooling and a sufficient number of top layers to avoid ‘pillowing.’
I don’t recommend ABS for the shim because flat objects like these tend to curl up a bit when the ABS cools down after being printed. It is best for the shim to be perfectly flat. PETG is a good material but PLA will also do fine unless you’re really going to be printing in a very hot enclosed chamber.
Updates
2016/11/12
First publication on Thingiverse.
2017/05/01
Added 6 mm version
2017/07/30
Added an option to Customizer to reinforce the center of the part around the hole for the Z axis leadscrew. This allows to make thin shims that do not bend easily.
fromvssliteimportLangChainVSSLiteClient# Initializevss=LangChainVSSLiteClient()
# Add data with embeddingsvss.add("The difference between eel and conger eel is that eel is more expensive.")
vss.add("Red pandas are smaller than pandas, but when it comes to cuteness, there is no \"lesser\" about them.")
vss.add("There is no difference between \"Ohagi\" and \"Botamochi\" themselves; they are used interchangeably depending on the season.")
# Searchprint(vss.search("fish", count=1))
print(vss.search("animal", count=1))
print(vss.search("food", count=1))
Now you can get these search results.
$ python run.py

[{'page_content': 'The difference between eel and conger eel is that eel is more expensive.', 'metadata': {'source': 'inline'}}]
[{'page_content': 'Red pandas are smaller than pandas, but when it comes to cuteness, there is no "lesser" about them.', 'metadata': {'source': 'inline'}}]
[{'page_content': 'There is no difference between "Ohagi" and "Botamochi" themselves; they are used interchangeably depending on the season.', 'metadata': {'source': 'inline'}}]
🔧 Data management (Add, Get, Update, Delete)
Helps CRUD.
# Addid=vss.add("The difference between eel and conger eel is that eel is more expensive.")[0]
# Getvss.get(id)
# Updatevss.update(id, "The difference between eel and conger eel is that eel is more expensive. Una-jiro is cheaper than both of them.")
# Deletevss.delete(id)
# Delete allvss.delete_all()
Upload data. Accept Text, PDF, CSV and JSON for now.
vss.upload("path/to/data.json")
🍻 Asynchronous
Use async methods when you use VSSLite in server apps.
VSSLite supports namespaces for dividing the set of documents to search or update.
vss=LangChainVSSLiteClient()
# Search product documentsvss.search("What is the difference between super size and ultra size?", namespace="product")
# Search company documentsvss.search("Who is the CTO of Unagiken?", namespace="company")
🌐 Web UI
You can quickly launch a Q&A web service based on documents 🚅
This is an example for OpenAI terms of use (upload terms of use to VSSServer with namespace openai).
Save this script as runui.py.
importasynciofromvsslite.chatimport (
ChatUI,
VSSQAFunction
)
# Setup QA functionopenai_qa_func=VSSQAFunction(
name="get_openai_terms_of_use",
description="Get information about terms of use of OpenAI services including ChatGPT.",
parameters={"type": "object", "properties": {}},
namespace="openai",
# answer_lang="Japanese", # <- Uncomment if you want to get answer in Japanese# is_always_on=True, # <- Uncomment if you want to always fire this functionverbose=True
)
# Start appchatui=ChatUI(temperature=0.5, functions=[openai_qa_func])
asyncio.run(chatui.start())
You can quickly launch a LINE Bot based on documents 🛫
Install dependency
$ pip install aiohttp line-bot-sdk
Make a script
This is an example for OpenAI terms of use (upload terms of use to VSSServer with namespace openai).
Save this script as line.py.
importosfromvsslite.chatgpt_processorimportVSSQAFunctionfromvsslite.lineimportLineBotServer# Setup QA function(s)fromvsslite.chatgpt_processorimportVSSQAFunctionopenai_qa_func=VSSQAFunction(
name="get_openai_terms_of_use",
description="Get information about terms of use of OpenAI services including ChatGPT.",
parameters={"type": "object", "properties": {}},
vss_url=os.getenv("VSS_URL") or"http://127.0.0.1:8000",
namespace="openai",
# answer_lang="Japanese", # <- Uncomment if you want to get answer in Japanese# is_always_on=True, # <- Uncomment if you want to always fire this functionverbose=True
)
app=LineBotServer(
channel_access_token=YOUR_CHANNEL_ACCESS_TOKEN,
channel_secret=YOUR_CHANNEL_SECRET,
endpoint_path="/linebot", # <- Set "https://your_domain/linebot" to webhook url at LINE Developersfunctions=[openai_qa_func]
).app
Start LINE Bot Webhook Server
$ uvicorn line:app --host 0.0.0.0 --port 8002
Set `https://your_domain/linebot“ to webhook url at LINE Developers.
🐳 Docker
If you want to start VSSLite API with chat console, use docker-compose.yml in examples.
Set your OpenAI API Key in vsslite.env and execute the command below:
$ docker-compose -p vsslite --env-file vsslite.env up -d --build
Or, use Dockerfile to start each service separately.
Reflecting on past experience as a preK teacher, the developer realized that licensing and citation info for CA child care facilities is not especially easy for the public to access and digest. Built off of data from California Dept of Social Services, Child Care Check enables a user to display facilities on a map & filter by adherence to state licensing, location, and center name/key words. Child Care Check is a resource that will help both parents & care providers find quality care environments for children.
Secrets will be stored in plaintext in the Terraform state. You should only
use this with provider with Terraform remote state. For more information, please
see sensitive state.
  -V, --version                output the version number
  -c, --config <config file>   configuration file to use (default: ".sftp.json")
  -h, --host <host>            hostname to connect to
  -p, --port <port>            SSH port to use (defaults to 22)
  -u, --user <username>        the ssh username
  -k, --key <key_or_file>      path to private key file, or private key itself
  --password <password>        the password to the private key
  -l, --local <path>           directory to upload
  -t, --target <target_dir>    target directory on remote host
  -s, --staging <staging_dir>  staging directory on remote host
                               (defaults to the target directory + .staging)
  -u, --upload <upload_dir>    upload directory on remote host
                               (default: "/var/tmp")
  --help                       display help for command
Using a configuration file
Each of the options listed above may also be specified in a configuration file called .sftp.json.
You may override this filename by using the -c option (see above).
For example:
{"host": "example.com","port": 1234,/* Optional, defaults to 22 */"user": "bob""key": "private_key.pem""password": "super_secure",/* Optional, only needed if the key is encrypted */"local": "./build","target": "/var/www/build","staging": "/var/www/incoming/uploads",/* Optional, defaults to target directory + .staging */"upload": "/my/upload/dir"/* Optional, defaults to /var/tmp */}
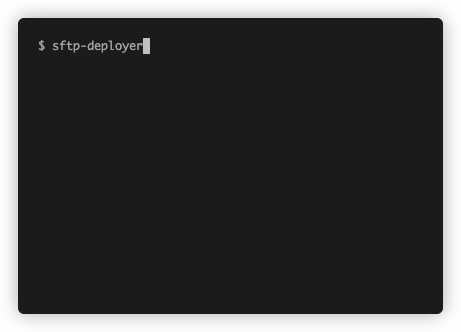
You may then simply invoke sftp-deployer and it will take its input from the .sftp.json file in the current working directory.
Blue/green deployment
When a directory is uploaded but a target directory already exists, the following steps are taken to minimize downtime:
Deploy new directory to a staging location
Swap staging location and target location
This makes sure that the target directory is only down for a couple of milliseconds.
Because each “day” is published at 9pm PST, there’s a crush on quality vs. sleep and a day-job. I’m primarily focused deepening my Go skills while “getting ‘er done” with crude beauty :). I’ve taken writing unit-tests to assert samples initially, then separate tests per “part” of each challenge.
LMK if you’re enjoying or loathing pawing over my code and approach: stephbu@gmail.com
The investment in writing a pseudo-CPU on day 2 just paid back, adding instructions and operating modes was pretty easy, albeit needed a few test cases for things like the parameter masking
Stalled for a while because I missed the test data/samples being ordered, but unordered in the puzzle. This caused problems in missing large chunks of data during the expansion of direct orbits into indirect orbits, and undercounting the dataset (~7300 vs ~203000). Rectified the mistake by taking two passes at the data, one to load the direct orbits, and second to recursively scan and expand each indirect orbit. Part two just needed to retro-fit hop-counting in the indirect expansion phase, to enable fast finding of common-root brute-force list comparison to extract least hops
Third day of Intcode CPU, after starting Part 1 a little late, I made good progress and took less than 30mins to get to answer. Part 2 not so good, managed to miss the fact that I was using a ref-copy of memory, so go-routines were corrupting each other. Figured it out in the end.
Simpler day, easier problem, less satisfying outcome with weaker tests because of the shape fo the results require visual interpretation. I used GSheets conditional formatting to make Part 2 answer really clear.
Lots of geometry – rusty as heck. Missed the occlusion at any angle clause, ended up writing a masking system that I canned when I RTFM. The Hashmap/SortedList worked really well in the second part. Most of the code was mainly assertives test cases. Almost went to bed to sleep on Part 2, transforming the X-oriented geometry to bearings. Had a brainwave literally just before shutdown, and got ‘er done.
Multidimensional Arrays suck lots in Golang – untuitive syntax, initialization, consumption, the works. Got there in the end.
Getting Started
I’ve broken out the project into packages of code and tests per day. Clone the repo, then use
go get github.com/stephbu/aoc2019
cd $GOROOT/src/github.com/stephbu/aoc2019
dep ensure
go test ./... -v   # test all days
...
go test ./day6 -v  # test specific day
I’ve taken writing unit-tests to assert samples initially, then separate tests per “part” of each challenge.
DevLog Day 7
Really tired after a late night and early start at work. Part 1 done reasonably quickly. Part 2, made a wrong turn that wasted ~3hrs on a go-routine-on-go-routine corruption because I forgot to copy IntCode program memory. Crawled into bed at 3am, not super good. Probably the biggest takeaway is debugging go-routines in Goland is getting better, but isn’t great. It was really difficult to find the accidental shared pointer, ended up going back to sprintf debug.
DevLog Day 11
So I made it to the brink of day 11. On track at 20 stars and just waiting for the clock to to get another couple. Made a tonne of use of the IntCode interpreter. I think all those days of Z80 are starting to pay off 42 years later. I’m sitting at 5.3KLoC, not bad for 10 nights of hacking away. If you’d missed some of the previous days, I’d suggest going back, especially to Day 10 which has a full IntCode validator as the final puzzle. Not sure if I’ll get time code Thur/Fri, I’m day-tripping SFO in a couple of days time, then company Xmas party the day after.
This is a dark syntax colouring theme for the Geany text editor.
Please help us extend the geany-dark theme to support new languages! Please extend the current theme by using the colours from one of the existing syntax files – that way they all play nice together.
Language Support
The scheme currently supports highlighting for these languages:
.c – C languages files (contributed by Paulo Cabido)
.cs – C# language files (contributed by Duncan Lock)
.css – Cascading Stylesheet files (contributed by Roman Snitko)
.d – d language files (contributed by gtk.monkey)
.docbook – Docbook mark-up files (contributed by gmunkhbaatarmn)
.haskel – Haskel code (contributed by Dave.Sarman)
.html – Hypertext Markup Language file – web pages (contributed by Roman Snitko, Javascript support added by Daniel Mlodecki)
.java – Java language files (contributed by Paulo Cabido)
.javascript – Javascript scripts (Duncan Lock, partially based on GeanyDarkTango?)
.latex – Latex files (contributed by Enrico Tröger)
.lua – Lua script files (contributed by curtstrangward)
.markdown – Markdown text files (contributed by pho3nixf1re84)
.NSIS – Nullsoft Scriptable Installer System scripts (contributed by mr.soup12, modified by Duncan Lock)
.pascal – Pascal code (contributed by gtk.monkey)
.perl – Perl language files (contributed by Roman Snitko)
.php (contributed by Roman Snitko, improved by s5n43K3s)
.py – Python language files (contributed by Nicolas Hainaux)
.r – R stats language (contributed by weibullguy)
.rb – Ruby language files (contributed by Roman Snitko)
.sh – Bash shell scripts (contributed by Duncan Lock)
.sql – SQL database query files (contributed by Duncan Lock)
.yaml – YAML files (contributed by pho3nixf1re84)
.vala – Vala language files (contributed by boromil)
.xml – Extensible Markup Language files (contributed by Roman Snitko)
How to Install the Theme
Linux: (Ubuntu)
Local User (just for you):
The simplest way to do this is to copy the contents of the filedefs folder into the ~/.config/geany/filedefs/ folder. This means that you can only have one theme installed at a time, though.
A better way, is to copy the contents filedefs folder into a ~/.config/geany/geany_dark_filedefs/ folder, creating the folder if it doesn’t already exist. Then create a symlink to that folder:
This allows you to have several themes stored in your ~/.config/geany/ folder, and to change which one you’re using by changing where the ~/.config/geany/filedefs symlink points.
System Wide:
BE SURE TO BACK UP THE EXISTING FILEDEFS IF YOU DON’T WANT TO LOSE THEM!
Copy the filedefs folder into /usr/share/geany/
NOTE: Geany may be installed in /usr/local/geany/ or /opt/geany/ depending on your OS or your installation method. Be sure to choose the correct directory. This method means that your filedef files will get overwritten when you upgrade Geany and also means that you can only have one theme installed at a time.
Windows:
Copy the contents of the filedefs folder to…
Current User only:
%APPDATA%\geany\filedefs
System Wide:
BE SURE TO BACK UP THE EXISTING FILEDEFS IF YOU DON’T WANT TO LOSE THEM!
C:\Program Files\Geany\data
NOTE: This method means that your filedef files will get overwritten when you upgrade Geany and also means that you can only have one theme installed at a time.


