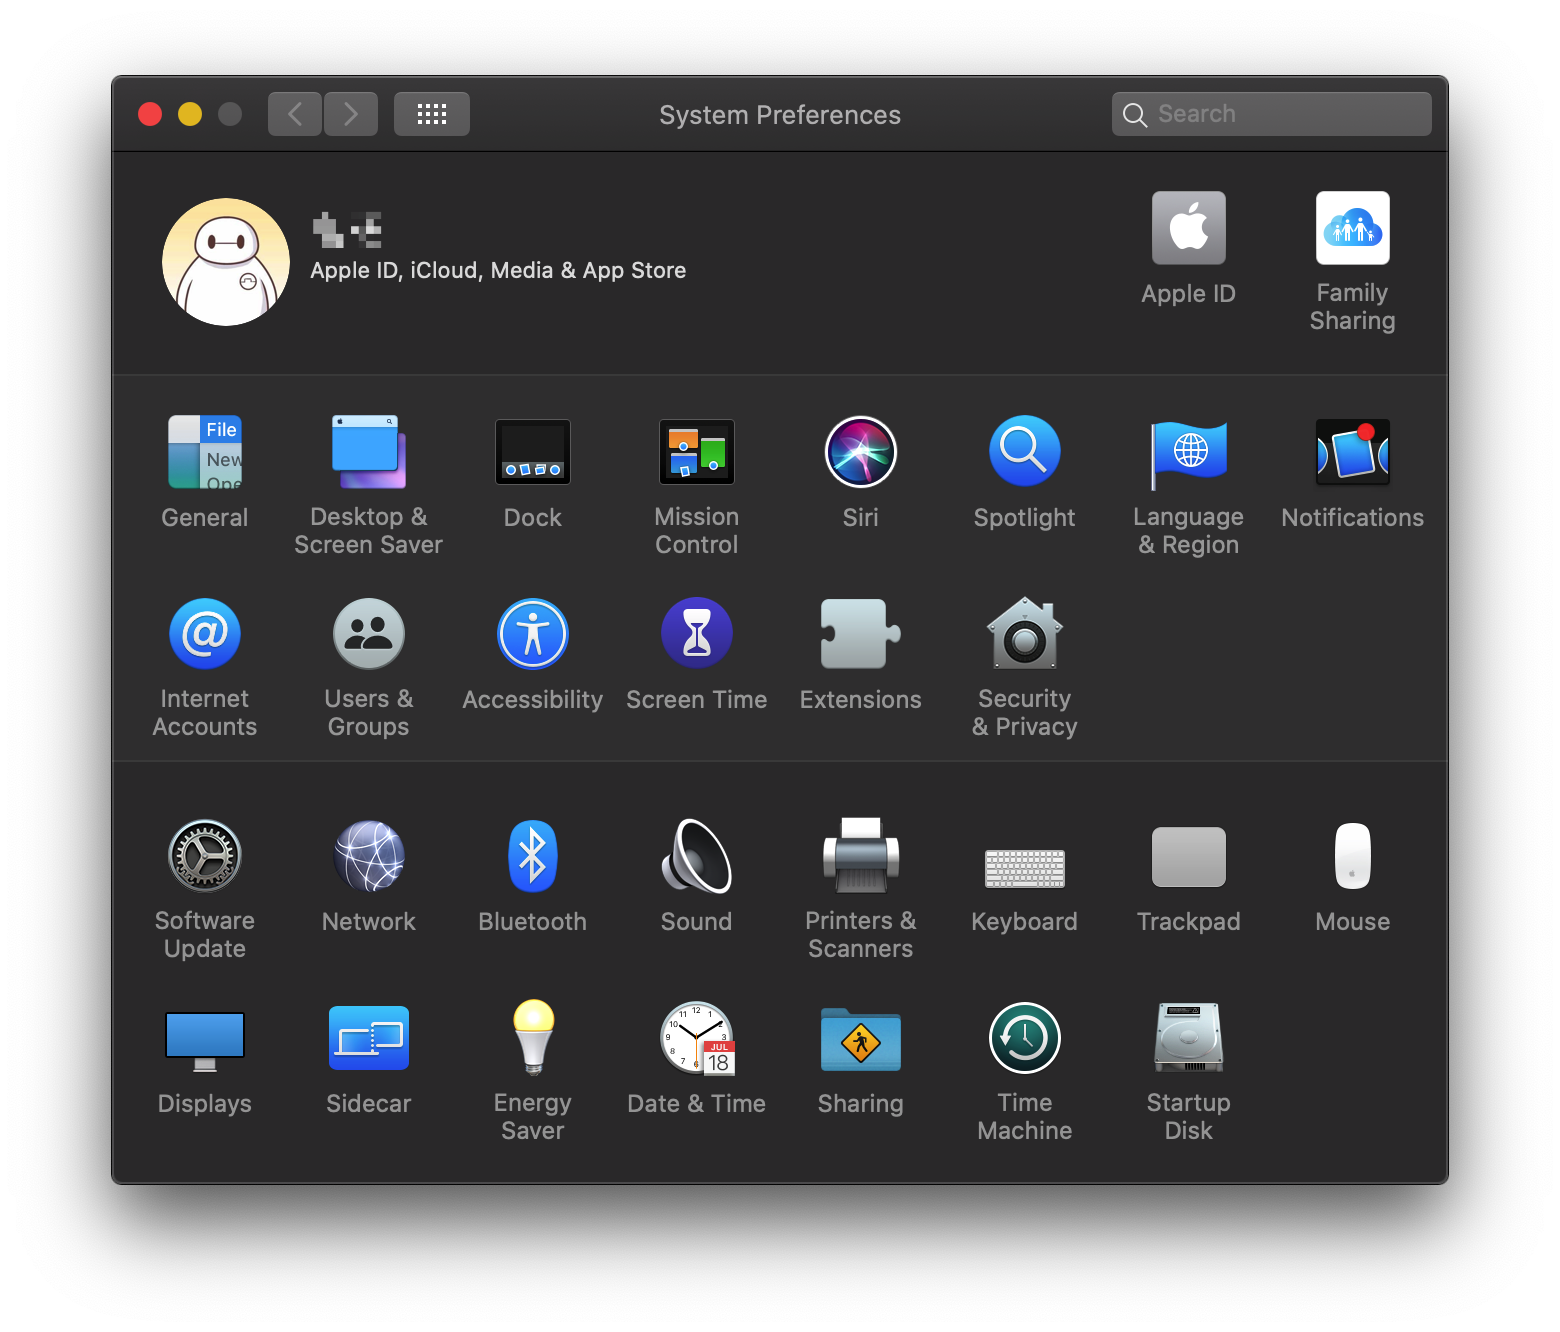
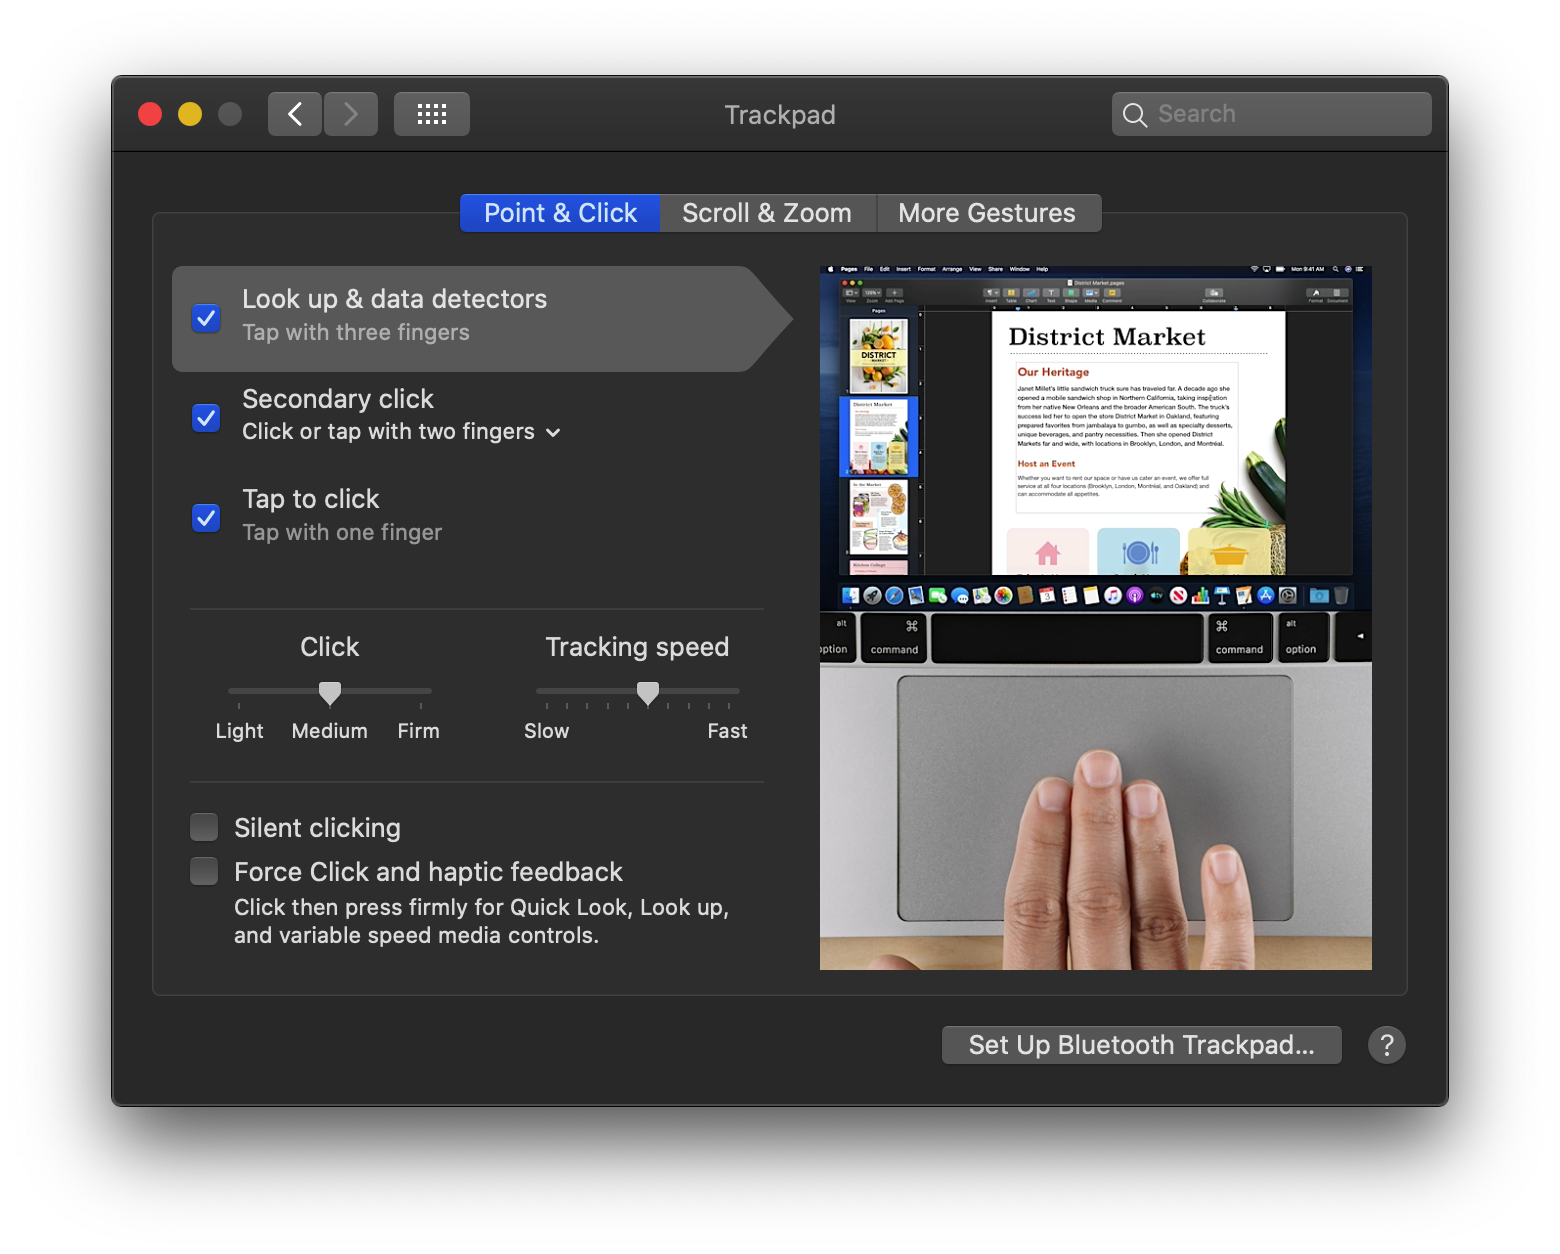
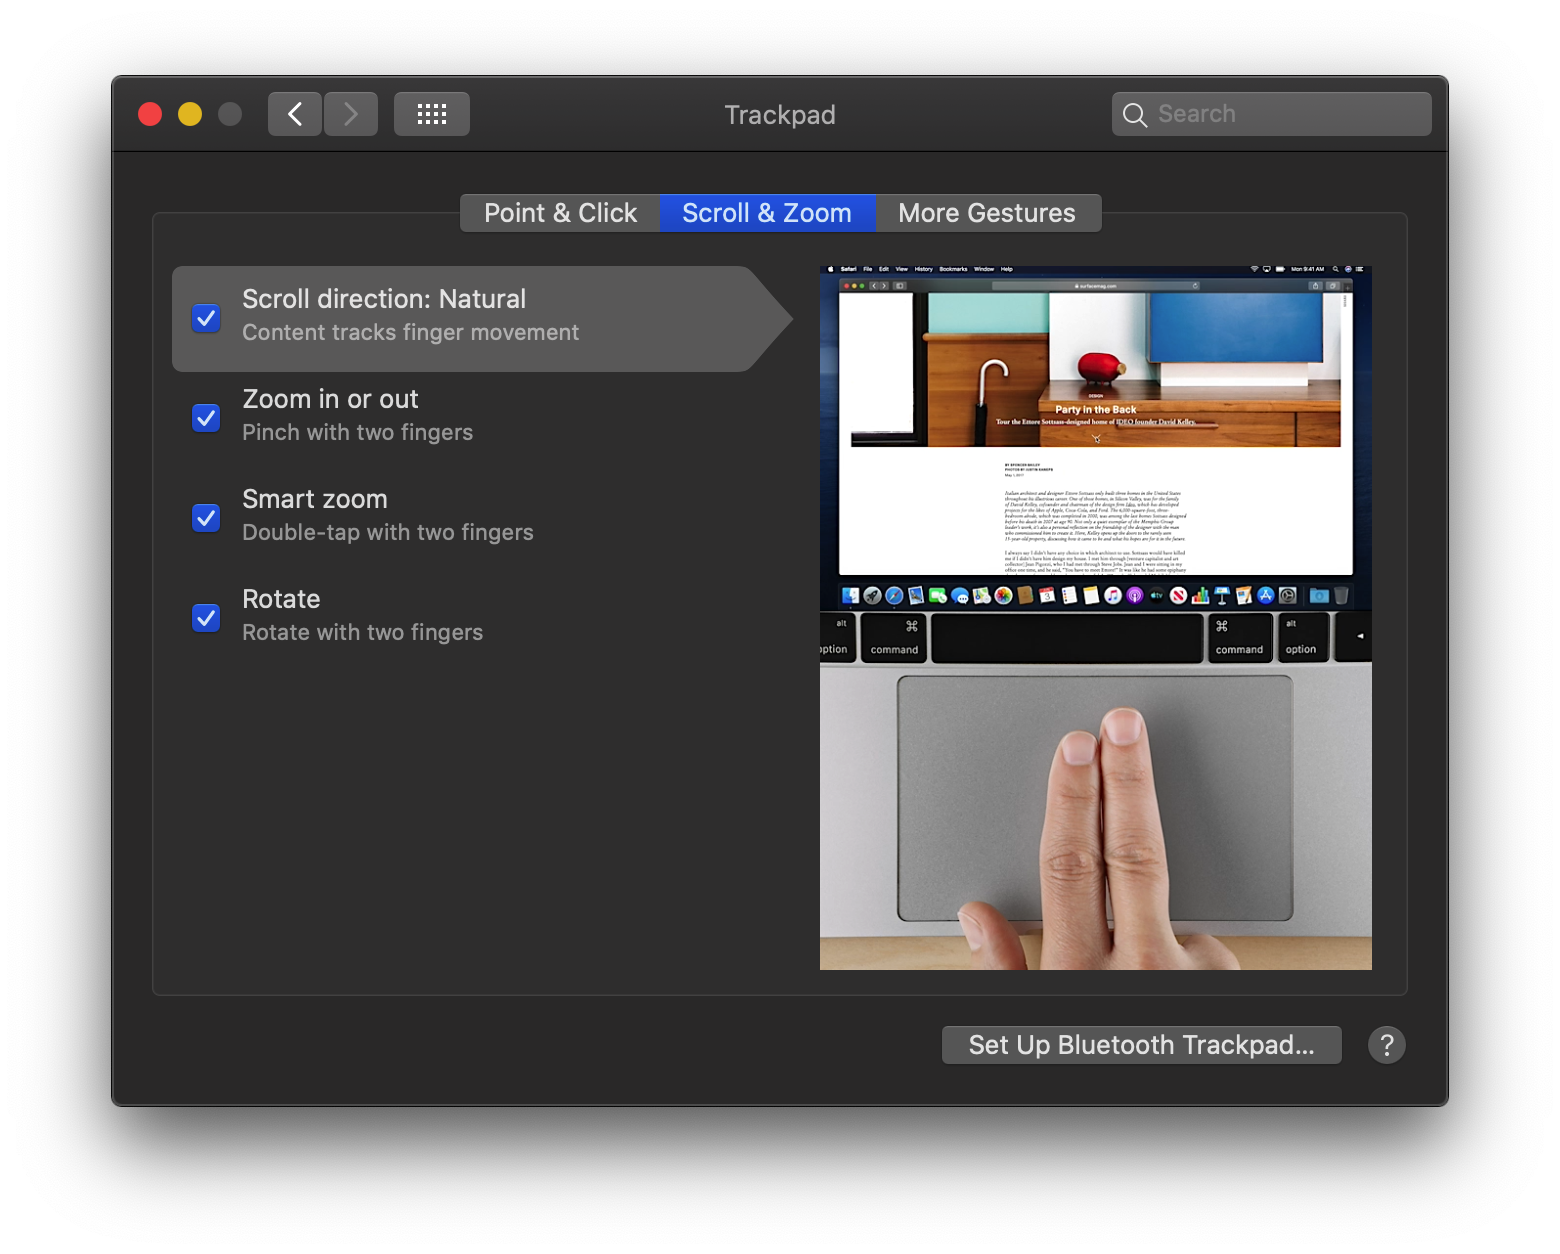
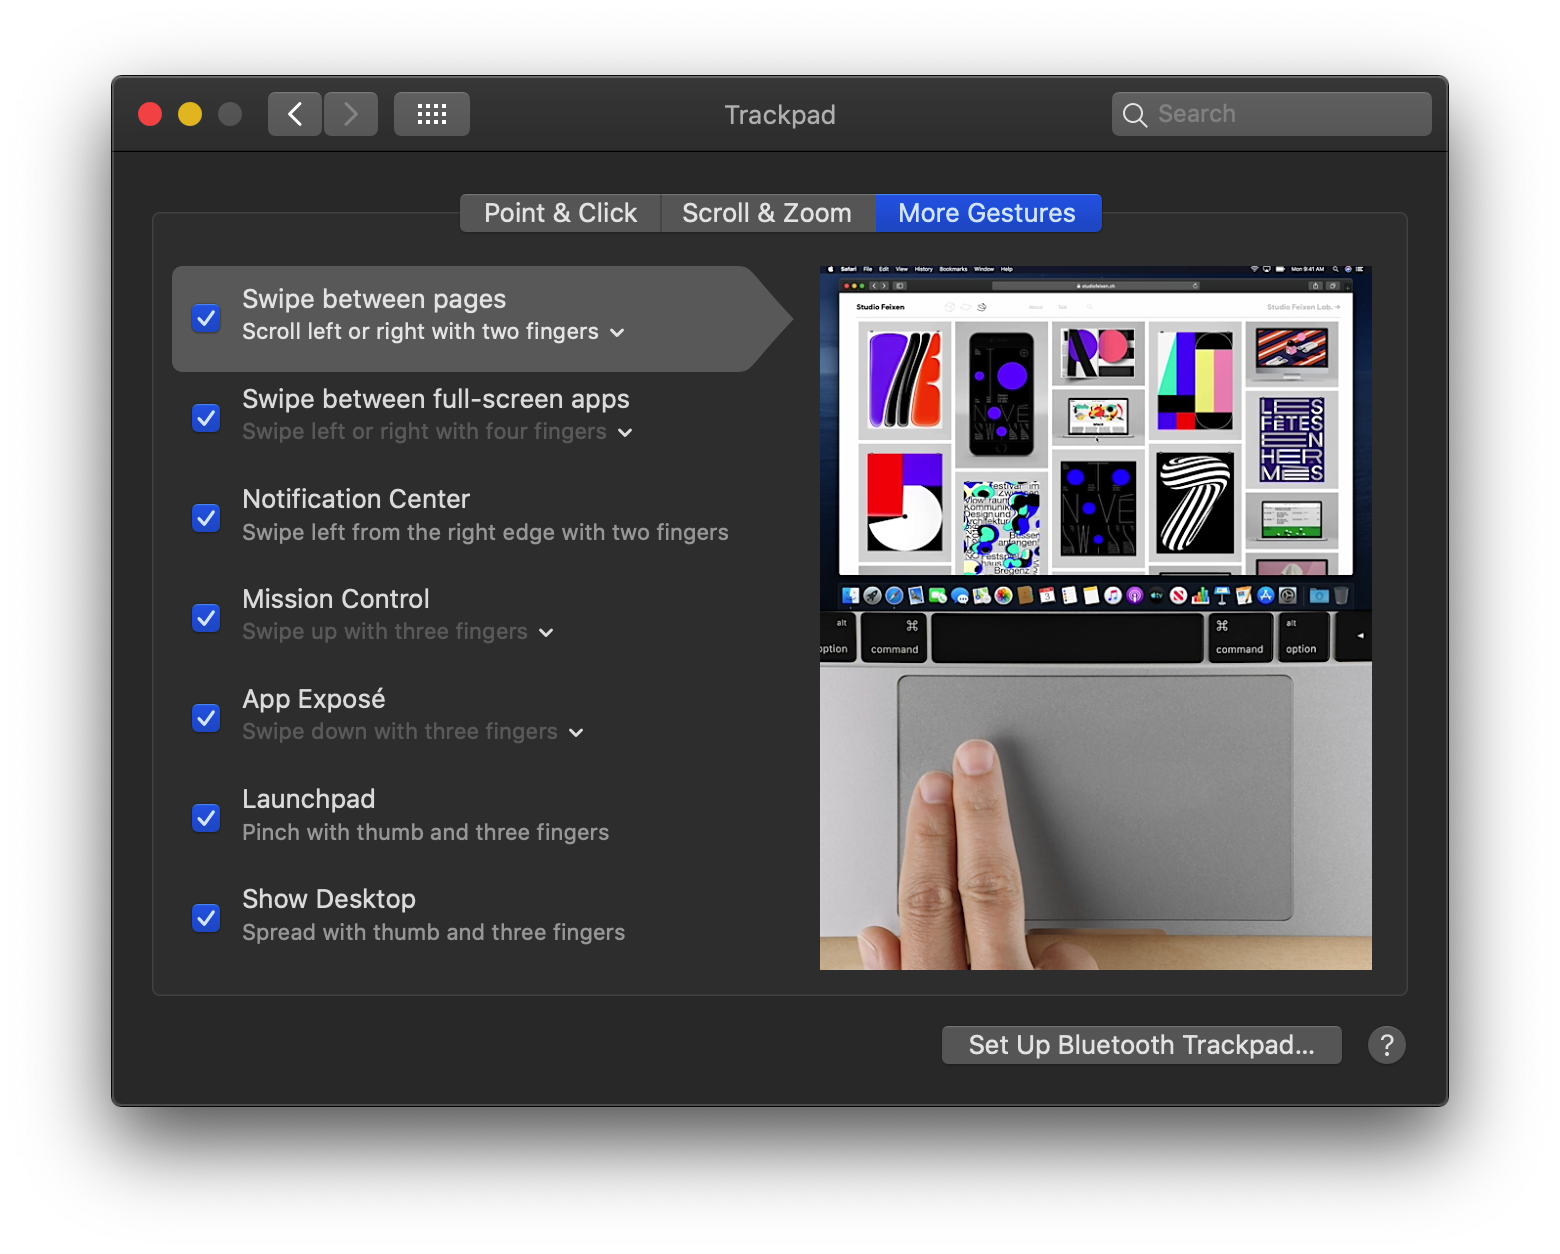
3、My touchpad is different from others,My touchpad is I2C HID,So I use @alexandred‘s VoodooI2C Drive,supported all gestures, (⚠️To use this driver, you need to delete the AppleIntelLpssI2C.kext and AppleIntelLpssI2CController.kext in S/L/E)
3、My touchpad is different from others,My touchpad is I2C HID,So I use @alexandred‘s VoodooI2C Drive,supported all gestures, (⚠️To use this driver, you need to delete the AppleIntelLpssI2C.kext and AppleIntelLpssI2CController.kext in S/L/E)
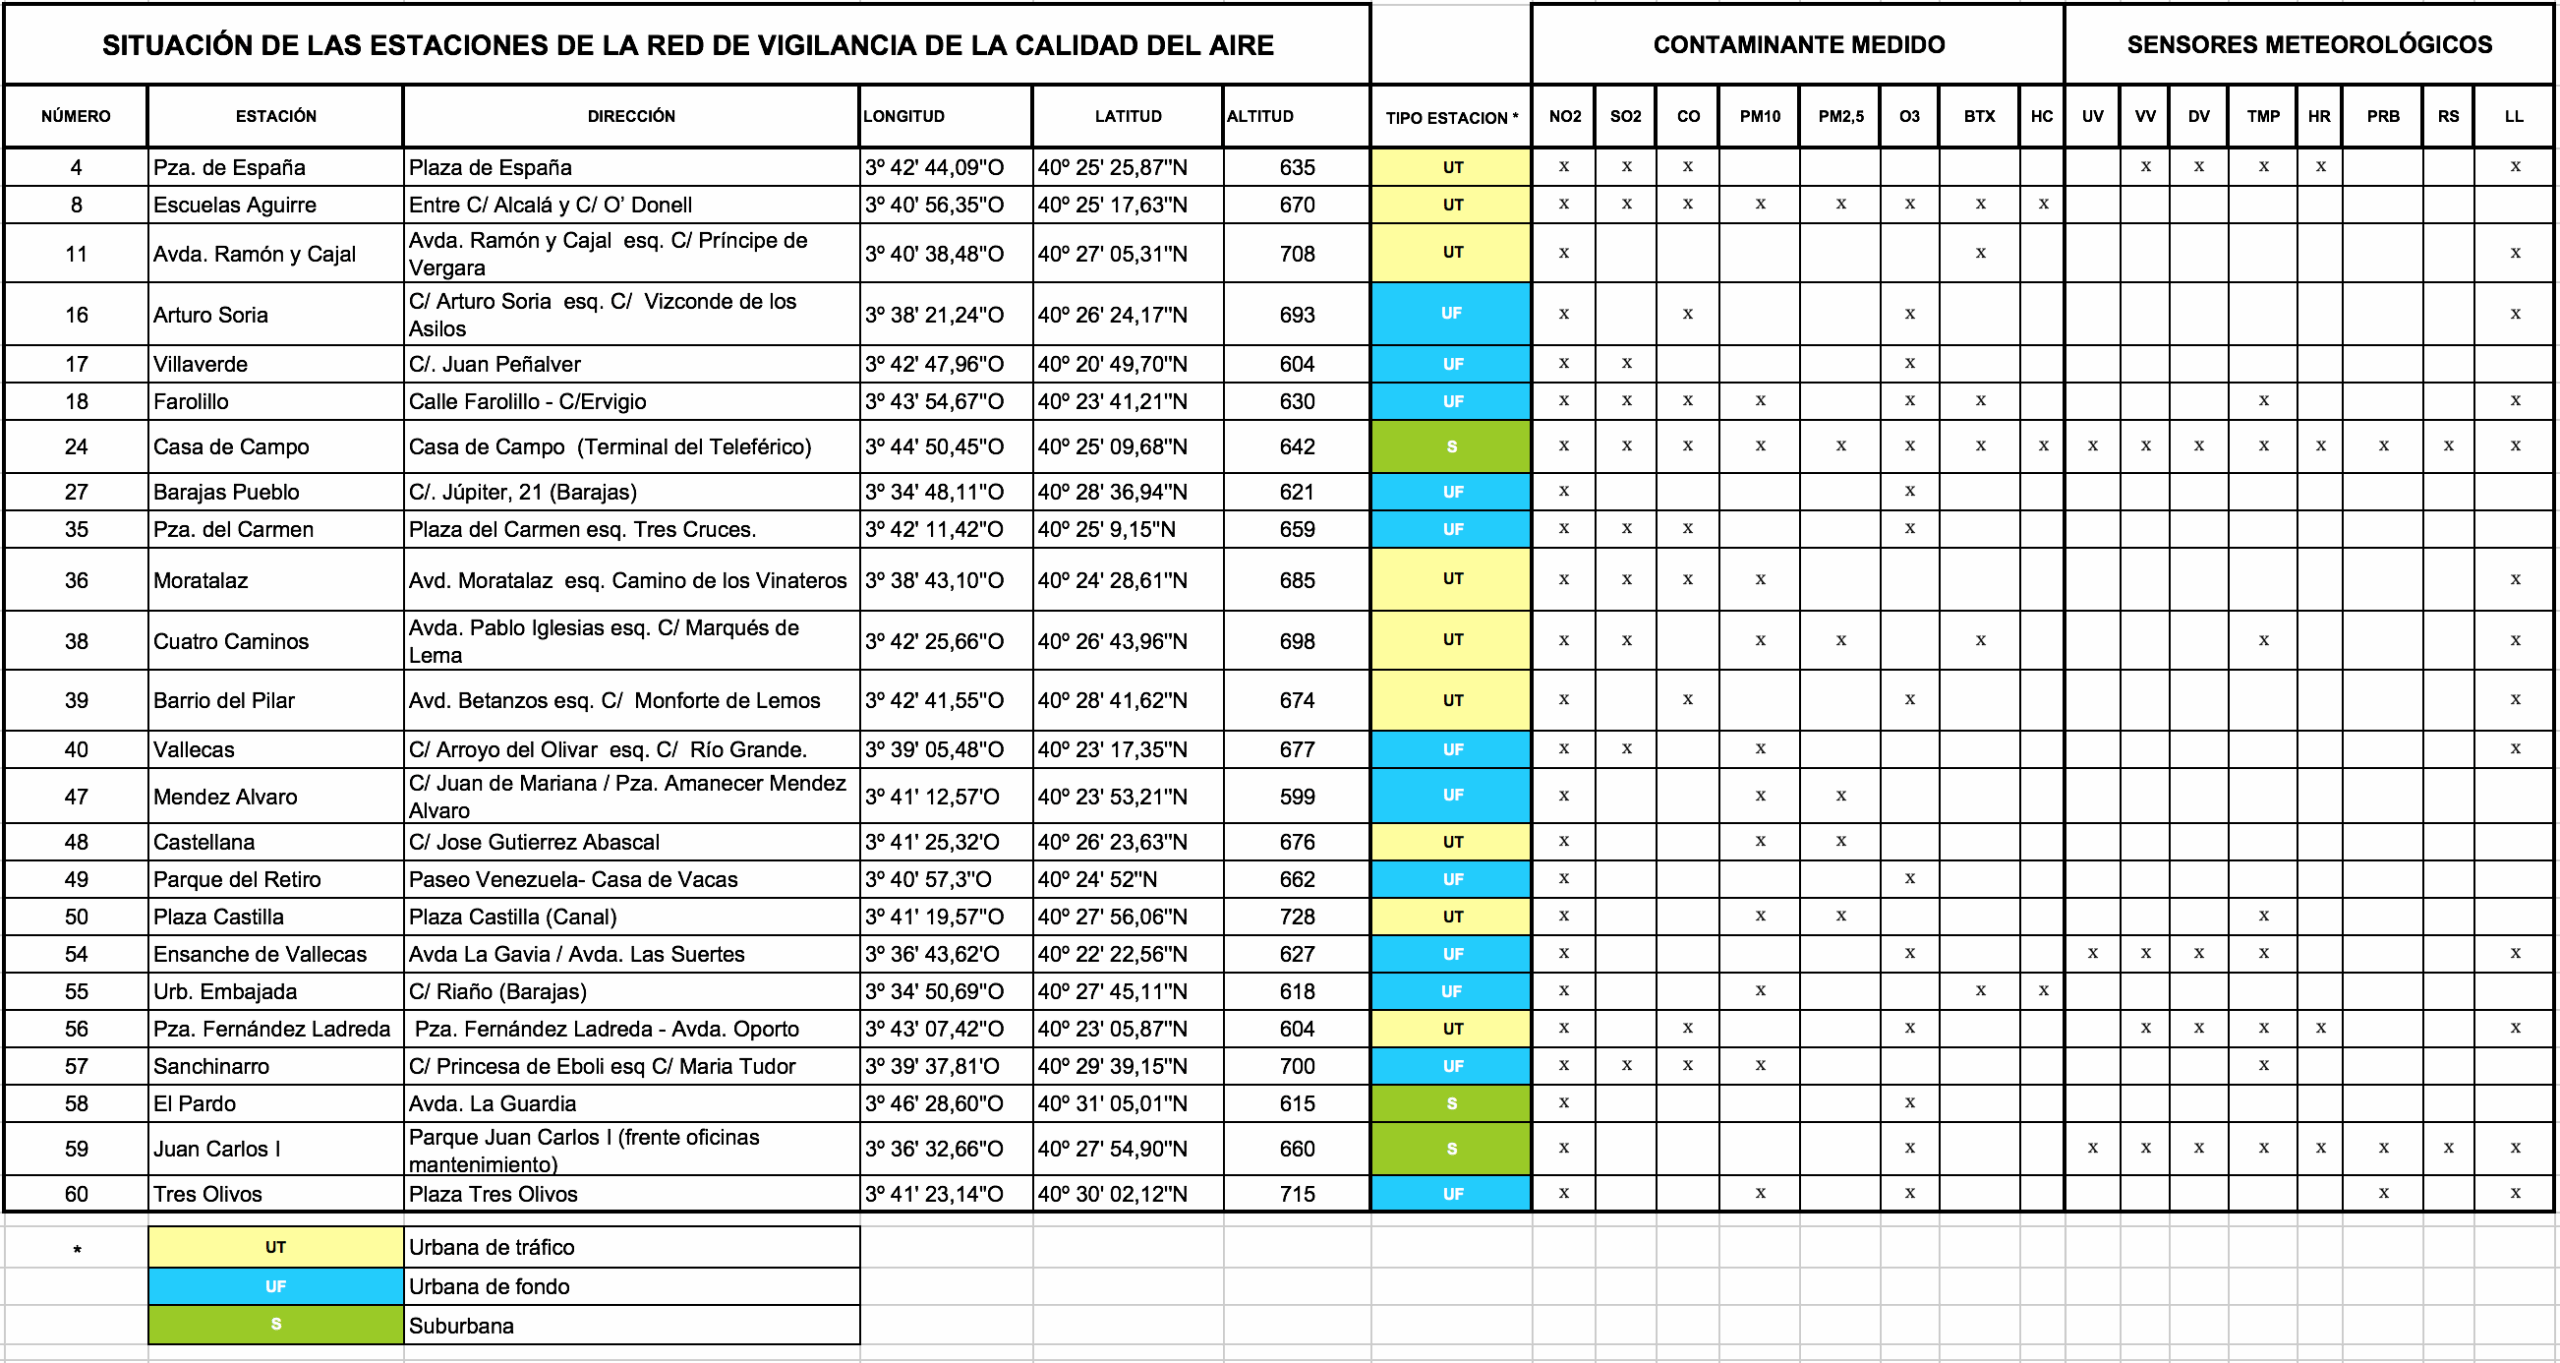
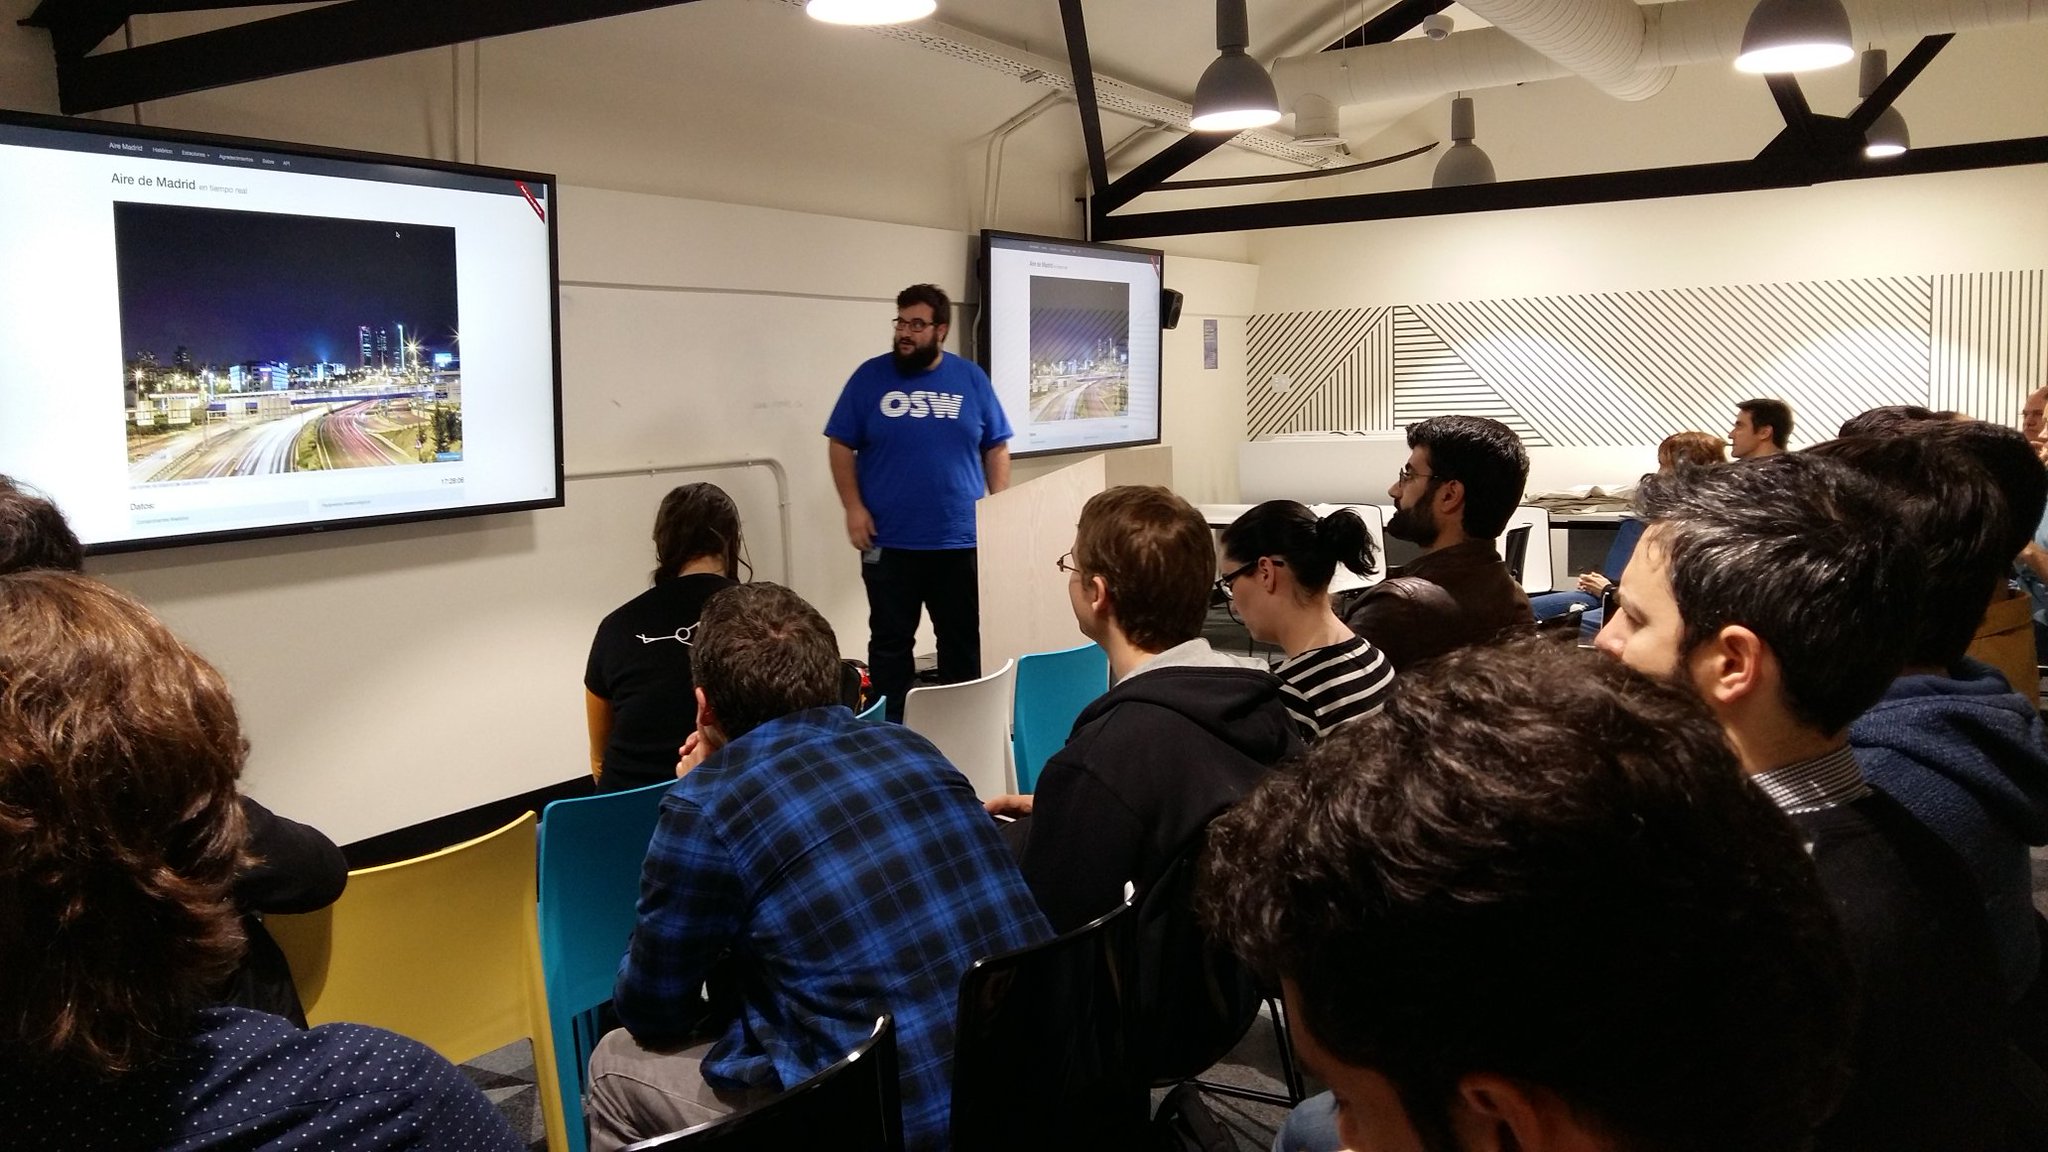
Aire Madrid es una aplicación para poder ver los datos de la calidad del Aire de Madrid en tiempo real. Ulises nos hablará de las dificultades que supone crear un proyecto Open Source que utiliza los datos abiertos de calidad del aire que publica el Ayuntamiento de Madrid para informar y permitir la reutilización efectiva de esa información por parte de los usuarios y otros desarrolladores..
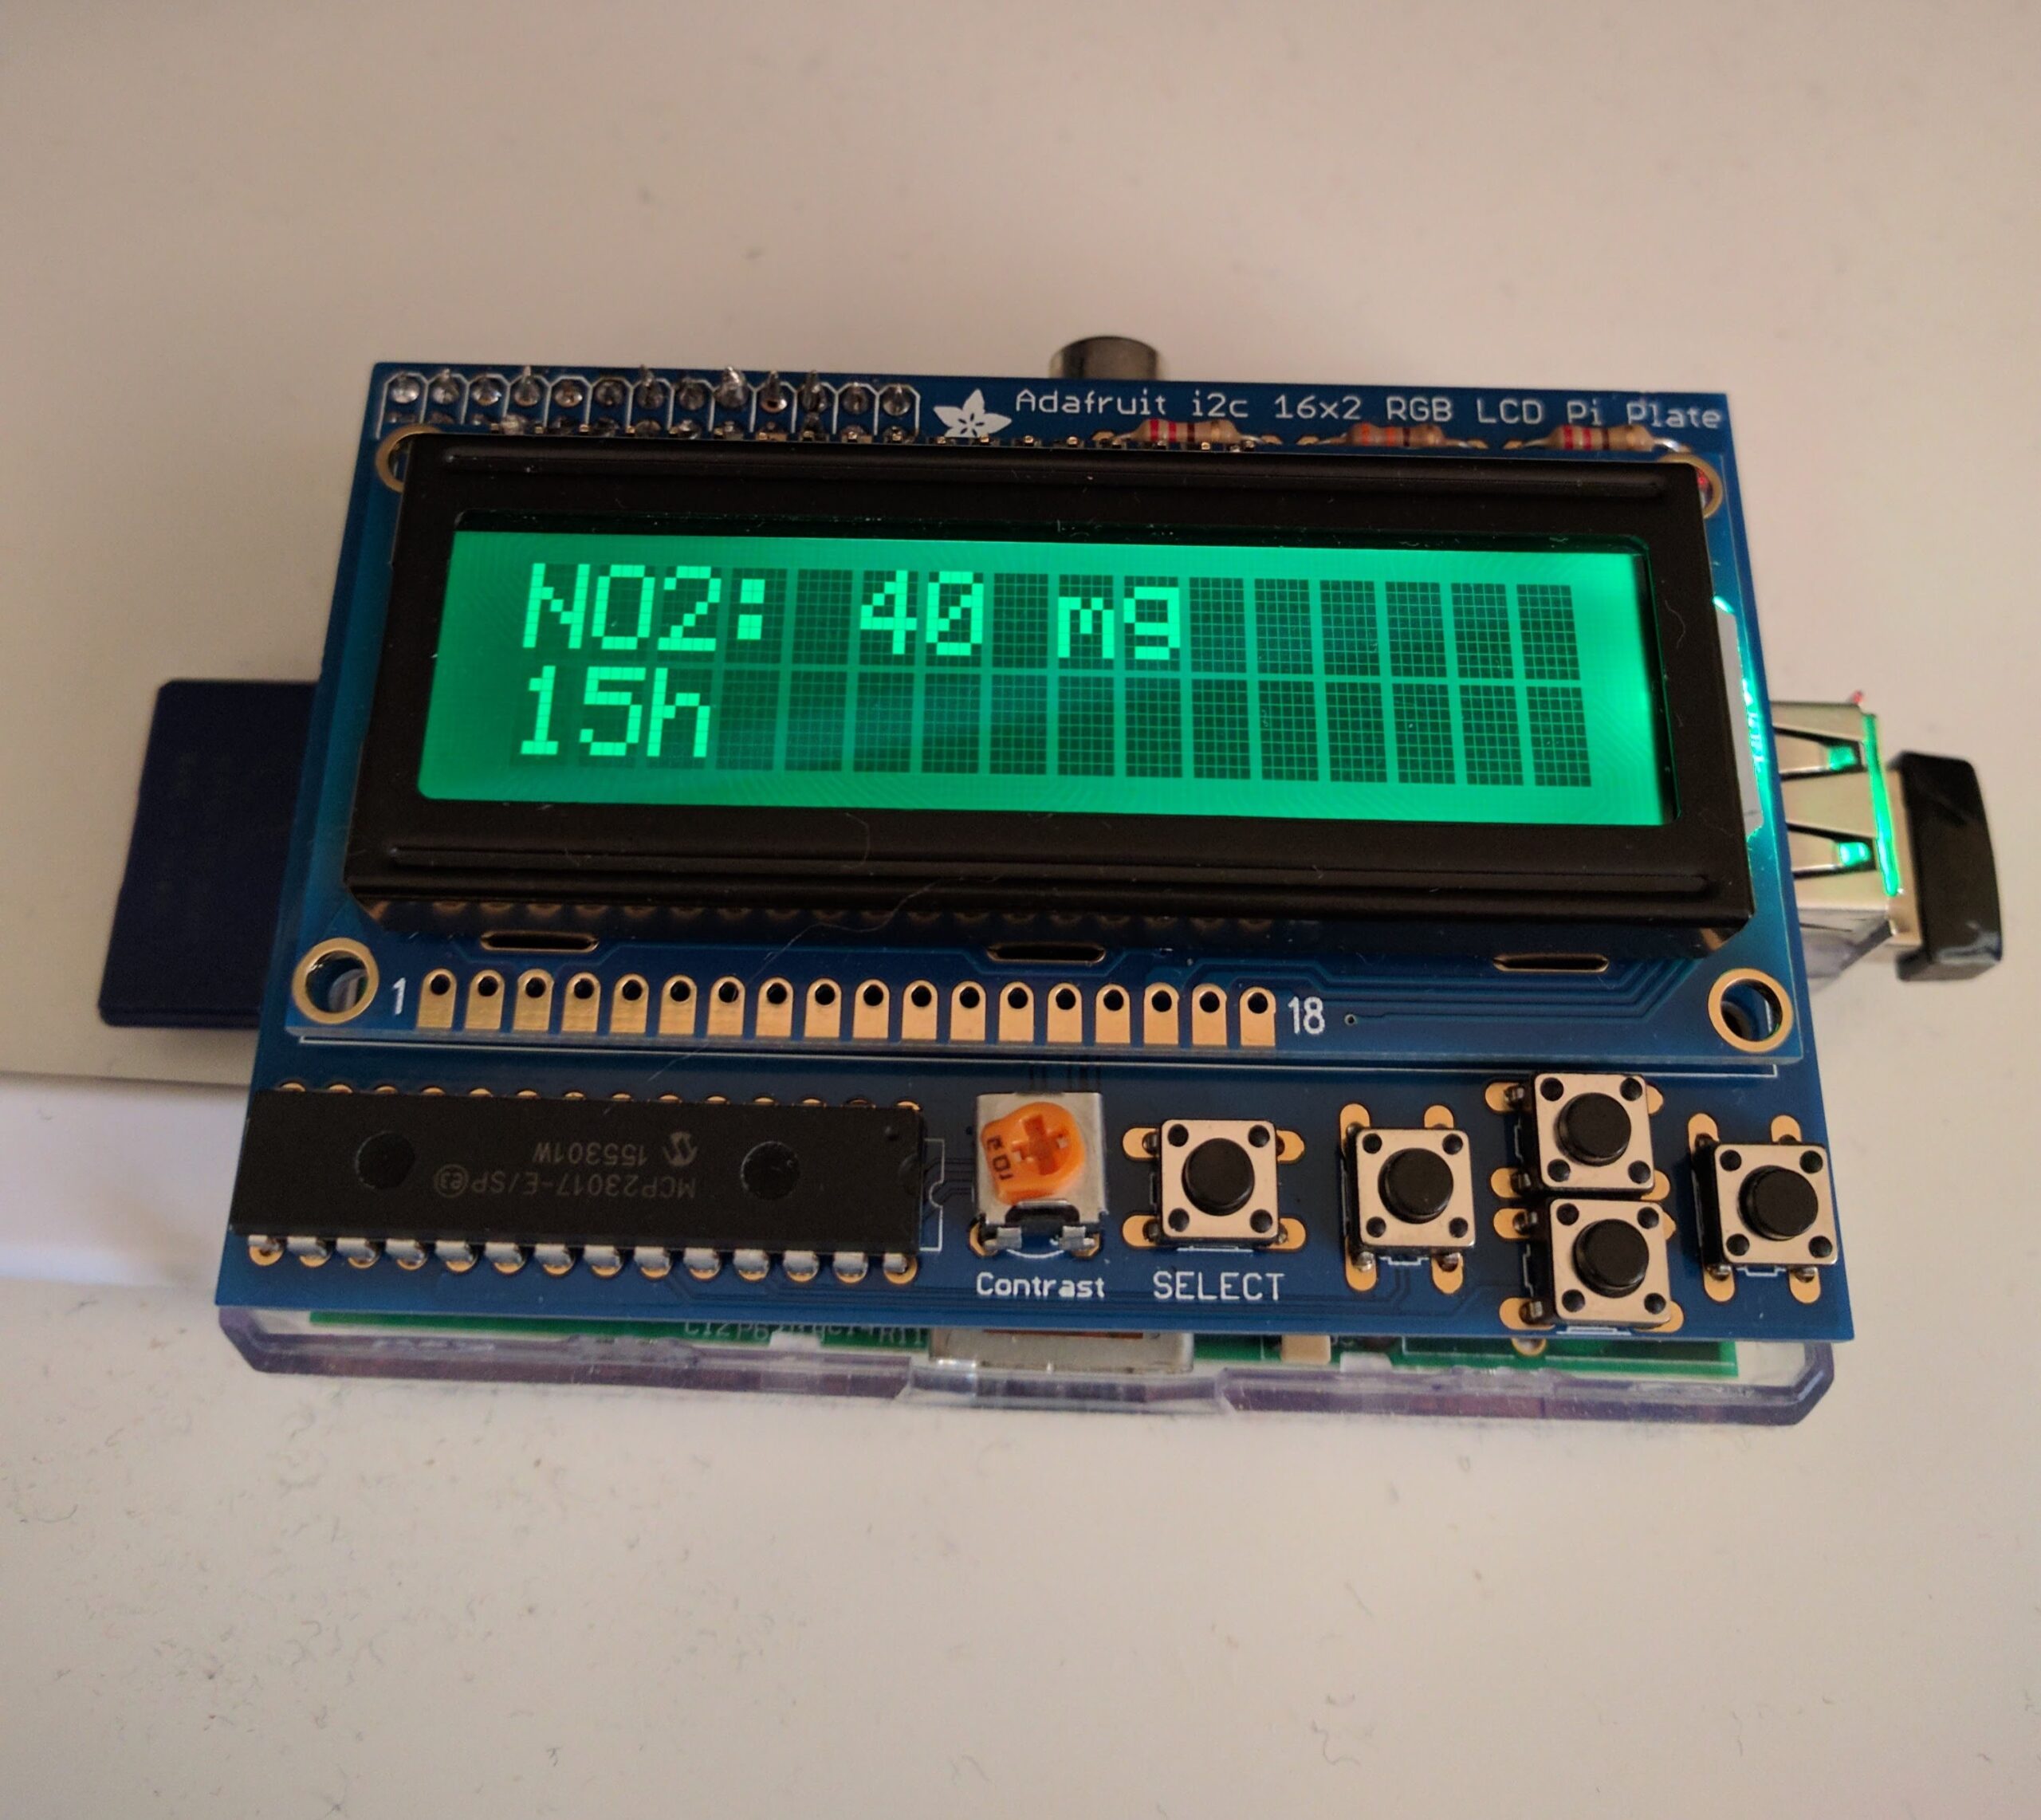
Monitor LCD/RGB con información de la calidad de aire (actualmente NO2) de una estación de Madrid
Monitor LCD/RGB con información de la calidad de aire (actualmente NO2)
de una estación determinada de Madrid.
El lcd se colorea para indicar el estado del aire y así de
un rápido vistazo sabemos como está la contaminación
antes de salir a correr, al parque con niños, etc… 🙂
EZ-PD™ PMG1 MCU: SCB UART transmit and receive with DMA
This code example demonstrates the UART transmit and receive operation on PMG1-S3 device using DMA. The application uses a serial terminal to read data and echoes what is received. The UART is configured to do both transmit and receive operations.
For kit version older than CY7113 board revision 3 or lower, connect J6.10 to J3.8 and J6.9 to J3.10 to establish a UART connection between KitProg3 and the PMG1 device. See the kit user guide to ensure that the board is configured correctly. Prototyping kits with a higher revision have UART lines internally connected. Therefore, external wiring is not required.
Note: If UART DEBUG PRINT messages are enabled, UART connection are needed. Please view compile-time configuration for more information.
Software setup
Install a terminal emulator if you don’t have one. Instructions in this document use Tera Term.
This example requires no additional software or tools.
Using the code example
Create the project and open it using one of the following:
In Eclipse IDE for ModusToolbox™ software
Click the New Application link in the Quick Panel (or, use File > New > ModusToolbox™ Application). This launches the Project Creator tool.
Pick a kit supported by the code example from the list shown in the Project Creator – Choose Board Support Package (BSP) dialog.
When you select a supported kit, the example is reconfigured automatically to work with the kit. To work with a different supported kit later, use the Library Manager to choose the BSP for the supported kit. You can use the Library Manager to select or update the BSP and firmware libraries used in this application. To access the Library Manager, click the link from the Quick Panel.
You can also just start the application creation process again and select a different kit.
If you want to use the application for a kit not listed here, you may need to update the source files. If the kit does not have the required resources, the application may not work.
In the Project Creator – Select Application dialog, choose the example by enabling the checkbox.
(Optional) Change the suggested New Application Name.
The Application(s) Root Path defaults to the Eclipse workspace which is usually the desired location for the application. If you want to store the application in a different location, you can change the Application(s) Root Path value. Applications that share libraries should be in the same root path.
Click Create to complete the application creation process.
ModusToolbox™ software provides the Project Creator as both a GUI tool and the command line tool, “project-creator-cli”. The CLI tool can be used to create applications from a CLI terminal or from within batch files or shell scripts. This tool is available in the {ModusToolbox™ software install directory}/tools_{version}/project-creator/ directory.
Use a CLI terminal to invoke the “project-creator-cli” tool. On Windows, use the command line “modus-shell” program provided in the ModusToolbox™ software installation instead of a standard Windows command-line application. This shell provides access to all ModusToolbox™ software tools. You can access it by typing modus-shell in the search box in the Windows menu. In Linux and macOS, you can use any terminal application.
The “project-creator-cli” tool has the following arguments:
Specify the directory in which the application is to be created if you prefer not to use the default current working directory
Optional
--user-app-name
Specify the name of the application if you prefer to have a name other than the example’s default name
Optional
The following example clones the “SCB UART transmit and receive with DMA” application with the desired name “MyScbUartDma” configured for the PMG1-CY7113 BSP into the specified working directory, C:/mtb_projects:
Note: The project-creator-cli tool uses the git clone and make getlibs commands to fetch the repository and import the required libraries. For details, see the “Project creator tools” section of the ModusToolbox™ software user guide (locally available at {ModusToolbox™ software install directory}/docs_{version}/mtb_user_guide.pdf).
To work with a different supported kit later, use the Library Manager to choose the BSP for the supported kit. You can invoke the Library Manager GUI tool from the terminal using make library-manager command or use the Library Manager CLI tool “library-manager-cli” to change the BSP.
The “library-manager-cli” tool has the following arguments:
Argument
Description
Required/optional
--add-bsp-name
Name of the BSP that should be added to the application
Required
--set-active-bsp
Name of the BSP that should be as active BSP for the application
Required
--add-bsp-version
Specify the version of the BSP that should be added to the application if you do not wish to use the latest from manifest
Optional
--add-bsp-location
Specify the location of the BSP (local/shared) if you prefer to add the BSP in a shared path
Optional
The following example adds the PMG1-CY7113 BSP to the already created application and makes it the active BSP for the app:
Launch Project Creator from the Windows Start menu or from {ModusToolbox™ software install directory}/tools_{version}/project-creator/project-creator.exe.
In the initial Choose Board Support Package screen, select the BSP, and click Next.
In the Select Application screen, select the appropriate IDE from the Target IDE drop-down menu.
Click Create and follow the instructions printed in the bottom pane to import or open the exported project in the respective IDE.
Use command-line interface (CLI):
Follow the instructions from the In command-line interface (CLI) section to create the application.
Export the application to a supported IDE using the make <ide> command.
Follow the instructions displayed in the terminal to create or import the application as an IDE project.
For a list of supported IDEs and more details, see the “Exporting to IDEs” section of the ModusToolbox™ software user guide (locally available at {ModusToolbox™ software install directory}/docs_{version}/mtb_user_guide.pdf).
Operation
Ensure that the steps listed in the Hardware setup section are completed.
Ensure that the jumper shunt on the power selection jumper (J5) is placed at position 2-3 to enable programming.
Connect the board to your PC using the USB cable through the KitProg3 USB connector. This cable is used for programming the PMG1 device and as a USB-UART bridge to the PC during operation.
Program the board using one of the following:
Using Eclipse IDE for ModusToolbox™ software
Select the application project in the Project Explorer.
In the Quick Panel, scroll down, and click <Application Name> Program (KitProg3_MiniProg4).
Using CLI
From the terminal, execute the make program command to build and program the application using the default toolchain to the default target. The default toolchain and target are specified in the application’s Makefile but you can override those values manually:
make program TOOLCHAIN=<toolchain>
Example:
make program TOOLCHAIN=GCC_ARM
After programming the kit, disconnect the USB cable and change the position on the power selection jumper (J5) to 1-2 to power the kit through the USBPD port.
Connect the USB cable back to the KitProg3 USB connector.
Open a terminal program and select the KitProg3 COM port. Set the serial port parameters to 8N1 and 115200 baud.
Connect the USBPD port to a USB-C power adapter or your PC using a USB Type-C cable to power the kit.
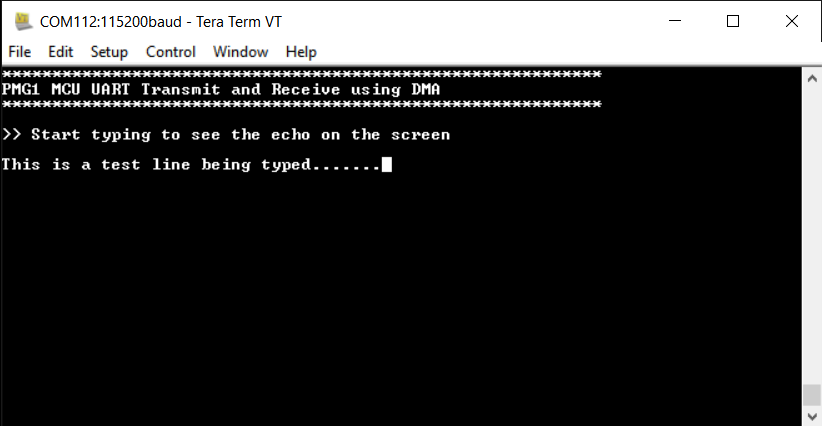
The application starts automatically. Confirm that “<CE Title>” is displayed on the UART terminal.
Start typing to see the echo on the terminal:
Figure 1. Sample output
Debugging
You can debug the example to step through the code. In the IDE, use the <Application Name> Debug (KitProg3_MiniProg4) configuration in the Quick Panel. Ensure that the board is connected to your PC using the USB cable through the KitProg3 USB connector and the jumper shunt on the power selection jumper (J5) is placed at position 1-2.
See the “Debug mode” section in the kit user guide for debugging the application on the CY7110 prototyping kit. For more details, see the “Program and debug” section in the Eclipse IDE for ModusToolbox™ software user guide.
Design and implementation
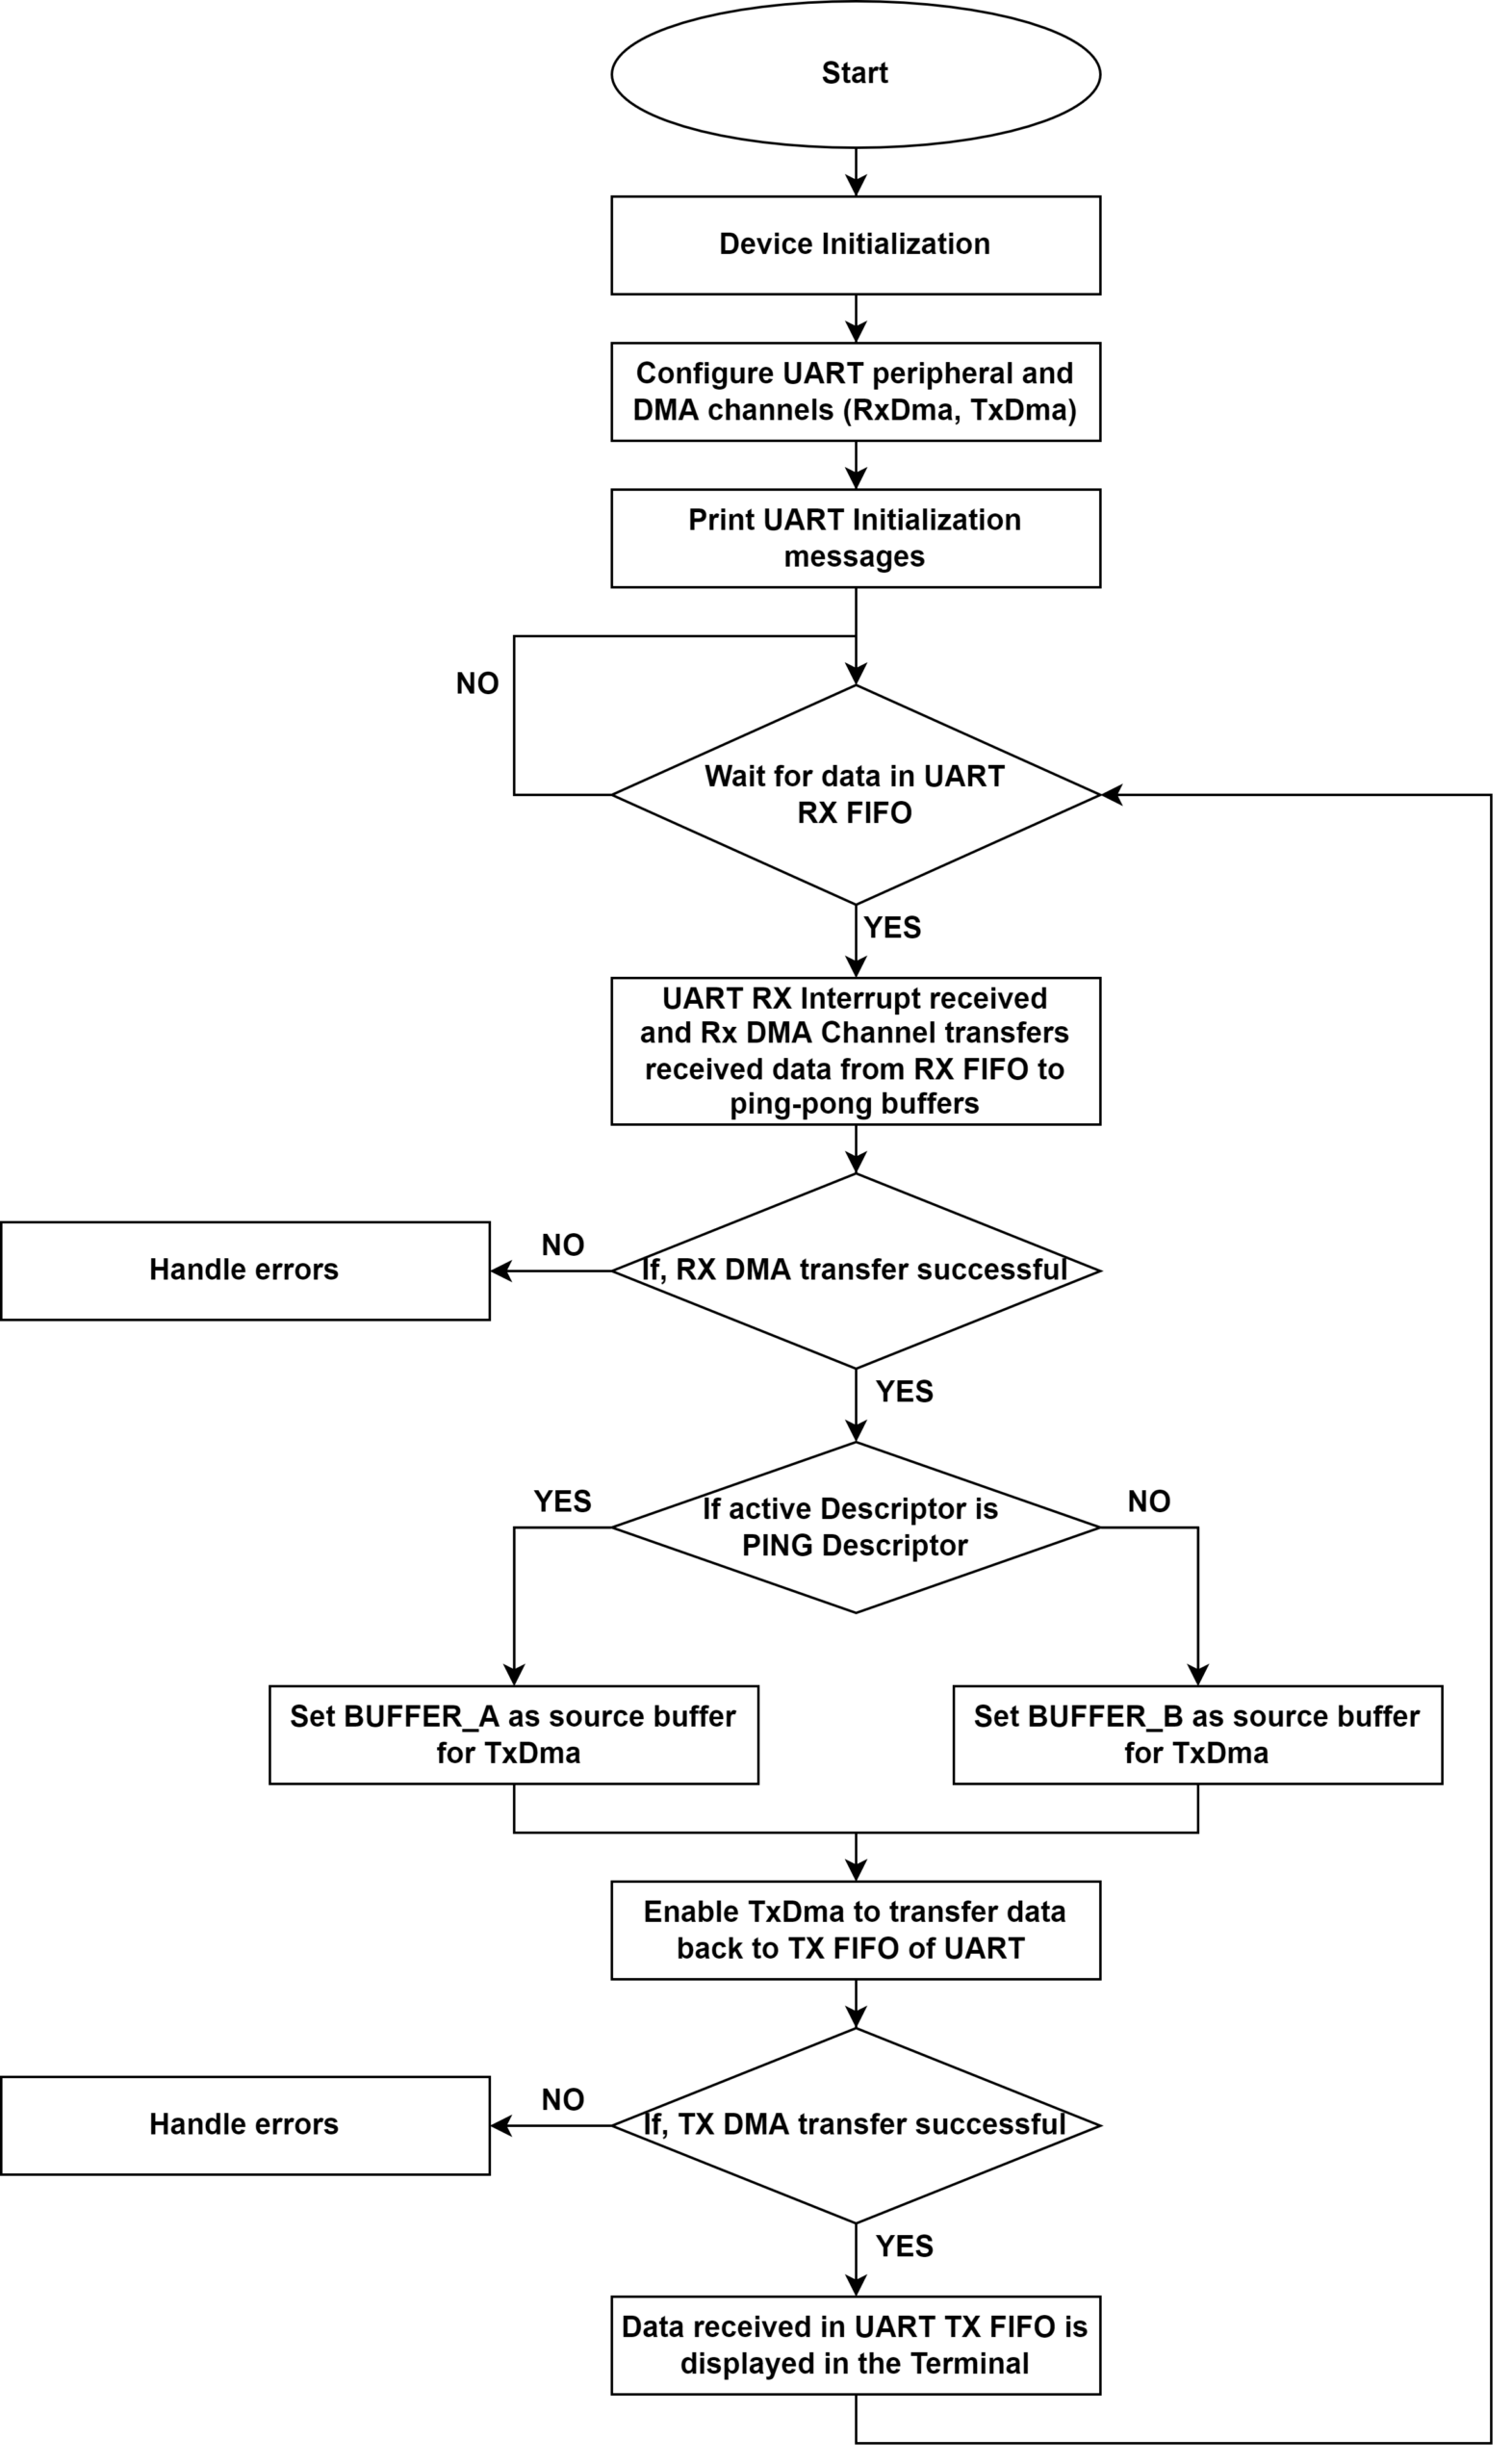
Figure 2 shows the firmware flowchart for the design.
Figure 2. Firmware flowchart
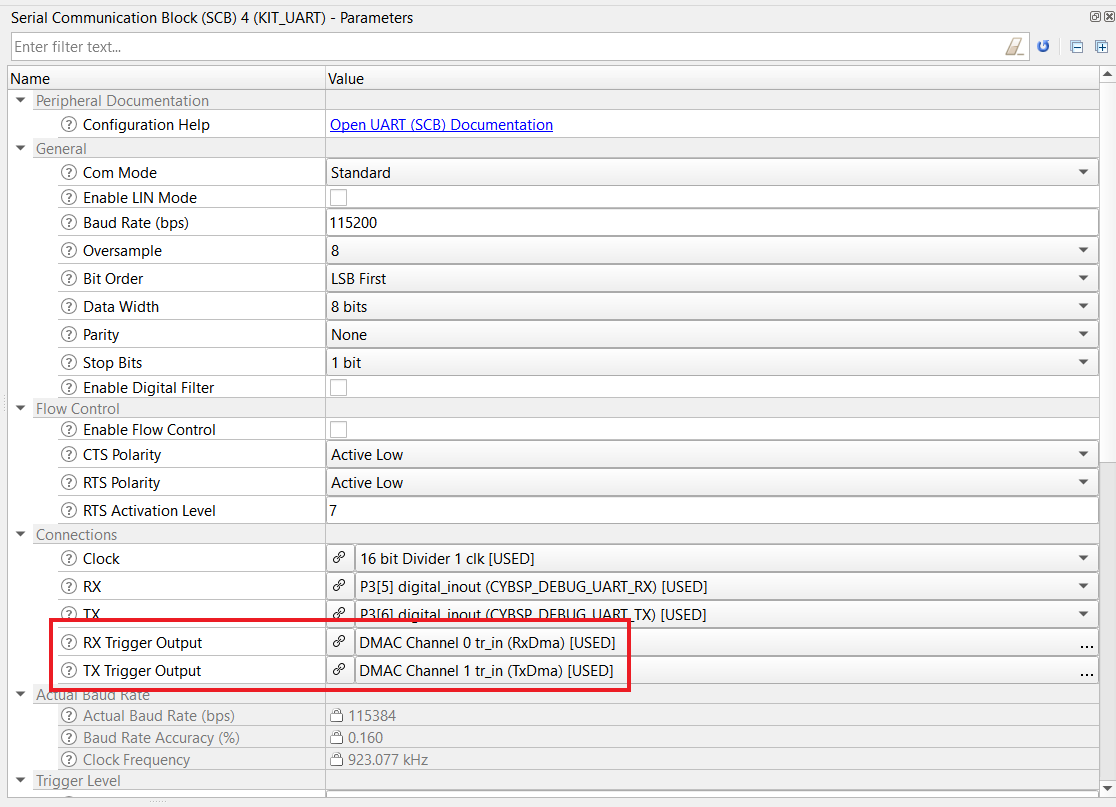
SCB4 is initialized as UART to receive and send data to a terminal emulator. To implement the UART data transfer on the SCB hardware block, the UART Peripheral Driver Library (PDL) APIs are used. The UART is initialized with the following settings:
Baud rate: 115200
Data width: 8 bits
Parity: None
Stop bit: 1
The clock input of the block is connected to a 48-MHz PERI-derived clock
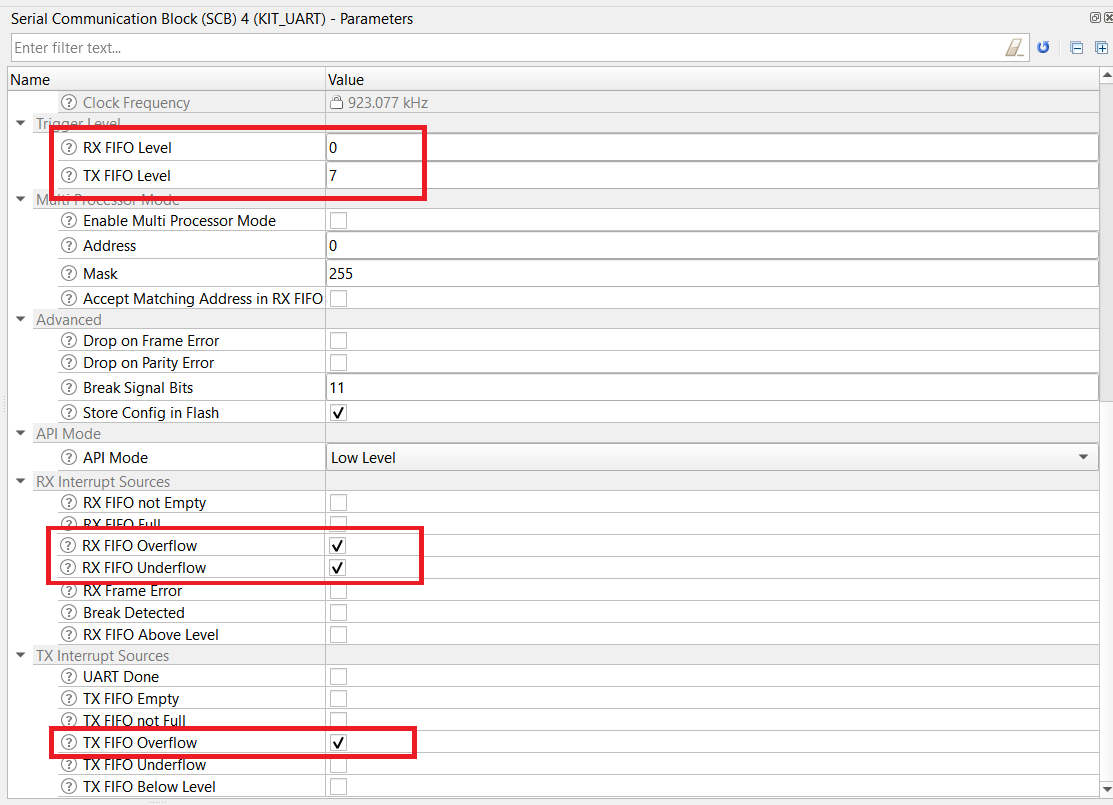
Figure 3. UART configuration
Figure 4. UART configuration (continued)
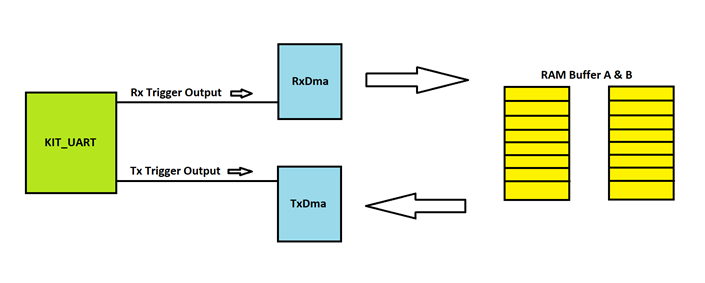
The application uses DMA to handle the data received in the UART Rx FIFO. Two DMA channels (DMAC Channel 0 and DMAC Channel 1) are used to handle the data in receive and transmit directions respectively. Two SRAM buffers are alternately used on the receive side to hold the data received from the UART terminal. These buffers are called “ping-pong buffers” and are mainly used to provide the time for pulling the data out of either buffer.
Each DMA Channel has one or more channel descriptor structures which are normally located in the RAM. These descriptors include source and destination addresses for the channel as well as the information on the data count, data transfer width, trigger type, etc. For more information on DMAC block configuration and usage, see mtb-pdl-cat2 DMAC documentation.
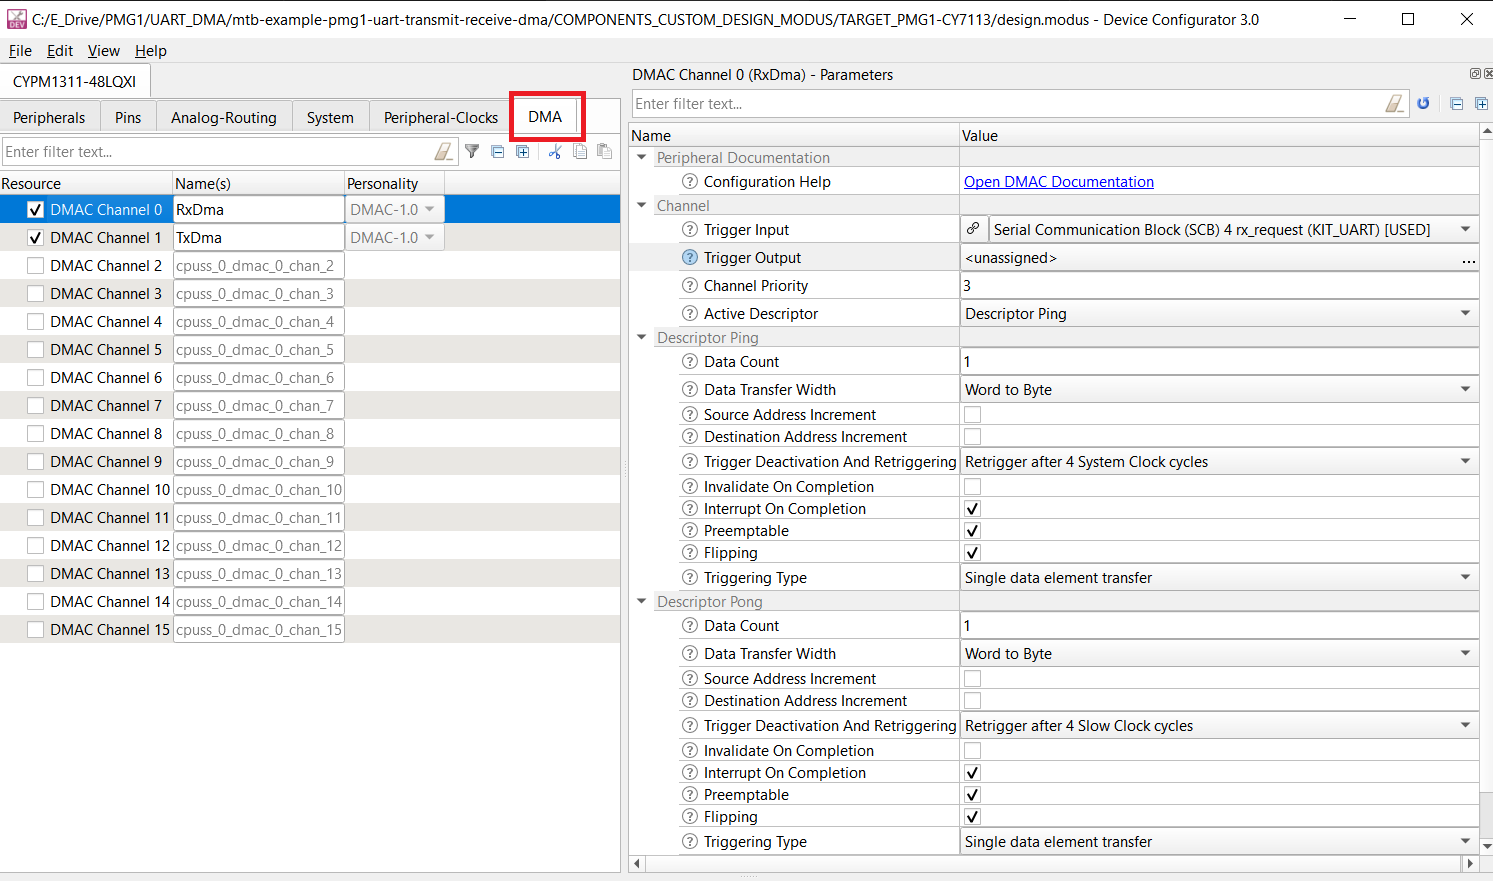
PMG1-S3 has 16 DMA channels. To configure or enable these DMA channels, click Device Configurator 3.0 under Tools in the Quick Panel and click on DMA tab as shown in the following figure:
Figure 5. DMA configuration
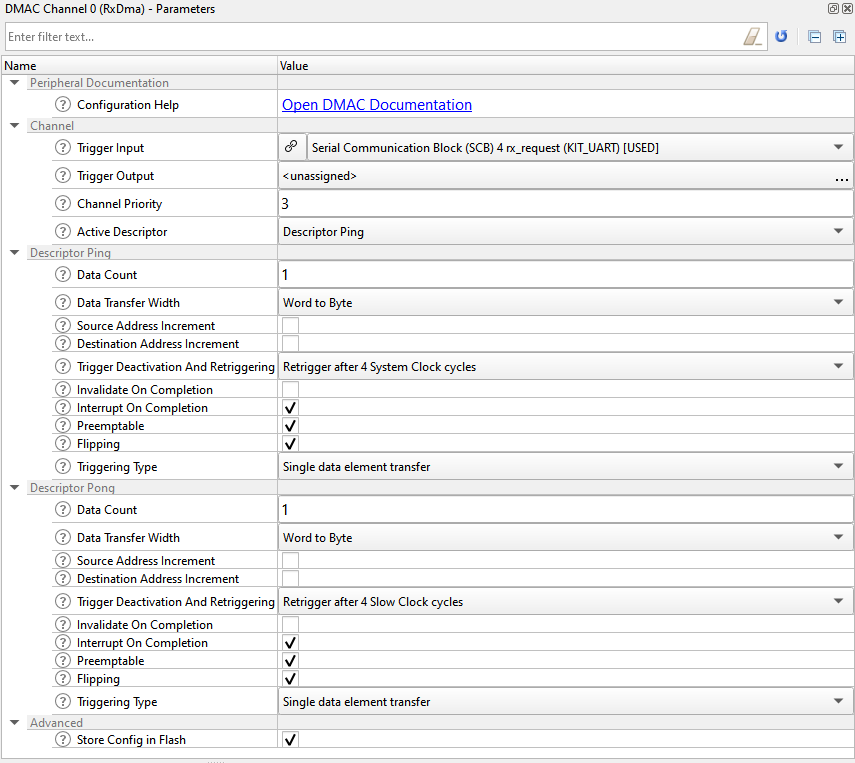
The RxDma (DMAC Channel 0) resource handles the data transfer in the receive direction. RxDma has two descriptors in the chain; these are configured such that the source alternates between the ping-pong buffers in the receive direction. RxDma channel and 2 descriptors (ping-pong) are configured as follows:
Figure 6. RxDma channel configuration
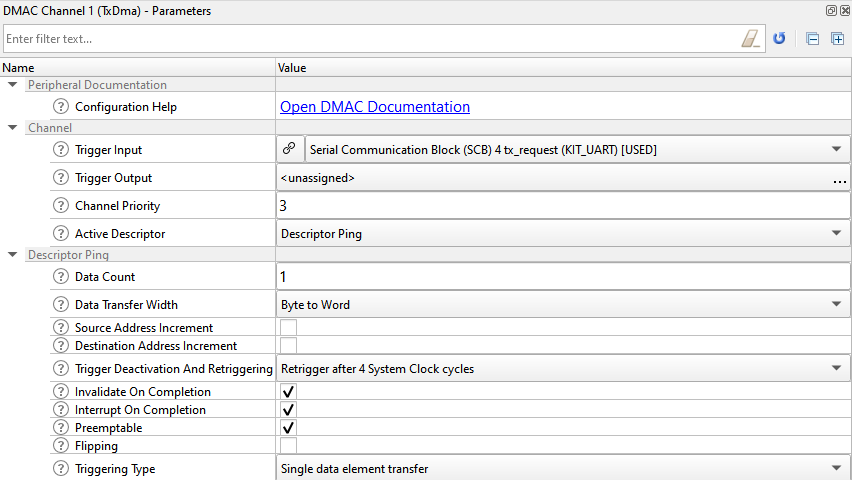
The TxDma (DMAC Channel 1) resource is used to handle the data in the transmit direction. TxDma has only one descriptor; the source address for this channel is alternated between ping-pong buffers upon reception of each byte of data to transmit back the correct value. TxDma channel is configured as follows:
Figure 7. TxDma channel configuration
The data received from the serial terminal is echoed back to the serial terminal.
Figure 8. Buffering
Compile-time configurations
The EZ-PD™ PMG1 MCU SCB UART transmit and receive with DMA application functionality can be customized through the compile-time parameter that can be turned ON/OFF through the main.c file.
Macro name
Description
Allowed values
DEBUG_PRINT
Debug print macro to enable UART print
1u to enable 0u to disable
Resources and settings
Table 1. Application resources
Resource
Alias/object
Purpose
SCB(UART)(PDL)
KIT_UART
UART object used for Debug UART port
DMA (PDL)
RxDma
Data transfer
DMA (PDL)
TxDma
Data transfer
List of application files and their usage
File
Purpose
source/UartDma.h
Defines function prototypes and macros to configure DMA channels and handle transfers
source/UartDma.c
Implements functions to configure DMA channels and handle transfers
Related resources
Resources
Links
Application notes
AN232553 – Getting started with EZ-PD™ PMG1 MCU on ModusToolbox™ software AN232565 – EZ-PD™ PMG1 hardware design guidelines and checklist
mtb-pdl-cat2 – Peripheral driver library (PDL) and docs
Tools
Eclipse IDE for ModusToolbox™ software ModusToolbox™ software is a collection of easy-to-use software and tools enabling rapid development with Infineon MCUs, covering applications from embedded sense and control to wireless and cloud-connected systems using AIROC™ Wi-Fi & Bluetooth® combo devices.
Other resources
Infineon provides a wealth of data at www.infineon.com to help you select the right device, and quickly and effectively integrate it into your design.
Document history
Document Title: CE233719 – EZ-PD™ PMG1 MCU: SCB UART transmit and receive with DMA
Version
Description of change
1.0.0
New code example
2.0.0
Major update to support ModusToolbox™ v3.0. This version is not backward compatible with previous versions of ModusToolbox™
All other trademarks or registered trademarks referenced herein are the property of their respective owners.
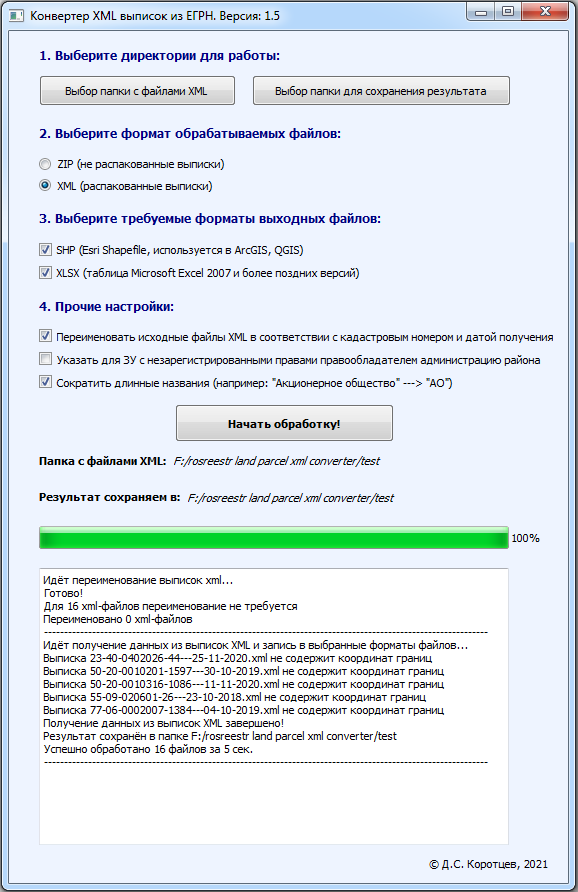
Позволяет конвертировать набор выписок в электронном виде (XML, распакованные или в исходном ZIP-архиве) из ЕГРН (Росреестра)
на земельные участки, здания, сооружения, помещения в формат ESRI Shapefile (.shp) и таблицу (.xlsx, Microsoft Office Excel начиная с версии 2007)
Поддерживает следующие xml схемы выписок из ЕГРН:
urn://x-artefacts-rosreestr-ru/outgoing/kvzu/7.0.1 (Выписка полная из ЕГРН на земельный участок)
urn://x-artefacts-rosreestr-ru/outgoing/kpzu/6.0.1 (Выписка краткая из ЕГРН на земельный участок)
extract_about_property_land_v01.xsd Номер версии – 01 (Выписка полная из ЕГРН на земельный участок)
extract_base_params_land_v01.xsd Номер версии – 01 (Выписка краткая из ЕГРН на земельный участок)
extract_about_property_build_v01.xsd Номер версии – 01 (Выписка из ЕГРН на здание)
urn://x-artefacts-rosreestr-ru/outgoing/kvoks/3.0.1 (Выписка полная из ЕГРН на объект капитального строительства)
urn://x-artefacts-rosreestr-ru/outgoing/kpoks/4.0.1 (Выписка краткая из ЕГРН на объект капитального строительства)
Внимание: из ОКС пока поддерживаются только здания, сооружения, помещения
Чтобы полученный слой (формат .shp) правильно отображался в ГИС-системе, нужно указать для него соответствующую местную систему координат.
Например, приблизительные параметры для Mapinfo можно найти тут: https://mapbasic.ru/msksolutions
Кодировка текста в формируемом .shp – Windows-1251
Требования: python 3.10 и более поздние версии
Установка зависимостей: pip install -r requirements.txt
Для начала работы запустите файл main.py
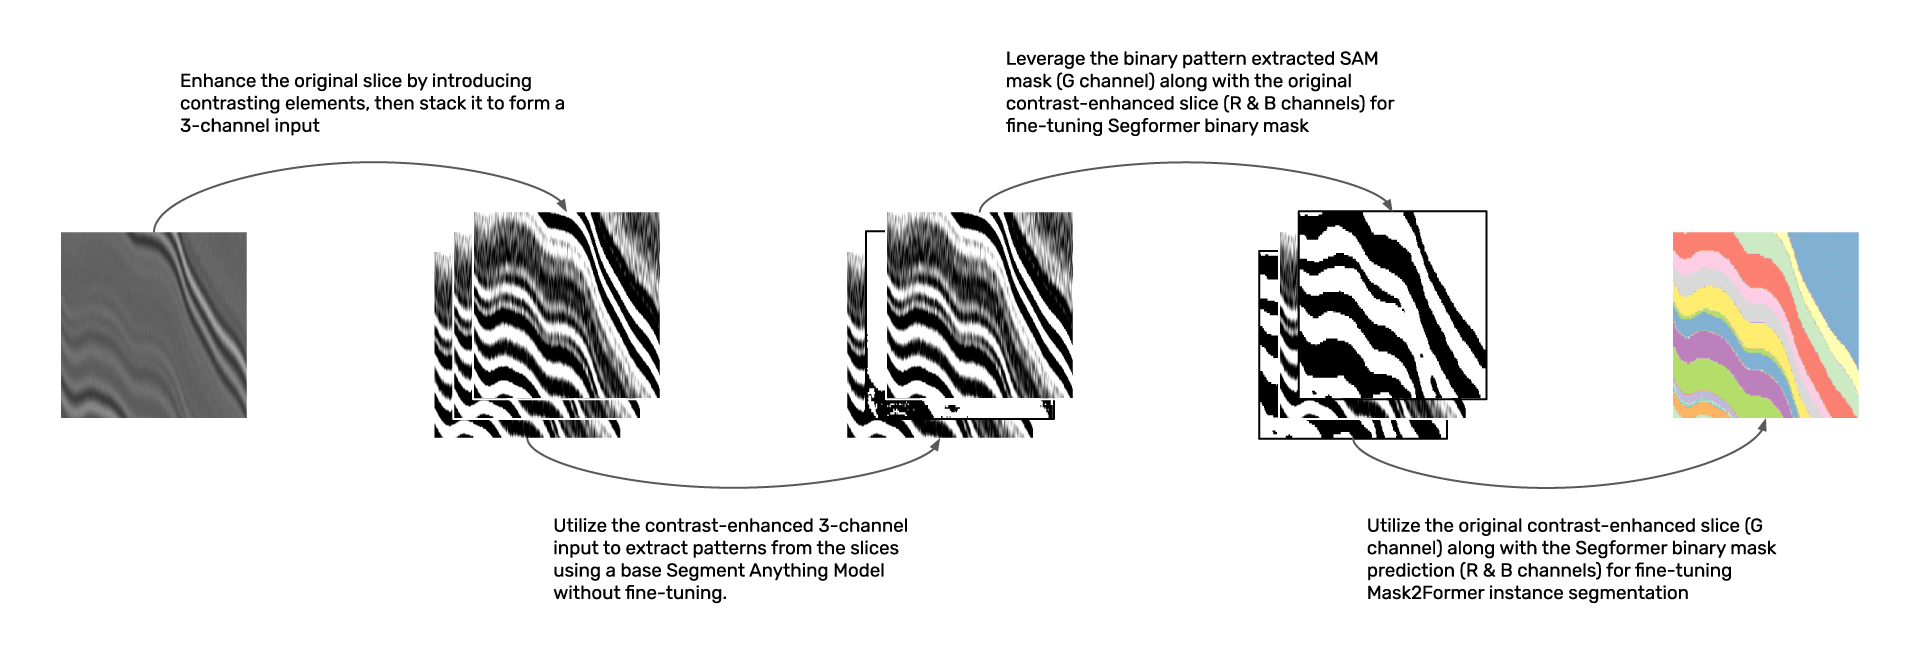
🌋 Every Layer, Everywhere, All at Once: Segmenting Subsurface
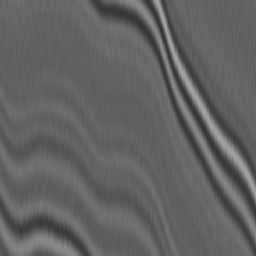
This project is part of a competition aiming to expand the capabilities of Meta’s Segment Anything Model (SAM) to perform multi-layer segmentation in 3D seismic data. The challenge involves creating machine learning models that can identify and map multiple geological layers simultaneously, thereby streamlining the interpretation process of seismic datasets. With a large training set of around 9,000 labeled seismic volumes representing a wide range of geological conditions, the goal is to develop generalizable and efficient algorithms that can cope with the inherent complexities of seismic data. The models will be evaluated against a complex holdout dataset to ensure robust performance across diverse geological features. This repository documents the development and implementation of our solution to this advanced pattern recognition and data analysis challenge.
This project was made possible by our compute partners 2CRSi
and NVIDIA.
🏆 Challenge ranking
The score of the challenge was a custom DICE coefficient.
Our solution was the best one (out of 225 teams) on the Prediction Leaderboard with a DICE coefficient equal to 0.65 🎉.
Kirillov, A., Mintun, E., Ravi, N., Mao, H., Rolland, C., Gustafson, L., … & Girshick, R. (2023). Segment anything.
arXiv preprint arXiv:2304.02643.
Cheng, B., Misra, I., Schwing, A. G., Kirillov, A., & Girdhar, R. (2022). Masked-attention mask transformer for
universal image segmentation. In Proceedings of the IEEE/CVF conference on computer vision and pattern recognition (pp.
1290-1299).
Xie, E., Wang, W., Yu, Z., Anandkumar, A., Alvarez, J. M., & Luo, P. (2021). SegFormer: Simple and efficient design for
semantic segmentation with transformers. Advances in Neural Information Processing Systems, 34, 12077-12090.
📝 Citing
@misc{RebergaUrgell:2024,
  Author = {Louis Reberga and Baptiste Urgell},
  Title = {Segmenting Subsurface},
  Year = {2024},
  Publisher = {GitHub},
  Journal = {GitHub repository},
  Howpublished = {\url{https://github.com/association-rosia/segmenting-subsurface}}
}
Что такое “GTA: Йошкар-Ола”? Я скажу вам, что это. Это мировозрение… Основанное на лучших чертах человека… Это цель… К которой мы стремимся! На благо вселенной… И на благо самой жизни! А вы… Можете принять участие во всем этом.
City Generation tools for GTA: San Andreas
Итак, ты однажды проснулся и решил, что тебе сильно-сильно хочется засунуть свой родной город в игру San Andreas? А может быть ты мечтал об этом еще лет 20 назад, когда игра только вышла? А может быть еще раньше, когда ты под msdos играл еще в GTA 1? Добро пожаловать в этот репозиторий, где мы совместными усилиями попробуем запилить что-то такое.
Можно пообщаться голосом в Mumble: mumble://shiziki.com
Что мы тут делаем?
Создаем играбельную карту города Йошкар-Ола.
Создаем набор утилит для создания играбельной карты.
Разбираем форматы файлов, чтобы написать свои утилиты для создания играбельной карты.
Иногда разбираем готовые утилиты, чтобы написать свои собственные утилиты на их основе.
Разбираем устройство города в San Andreas и устройство игры в целом, чтобы понять какие утилиты писать.
Вытаскиваем очевидные и неочевидные ресурсы (таблицы погоды, скорости поездов и т.д.) из игры.
Учимся в целом как строить города, как в CitySkylines, так и по ГОСТ-ам времен СССР.
Изучаем фенотипы городских растений и заменяем пальмы на березки, свойственные Йошкар-Оле.
Придумываем сотни других сайд-проектов, которые как-то связаны с попыткой создать город Йошкар-Ола в игре GTA San Andreas.
Коротко о себе:
Мальчик, более 40 годиков, умею в Сишечку, имею представления о Cleo, в виртуалке стоит SunnyBuilder3, могу писать скрипты для 3dsmax, если сильно надо, то и полноценные плагины. Умею парсить OpenStreetMaps из Planet.pbf и вообще работать с геоданными. Страдаю от депрессии, нежелания жить и от желания делать такие странные и никому ненужные проекты, мимолетом приходящие мне в голову. Сейчас вымучиваю свой проект фотомода https://github.com/LudmilaPetrovna/panorama-gtasa и программирую его онлайн, показывая все свои страдания: https://www.youtube.com/watch?v=ln0MwaiEq4w или https://www.youtube.com/watch?v=oPA9a1h6NeU
Не уверен, что тут много людей увидят этот пост, потому приветствуются посылания меня в более подходящие места, где обитает более целевая аудитория и ее больше. Ну и другие посылания тоже приветствуются. Приветствуется все, кроме игнора.
Analyses the sentiment of the tweets written by people into positive, negative & nuetral.
Inspiration for this app came from a study conducted in IIT,Bhubaneswar : https://arxiv.org/pdf/1610.09225.pdf
For any particular handle, this app analyses the cumulative sentiment of 100 latest tweets (written in english language) and generates an emoji based on results.
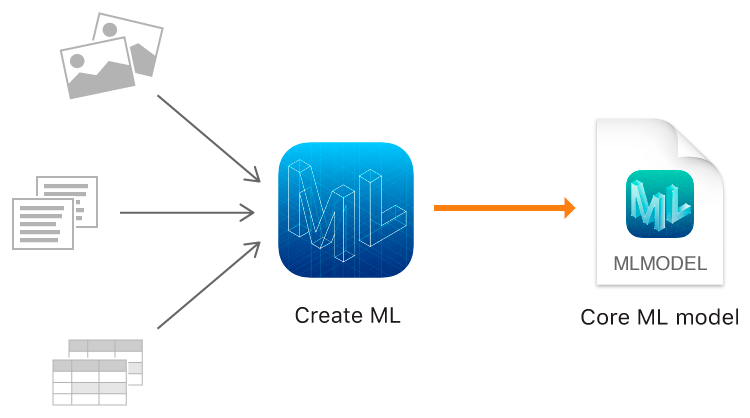
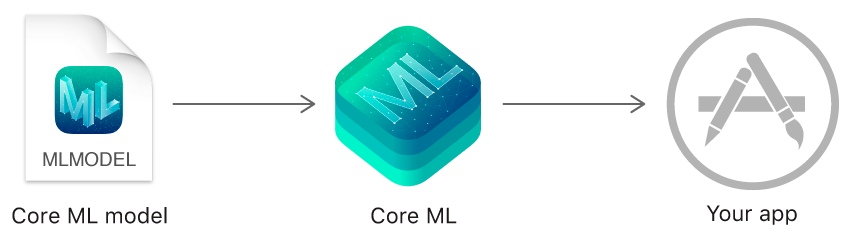
Text Classfier Machine learning model which classifies any text into positive, negative & nuetral statement is trained using CreateML.
For more info on CreateML visit : https://developer.apple.com/machine-learning/create-ml/
Result parameters:
-For every positive tweet +1 is added,
-For every negative tweet -1 is added and
-For every nuetral tweet nothing is added to sentiment score.
Finally the sentiment score generates a corresponding emoji representing the overall sentiment of 100 tweets towards the entered handle name.
I created this ansible playbook to automate the process of setting up my Kali Linux dotfiles and configurations.
Tested on a clean Kali VMware virtual machine.
# Press (Ctrl + Alt + F1)# Login as kali:kali# Change root password
sudo passwd root
exit# Log off and relogin as root# Check it copied correctly and set your new username
bash <(curl -sL https://gist.githubusercontent.com/NLXZ/2a90f5cb7b066f3571ca52f2cea643fb/raw/0865987d1524c5bb5c7cc02eb60385544808fb5e/change-username.sh) kali new_username
# Change your user password
sudo passwd new_username
Automatic configuration script
Install ansible
pipx ensurepath && pipx install ansible-core
Clone the repository and run the playbook
git clone https://github.com/NLXZ/kali-setup.git
cd kali-setup
ansible-playbook -K main.yml
SRP_app :Biometric recognition based on mobile phone vibration
South China University of Technology
Future Tech. School
SRP program
Application
APP function
Source: Vibrator3
Compressed package: Vibrater.apk
Objective: To collect high-frequency IMU data of Android mobile phone during mobile phone vibrating, including three-dimensional linear acceleration and three-dimensional angular acceleration
Collection method: 1. Click the little man button to start vibrating, and then carry on the experiment of data collection,whether static or dynamic motion 2. Click the “识别抬起动作” button. When the mobile phone is not vibrating, it will start to vibrate when it is detected that the mobile phone is lifting; Conversely,if the phone has been already vibrating,it will keep the initiative plan and continue vibrating until the time runs out.
File storage: Collect and store data in csv format, including time stamps and 6-dimensional IMU data(linear and angular)
File transfer: 1. Wake up the app Wechat and transfer the specific csv file; 2. Select multiple specified csv files,then compress them into zip files, wake up wechat and transfer the target zip file/
Other functions: 1.Dynamically display of mobile phone vibration time; 2.Different vibration patterns can be set (continuous vibration or intermittent vibration); The maximum vibration time can be set.
Pre-interruption of vibration: Click the “South China University of Technology” badge button to stop the vibration directly.
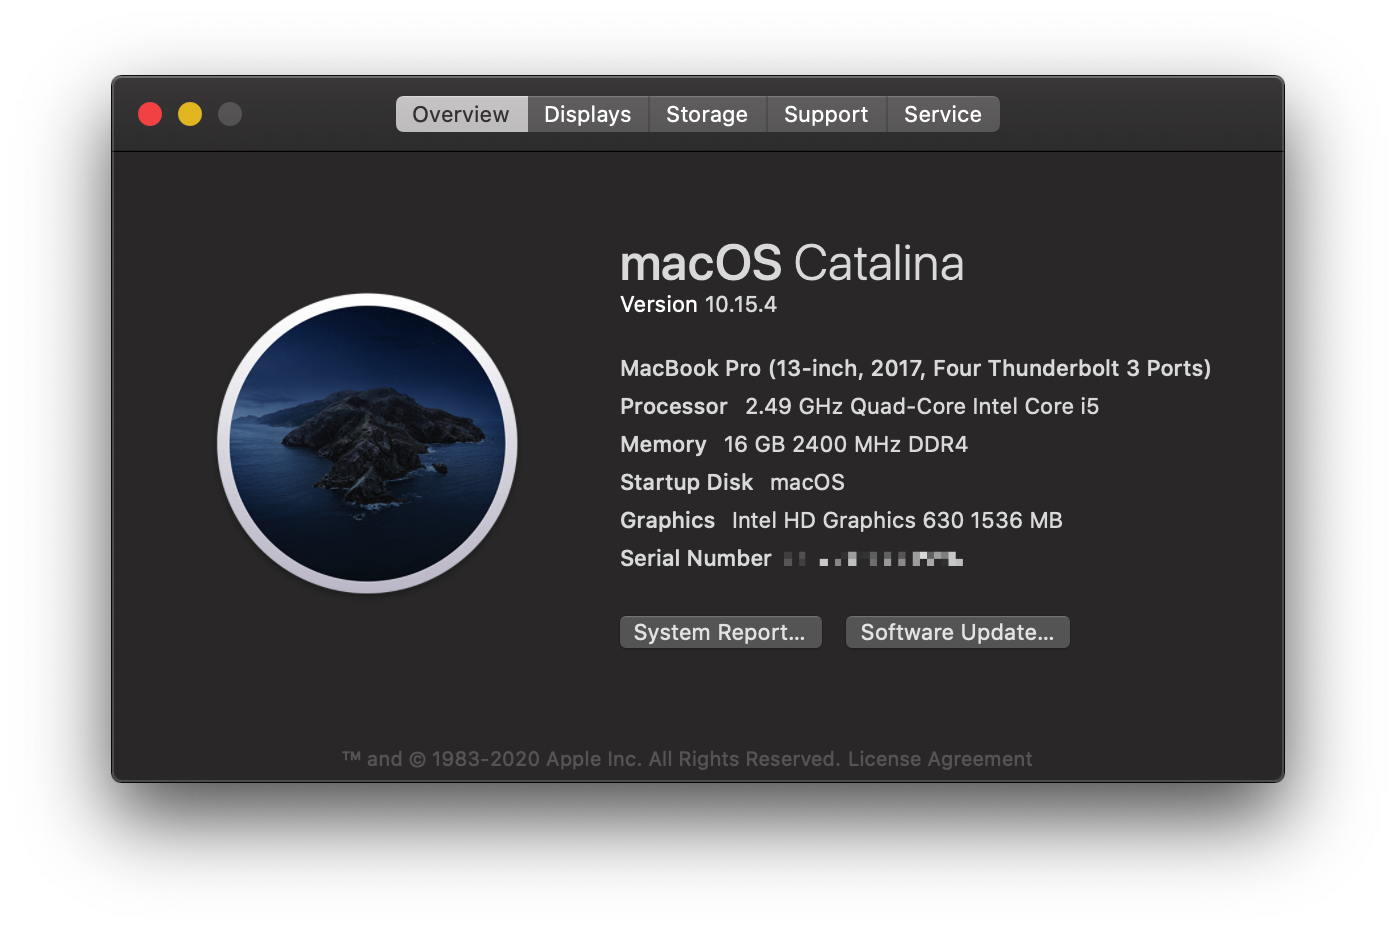
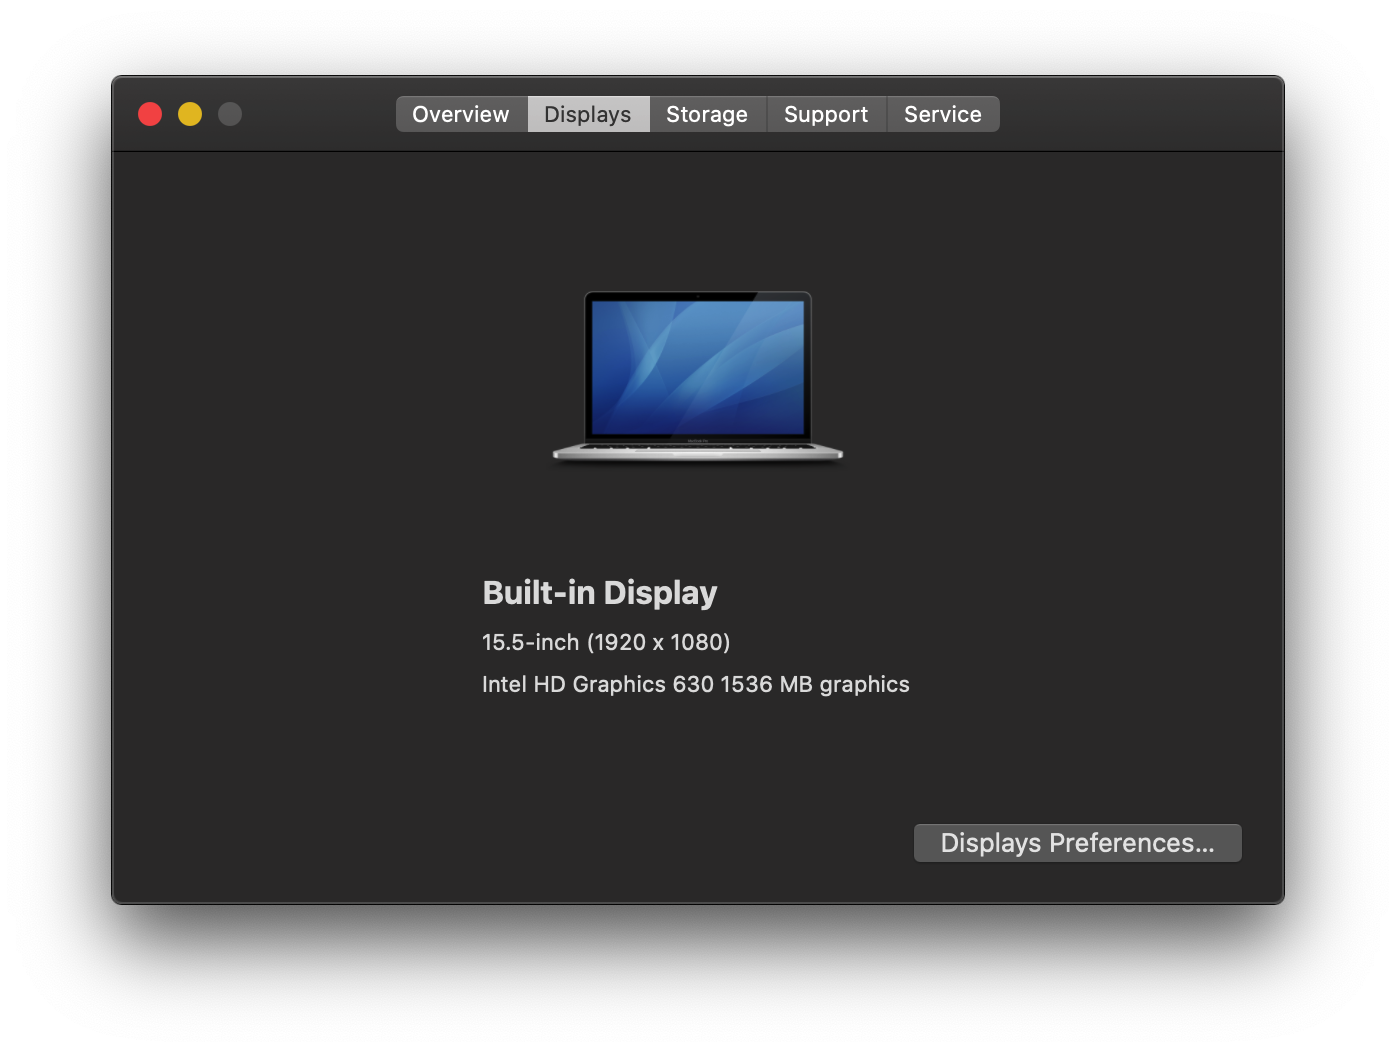
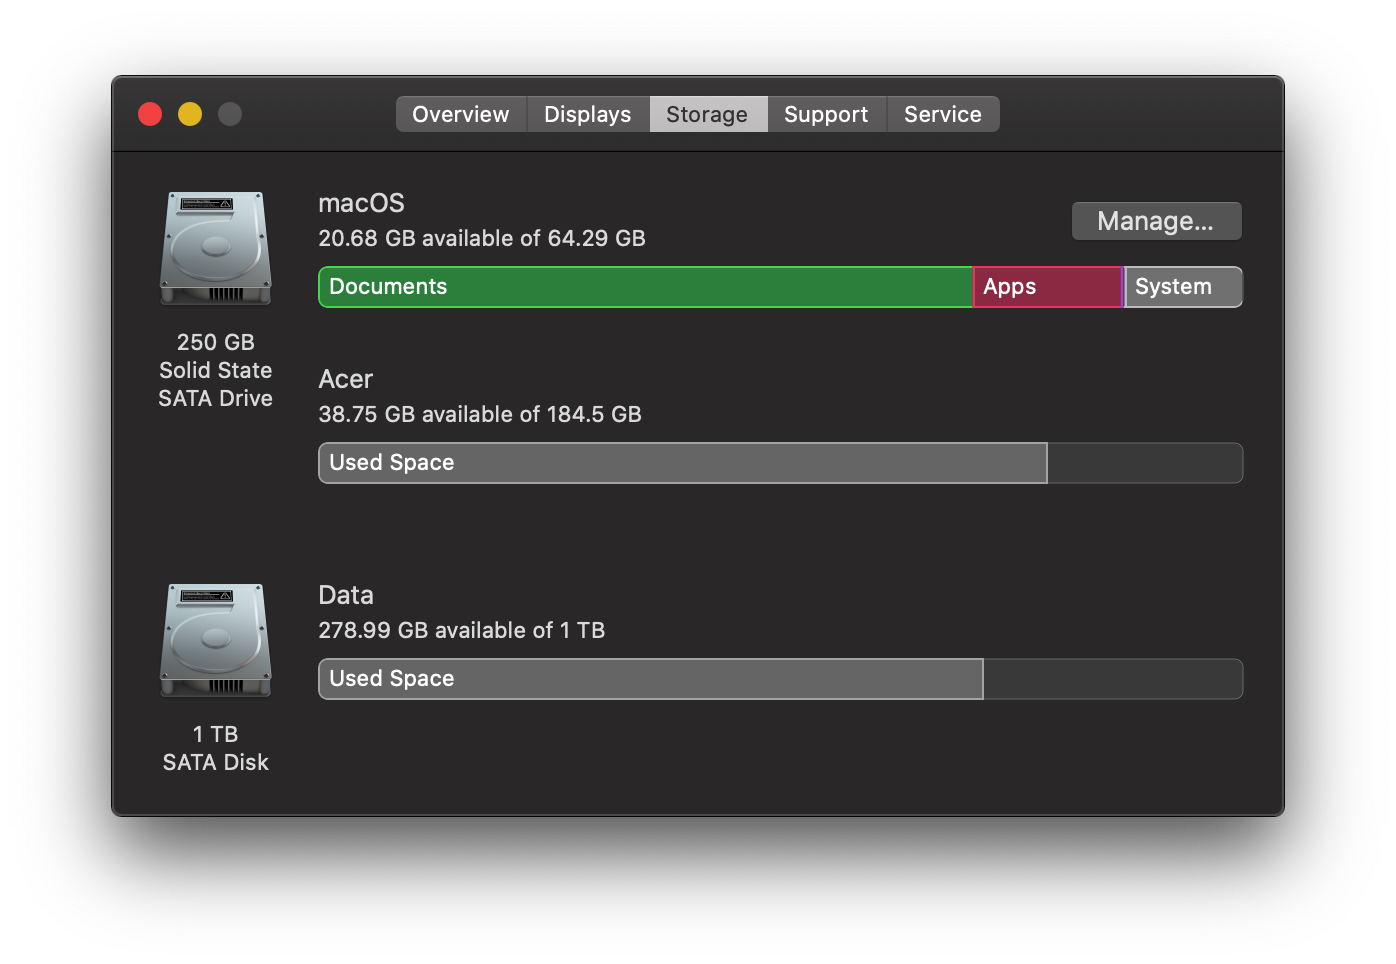


 https://github.com/LanbenGG/Acer-Aspire-VX5-591G-Hackintosh


