Blog

  • Community-Governance

    image

    IOTA Treasury Governance Info Thread

    Latest updates 24.06.2022

    The vote to establish a community treasury has been finaly concucted. Counting of votes started on 03.06.2022 and lasted til 13.06.2022.

    The outcome and Final results are the following:

    Votes for BUILD: 30.820.033.631.800.548

    Votes for BURN: 6.414.706.069.859.334

    Total amount of votes: 37.234.739.701.659.800

    This translates to 82,77% BUILD and 17,23% BURN votes.

    The results have been verified by community node operators, documented here: iotaledger/participation-events#6

    Read the following blog-post for more detals: Treasury vote results

    Herby it is confirmed that the IOTA community has voted to BUILD a community treasury.

    Community members are invited to take part in the proccess of establishing this treasury by participating in the discussions in the IOTA Discord. Dedicated channels like #governance-discussion are setup to do this. A Treasury working group is currently involved in core work around the treasury.

    Below described is the history that lead to the vote. It will stay in this readme to keep the proccess documented.

    General Information and history of the Tokens:

    The community has been offered the option to decide the future destiny of unclaimed tokens from the initial crowd sale and some network upgrades in 2017. As these tokens are no longer under the control of any single entity, the IOTA community must decide their future. The tokens should either be under the control of the community or should be destroyed.

    The node operators took this first decision about the future of the tokens following the Chrysalis network upgrade in April 2021. Node operators had two options: To follow a version of the network where those funds are still under the control of a single actor (IOTA AS Fork) To let the community decide the future use of the funds. (IOTA Chrysalis mainnet). Interested readers can find a detailed explanation of the two options mentioned above in the following IOTA Foundation blog posts:

    None of the node operators or users came forward to support the IOTA AS network, and the IOTA Foundation stopped supporting this network 30 days after the Chrysalis upgrade.

    Shortly after the Chrysalis update, the community established a governance channel in the IOTA Discord server where the IOTA community could discuss the vote at length. Since these early days in May 2021, many members have been actively involved in developing a solution to give the whole IOTA community a voice and make a decisive vote possible.

    The following resources have been created since then and are available to inform yourself and take part in the ongoing process:

    • #governance-discussion
    • #voting-tech
    • #governance-vission
    • #treasury-website
    • Google Drive folder: A loose collection of papers, docs, articles. and other drafts created by several community members can be found here in this public folder: https://drive.google.com/drive/folders/1hCyYobDhQlLrTvOROuY0woy7sAq-qL7x?usp=sharing It contains technical ideas, proposals for possible voting and Treasury solutions, Articles, research, and summaries of our weekly meetings.

    • Weekly / 2 weekly Community meetings in Discord. The community has established bi-weekly live chat meetings to discuss ideas and ongoing developments in the project. Meetings take place every second Thursday in the IOTA Discord #General-voice channel.

    This is the collection of the meeting notes.

    In this YouTube playlist you can watch recordings of most of the meetings.

    Many community members have taken part in these online discussions and group calls, and important decisions have been made in approaching the first vote.

    This is the current state of the project “Community Vote on the unclaimed Treasury Tokens”:

    General Vote Info for the first vote

    In the first vote, the community will have two clearly defined options, voting on what should happen to the tokens:

    • Build: The tokens will be made available to form a community treasury.

      • The community can start to create a system that provides governance over the tokens. Once this is completed, the node operators will release the tokens into the control of the new IOTA community treasury.
      • These IOTA community funds will be used by the community to support and fund projects and initiatives important to the IOTA community ecosystem.
      • Control and transfer of the tokens cannot and will not take place until an IOTA community governance system is designed and in place.
    • Burn: The tokens will be removed from the IOTA Ledger, and the total supply of IOTA tokens will decrease by the number of tokens that have been held in the treasury.

    IOTA holders will receive an updated version of the Firefly wallet with integrated voting functionality.

    You can only participate if you hold IOTA tokens in the Firefly wallet.

    • The number of votes is related to the balance of tokens held by the user: 1000 IOTA tokens (0,001 Mi) produce one counted vote every 10 seconds during the counting period. To reach the maximum vote count, a voter must keep the tokens voting for a defined time of 10 days. Voting for less than ten days will result in fewer votes counted for a voter.

    • 100% of all valid votes is defined as the amount of IOTA tokens successfully migrated into the chrysalis network at the milestone when the counting period ends.**

    • Minimum total participation is not required to produce a legit and binding vote outcome – only the amount of counted votes will be used to determine the result.

    • The winner will be the option that receives the simple majority of all valid votes

    • Should an error in the code occur during or after the decision, the proof is imminent that it has been exploited to influence the outcome, the vote is invalid and must be repeated after the error has been removed from the code.

    • Should the outcome of the vote be a draw, the community will set up a second vote with the same conditions as the first one

    • All information regarding the vote and the possibility to initiate a vote will be available on the community-owned Treasury Website IOTA Treasury.

    • Voters will execute the vote in the Firefly Wallet. Voters can cast a vote directly in Firefly or prepare it in a web application on iotatreasury.org that transfers the voting data to the user’s Firefly Wallet. This system is developed by the community with technical support and backing of the IF

    • Counting will happen in the [Hornet node participation plugin](hornet/plugins/participation at develop · gohornet/hornet (github.com)). Node owners can implement this plugin and participate in the counting of votes.

    Treasury Website

    The participating community members have decided to build a website as a single information point for voters. This website will show all relevant information about the vote, display tutorials and guides on voting, and display the appropriate vote count and statistics during the vote. Additionally, this website will host an application where voters can start their vote by deciding between Build and Burn. The application then transfers the vote to the Firefly Wallet of the user, where the user will execute the vote.

    The domain chosen by the community members is: IOTATreasury.org

    The Voting mechanism:

    Once everything is ready, IOTA holders can update the Firefly wallet to the newest version containing the voting functionality. You can only participate in the vote if you hold IOTA tokens in the Firefly wallet.

    The number of your votes is directly related to the number of tokens you commit during the counting time frame of ten days. Every 1000 IOTA tokens (0,01 Miota) used to vote will create 1 vote every 10 seconds. The sum of all those votes counted over ten days will be your total votes in this decision.

    The Vote will be separated into different phases

    • Proposal announcement Upon publishing the vote proposal to the GitHub Repository and implementing and displaying it to the Treasury website, the Hornet node operators can implement the vote proposal now as an event in their nodes. The participating nodes are now observing the Tangle and are ready to count votes for this proposal.
    • Pre-vote (seven days) The pre-vote phase starts at a predefined point in time (a milestone) in the IOTA network. Users can now vote using the Firefly wallets voting functionality. Changes in voters’ opinions during this time frame can be done without influencing the final vote count of the voter. Voters are required to initiate the vote during these seven days to gain their maximum possible votes counted.
    • Counting This period follows the pre-vote phase: the declared vote of a user is now counted. The number of counted votes will increase with every passing milestone (one milestone is issued every 10 seconds) in the network. If a voter did issue the vote during the pre-vote phase, the vote would reach the maximum possible counted votes related to the number of tokens used by the voter. If a voter attempts changing the selected vote option in this timeframe, the counting for the new option starts with the confirmation of the change in Firefly. Although the option has changed and new votes are now counted for a different option, the previously counted votes for the first option are not dismissed and count as valid votes.

    The number of your votes is directly related to the number of tokens you commit during the counting time frame of ten days. Every 1000 IOTA tokens (0,001 Miota) used to vote will create 1 vote every 10 seconds. The sum of all those votes counted over ten days will be your total votes in this decision.

    This is how a user will cast a valid vote:

    A) Initiate a vote directly within the Firefly Wallet:

    • You can execute your vote in the Firefly Wallet. Once published, every user can install the latest update of the Firefly software, which will contain the new voting functionality.

    • You decide which option you want to vote for and which wallet and token balance should participate in the vote. You can individually vote with all wallets in a profile. If you only want to use a part of your tokens to vote, moving this amount into a separate wallet in your profile is necessary. You will confirm the prepared voting transaction with your Stronghold password or Ledger Nano hardware wallet.

    B) Initiate a vote directly on the website iotatreasury.org:

    • This website includes a voting application. In this application, you can prepare your vote by deciding between the Build or Burn options.

    • Once you have decided on the website, your vote will be forwarded to your Firefly wallet, where further selection and confirmation steps are required from you.

    • Every Wallet in your Firefly profile will have access to the new governance tab in the Firefly sidebar.

    • You will be able to decide which amount of Votes (derived from token balance) should be used in the vote by voting with every wallet under your profile separately. You can create Wallets with the number of tokens you want to use as votes.

    • You must now decide for which option the vote should count – Burn or Build. Confirming the decision with your stronghold password or signing it with your Ledger Nano hardware wallet will produce your voting transaction.

    • The Treasury website will also offer the opportunity to decide between Build or Burn and transport this decision to your Firefly Wallet. To access your Firefly wallet, a deep link is used. Deep links create the exact transaction logic and transfer this information to Firefly using a predefined link format.

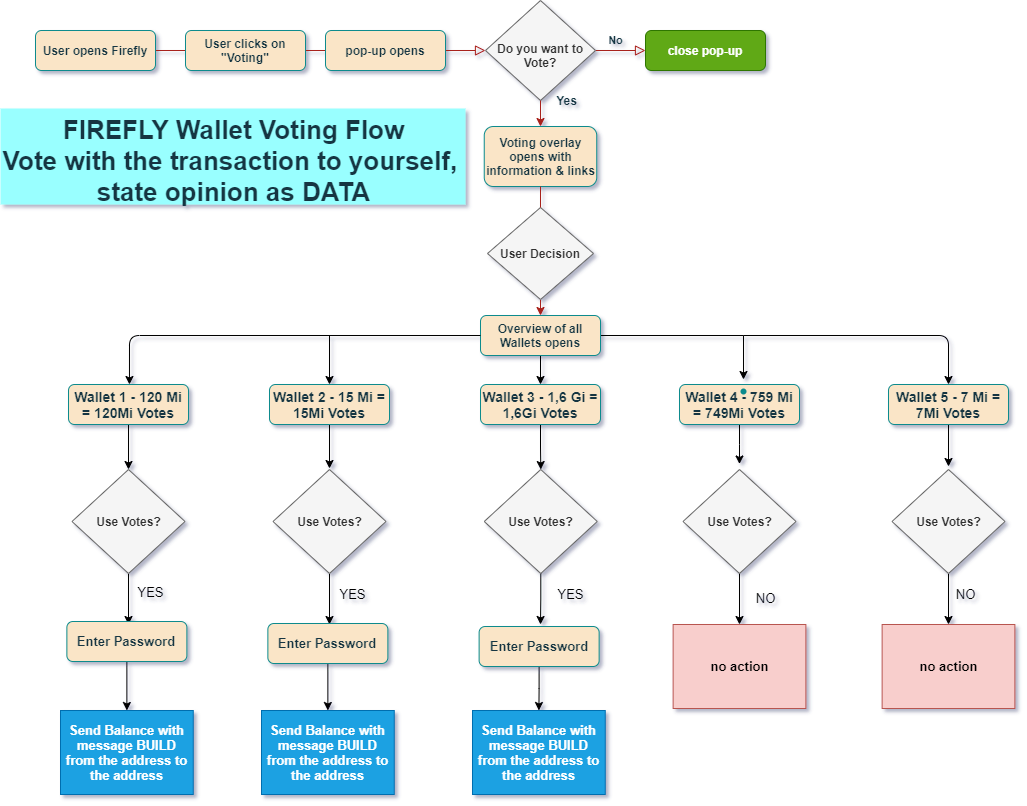
    Firefly initiates the following logic to create a vote:

    • The voting mechanism uses IOTA’s capability to issue value transactions with attached metadata. In a vote, a transaction is issued that moves the tokens residing on your address (and specifically, the unspent transaction outputs (UTXO) of this address). In this transaction, the sender and receiver address is identical (you are sending the tokens to yourself). During this transaction, the vote metadata (vote event ID, voter opinion ID: build or burn) will be attached and immutably written onto the UTXOs of your address in the IOTA Tangle. After the vote, the tokens will still reside on the same address as before, but now with attached information in the metadata that represents your opinion in the vote.

    Detailed current specification to find here:

    https://github.com/iota-community/treasury/blob/main/specifications/hornet-participation-plugin.md

    This is how a user can change a vote:

    • During pre-vote phase: Use the “manage vote” function in your Firefly wallet. The old vote will be removed, and the new one initiated.

    • During the counting period: Use the “manage vote” function in your Firefly wallet. The old vote will be removed, and the new one initiated. You can always add freshly received tokens into the vote by using the “merge votes” function in a wallet. The tokens will then be counted from the next milestone on.

    • Changing the opinion: You can also change the opinion of the vote anytime. In which case, Firefly will send the tokens again. Open the voting application in Firefly. The votes will be counted for the new opinion from the next milestone forward. Be aware that votes that have been already counted until the change has happened will still count for the first opinion. So if you changed your opinion exactly at the vote’s “halftime” with an unchanged token amount, both opinions would accumulate exactly the same amount of counted votes in the end.

    Using Github to create, discuss, approve and publish proposals

    Github is considered a trustworthy source and provides a very secure environment for proposals at this stage.

    • The proposal for the first vote will need to follow a predefined form (based on RFC by Walter, adjusted by Alex). The texts users will see in the Firefly wallet for Vote questions and possible answers are defined in this so-called “event file.”
    • The hornet node operators, the IOTA Firefly Nodes, and the Treasury Website will use this file to display the vote information and count the votes. To ensure that only the correct data is included in this file, it will need to be proposed in the community treasury Github Repository as a pull request, checked by a set of approvers, and merged into the Main branch of the Repo. This check, approval, and merging is a crucial security part of the vote. The community has decided which persons to ask to take these checks and approve the proposal.
    • Following the community call on 04/11/21, a discussion thread has been created to nominate candidates: #52
    • The nomination has ended on 18/11/21 at 12:00 CET
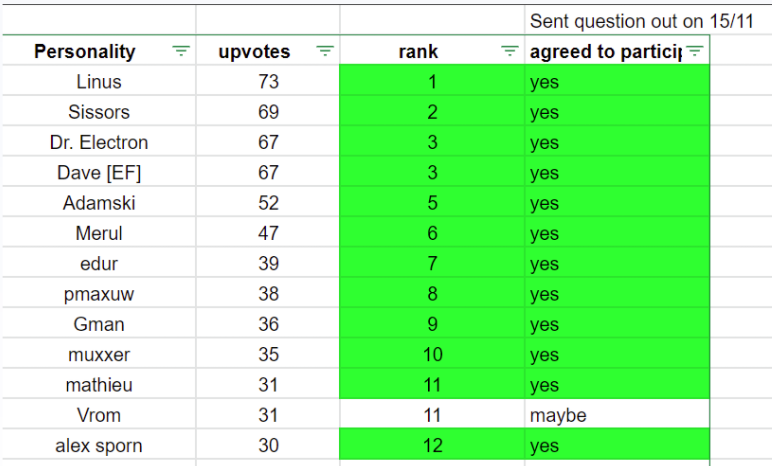
    • Results:

    image

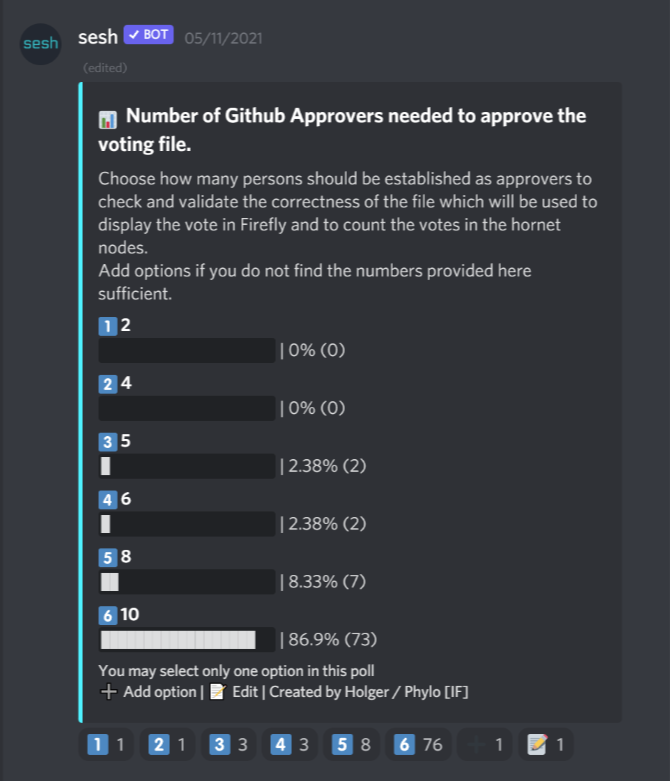
    • Also, a poll was created to decide on the numbers of approvers

    image

    According to this, the following decision has been taken by the participants of the meeting:

    • In total, 13 members will be enabled as approvers. The voting file merge is possible if 10 of those 13 members approve the file as correct. The call participants have decided to elect the members according to the received number of upvotes in the nomination process.

    Elected members:

    1. Linus Nauman
    2. Sissors
    3. Dr. Electron
    4. Dave [EF]
    5. Adamski
    6. Merul
    7. Edur
    8. pmaxuw (microhash)
    9. Gman214
    10. MuXXer
    11. mathieu (Chris Alice)
    12. Vrom
    13. Alex Sporn

    This is how votes will be counted:

    • Votes get counted in the Hornet nodes.
    • Node operators can activate the participation plugin in the Hornet node software in every Hornet node. Nodes that initiate this plugin during the proposal announcement phase can produce the results because they will observe all IOTA addresses during the whole period and count all votes that happen.
    • This plugin has gone through a community test and is fully audited by an external security audit provider.
    • As every node in the IOTA network knows the status of every UTXO in the Tangle, they can observe and register changes to these UTXOs. As soon as a vote transaction is issued and confirmed, the UTXO contains attached metadata information. Hornet nodes that have the participation plugin activated will observe the ledger for UTXOs that hold this specific metadata (the vote event ID). They will log all UTXOs with this metadata for every new milestone in the Tangle and create a database of the counted votes. This node database will store the following information for every milestone:
    • UTXO’s that contain the event ID of the vote.
    • Voter opinion ID written to this UTXO.
    • Number of tokens residing on the UTXO.
    • The plugin keeps track of all those UTXOs and adds new ones as soon as they appear in the ledger or stops further counting them as soon as they disappear. This Github repo contains the exact structure of the counting mechanism.
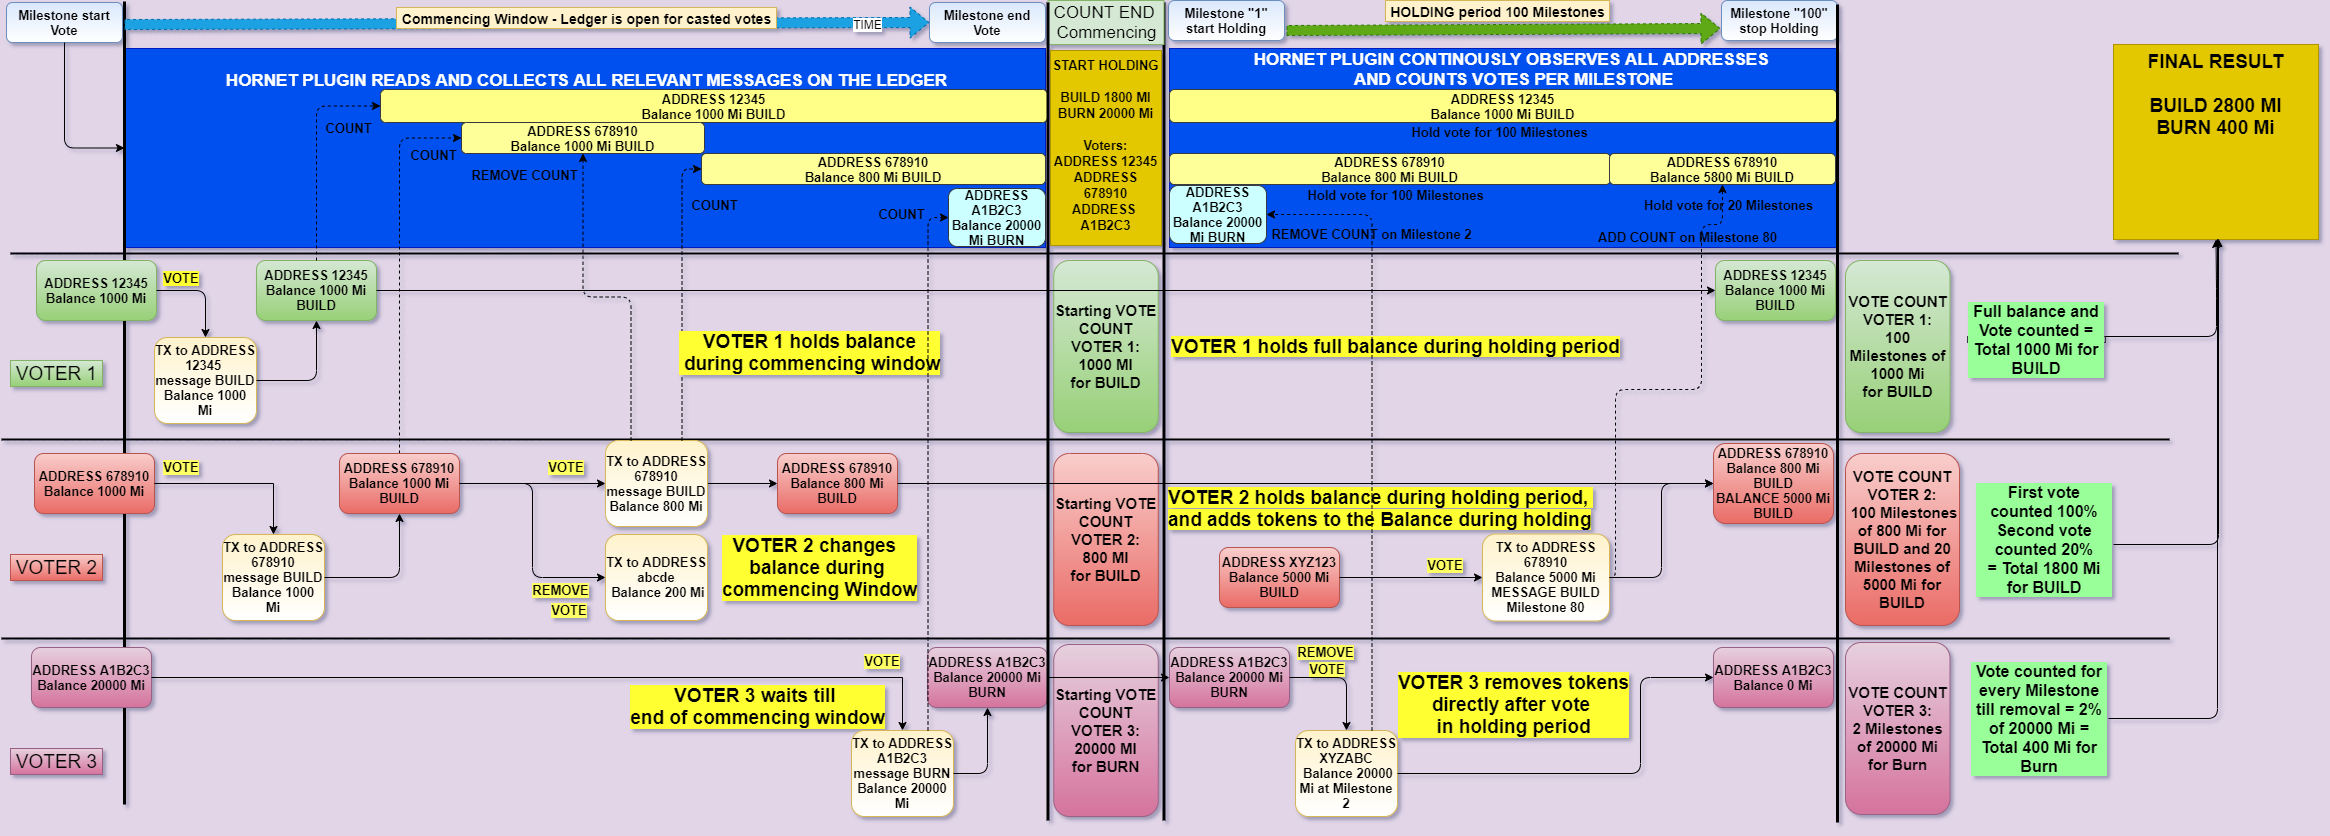
    • Counting happens from the defined “start holding – milestone” till the defined “end holding – milestone.” as defined in the specification
    • As a new milestone is issued every 10 seconds, it produces an exact counting as every change in opinions or balances will be recognized in a 10-second time frame.
    • After the defined “holding end – milestone,” the plugin produces an output with all observed UTXOs, balances, indexation payloads per milestone, and the final result as an accumulation of that milestone data. That information will also be available live during the vote via an API endpoint in every node.
    • The result will be produced and verified in a decentralized fashion through every node participating in the counting. At the beginning of the counting period, the respective number of votes is counted for every milestone in which tokens containing attached voting metadata reside on a UTXO.
    • These live results will be visible on the iotatreasury.org website.

    This is a flow diagram of the process:

    General Flow:

    Chrysalis Vote Flow-Token-voting

    Detailed Flow with Counting:
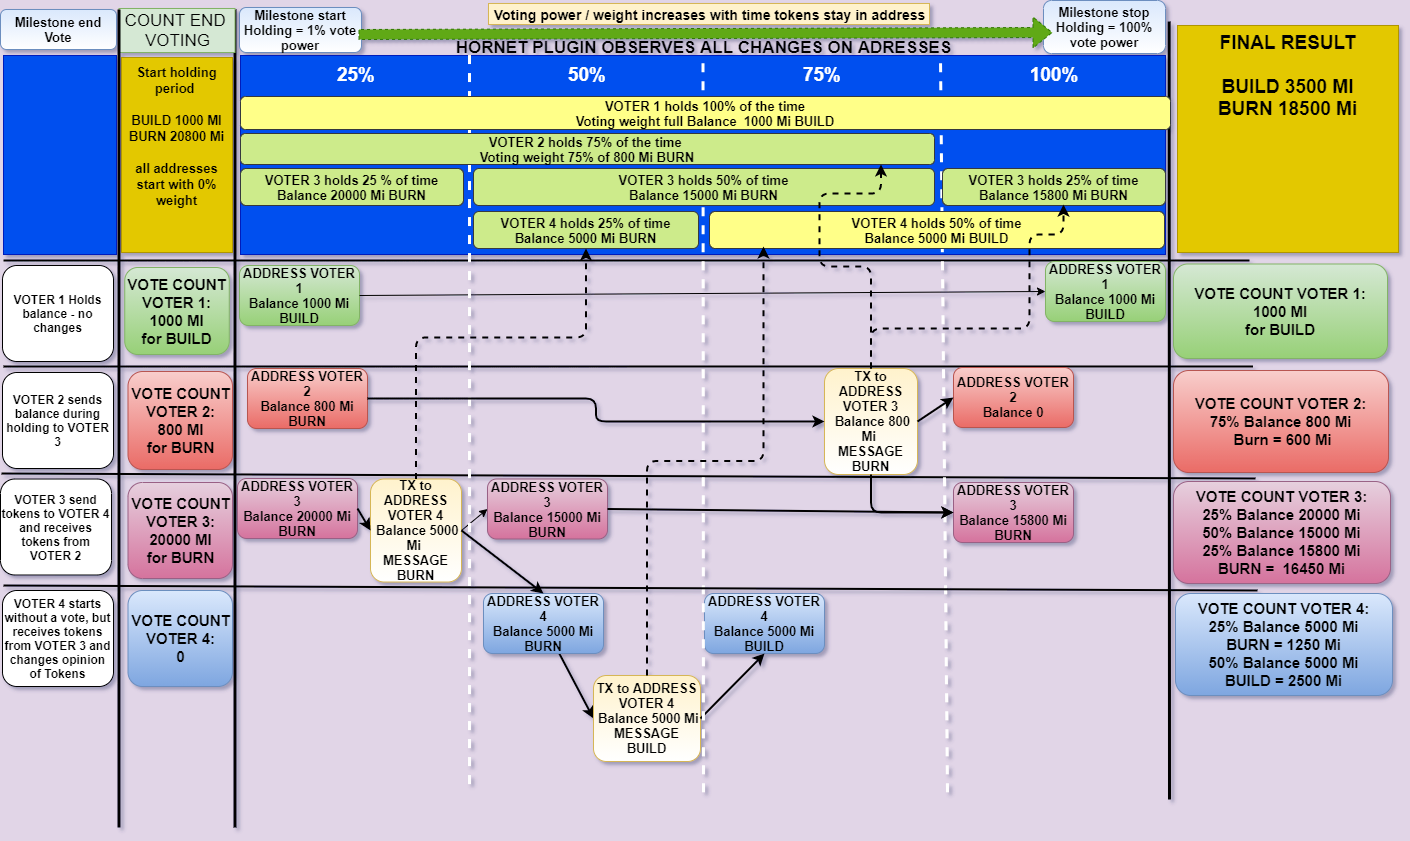
    image

    Special cases:

    image

    Core development Team

    A team of community members will develop the Treasury voting system. The core developer will be Adam_unchained https://github.com/adamkundrat supported by Gman214 and frnfa. The scope of work is laid out in this specification: https://github.com/iota-community/treasury/blob/main/specifications/treasury-tech-proposal.md


    Community-Governance

    This Repo is set up to gather and focus discussions regarding the proposed installation of community governance over the funds currently in the community treasury of the IOTA Chrysalis Main – Network.

    It is created as an open place to exchange thoughts, form working groups, explore topics and develop different approaches to this complicated topic. Every discussion and action here will be transparent, open-source, and free for everyone to contribute.

    Contributing

    The primary go-to point for everyone that wants to contribute will be the “Discussions” Tab.

    https://github.com/iota-community/Community-Governance/discussions

    The IOTA community did put up some topics to keep the talk a bit more specific in a forum style, so opinions can be better formulated and will stay visible and quickly found. If you have a topic to discuss, please check it fits under one of the main topics (voting power, voting proposals, …) and add it as a comment there to avoid the forum spreading out over too many threads.

    This should not be a place of disputes over the past or the actions that lead to the fork, but of constructive forward-thinking working. Critical questioning of everything that happens here is welcome and encouraged, but spam or toxic behavior will not bring us forward and so should not be a part of this Repo here.

    The primary and starting point of this process is the announcement made by the IOTA Foundation in this blog-post

    https://blog.iota.org/iota-community-treasury-and-genesis-validation/

    and the clarification blog-post

    https://blog.iota.org/unclaimed-tokens-community-treasury-and-iota-as-faq/

    The goal will be to propose a voting mechanism and votable options to the community what should happen to these Tokens. The community might also use it to develop ideas and processes on how a possible community governed use of those funds can be established if the community comes to a vote and decides to install such a system.

    The nature of Github Repos allows us to have a verifiable track of all changes and to make it possible for everyone to contribute to the project by issuing commits and pull requests.

    Have a look at CONTRIBUTING.


    Contact

    Currently Maintainers of this Repo:

    Adamkundrat – https://github.com/adamkundrat

    WernerDerChamp – https://github.com/WernerderChamp

    Phyloiota – https://github.com/Phyloiota

    Antonio Nardella – https://github.com/antonionardella

    If you want to contribute as a Maintainer, please get in touch!

    This Repo is part of the Organisation “IOTA community” https://github.com/iota-community on Github.

    Visit original content creator repository https://github.com/iota-community/Community-Governance
  • vk-vbitve-bot

    vk-vbitve-bot

    Бот для мини-игры “ВБитве 2022” ВКонтакте.

    Установка на Windows

    • Устанавливаем Python (для Windows 7 нужен Python 3.8.X). Во время установки обязательно ставим галочку Add Python to PATH (Добавить Python в PATH).
    • Скачиваем архив с ботом.
    • Распаковываем архив.
    • Редактируем файл config.py через текстовый редактор:

    Настройка Инструкция (описание)
    VK_ADMIN_TOKEN 1. Открываем https://vkhost.github.io;
    2. Выбираем VK Admin;
    3. Авторизуемся в аккаунт ВК, если не авторизованы;
    4. Нажимаем Разрешить;
    5. Копируем ссылку на текущую страницу;
    6. Вставляем скопированный текст в значение VK_ADMIN_TOKEN в config.py между кавычками.
    VK_AUTH_HEADER 1. Открываем игру;
    2. Нажимаем F12 (Для Chromium браузеров);
    3. Перезагружаем страницу горячей клавишей F5;
    4. В появившейся панели выбираем вкладку Network;
    5. Находим кнопку Filter (в виде воронки);
    6. В появившемся поле пишем inbattle;
    7. В панели появится поле get, нажимаем по нему;
    8. Появится ещё одна панель, выбираем в ней вкладку Headers;
    9. Ищем поле vk-auth;
    10. Копируем его значение (начинается c vk_access_token_settings);
    11. Вставляем скопированный текст в значение VK_AUTH_HEADER в config.py между кавычками.
    FRIENDS_HEADER 1-8. Идентично VK_AUTH_HEADER;
    9. Ищем поле friends;
    10. Копируем его значение (состоит из цифр);
    11. Вставляем скопированный текст в значение FRIENDS_HEADER в config.py между кавычками.
    USER_AGENT User agent браузера. Рекомендуется поставить свой, чтобы уменьшить вероятность бана. Получить можно через сайт.
    TRAIN Тренировать армию (0 – выкл, 1 – вкл).
    CONTRACT Выполнять контракты (0 – выкл, 1 – вкл).
    ATTACK_MODE Режим нападения:
    0 – выкл;
    1 – на случайных игроков;
    2 – на вражеский клан, если идёт война, иначе на случайных игроков;
    3 – на игроков из ATTACK_TARGETS.
    ATTACK_EXCLUDE ID игроков, которых не надо атаковать. ID можно получить через сайт.
    ATTACK_TARGETS ID игроков, которых надо атаковать при ATTACK_MODE = 3.

    Запуск: start.bat. Если после запуска выводится Python или выходит ошибка, связанная с Python или pip:

    • Откройте cmd
    • Напишите python -V
    • Вывод должен соответстовать виду: Python версия. При этом версия должна быть выше 3.6.X.
    • Если вывод не соответствует виду, нужно заново выполнить первый пункт инструкции (переустановить Python).

    Установка в Termux (Android)

    • Устанавливаем Termux с F-Droid, т. к. в Google Play разработчик его больше не обновляет.

    • Запускаем Termux.

    • Пишем по порядку:

      cd
      pkg update -y
      pkg install -y git python
      git clone https://github.com/monosans/vk-vbitve-bot
    • Редактируем файл config.py командой nano vk-vbitve-bot/config.py:

      • Чтобы получить VK_AUTH_HEADER и FRIENDS_HEADER с телефона, используем приложение F12:
        1. Открываем приложение F12, заходим на сайт мобильного ВКонтакте и авторизуемся.
        2. Открываем игру через тот же F12.
        3. Нажимаем кнопку F12, переходим на вкладку Network (3-я по счёту).
        4. Ставим галочку около Advance.
        5. Сворачиваем панель и нажимаем на стрелочку для перезагрузки страницы.
        6. Вновь нажимаем кнопку F12, переходим на вкладку Network.
        7. Немного листаем вверх и находим запись https://www.inbattle.space/get, нажимаем по ней.
        8. Появится ещё одна панель. Под записью Request Headers находим поле vk-auth.
        9. Копируем его значение (начинается c vk_access_token_settings).
        10. Вставляем скопированный текст в значение VK_AUTH_HEADER в config.py между кавычками.
        11. Возвращаемся в приложение F12.
        12. Под записью Request Headers находим поле friends.
        13. Копируем его значение (состоит из цифр).
        14. Вставляем скопированный текст в значение FRIENDS_HEADER в config.py между кавычками.
      • Про остальные настройки можно прочитать в инструкции для Windows.
    • После редактирования файла, для сохранения нажмите Ctrl-O, Enter, Ctrl-X.

    Запуск: sh vk-vbitve-bot/start.sh

    Переустановка в Termux

    Ввести команды по порядку:

    cd
    rm -rf vk-vbitve-bot

    После этого заново установить по инструкции.

    License / Лицензия

    MIT

    Visit original content creator repository
    https://github.com/monosans/vk-vbitve-bot

  • openapi-sdk-php

    English | 简体中文

    Alibaba Cloud SDK for PHP

    Latest Stable Version composer.lock Total Downloads License codecov Travis Build Status Appveyor Build Status

    AlibabaCloud

    The Alibaba Cloud V1.0 SDK will soon enter the Basic Security Maintenance phase and is no longer recommended for use. It is suggested to use the V2.0 SDK instead.

    Release Notes

    We developed a new kernel on the principle of eliminating known issues and compatible with old grammar, adding the following features:

    Prerequisites

    Your system will need to meet the Prerequisites, including having PHP >= 5.5. We highly recommend having it compiled with the cURL extension and cURL 7.16.2+.

    Installation

    If Composer is already installed globally on your system, run the following in the base directory of your project to install Alibaba Cloud SDK for PHP as a dependency:

    composer require alibabacloud/sdk

    Please see the Installation for more detailed information about installing through Composer and other ways.

    Troubleshoot

    Troubleshoot Provide OpenAPI diagnosis service to help developers locate quickly and provide solutions for developers through RequestID or error message.

    Online Demo

    Alibaba Cloud OpenAPI Developer Portal provides the ability to call the cloud product OpenAPI online, and dynamically generate SDK Example code and quick retrieval interface, which can significantly reduce the difficulty of using the cloud API.

    Quick Examples

    Before you begin, you need to sign up for an Alibaba Cloud account and retrieve your Credentials. Before request, please Understanding the Clients, after request, please Understanding the Result.

    Currently, only some Alibaba Cloud products are supported, Supported Products, For products that are not supported, you can use Alibaba Cloud Client for PHP to initiate custom requests, and you can use Alibaba Cloud OpenAPI Developer Portal to generate Alibaba Cloud Client for PHP code online.

    <?php
    
    use AlibabaCloud\Client\AlibabaCloud;
    use AlibabaCloud\Client\Exception\ClientException;
    use AlibabaCloud\Client\Exception\ServerException;
    use AlibabaCloud\Ecs\Ecs;
    
    // Set up a global client
    AlibabaCloud::accessKeyClient('foo', 'bar')
                ->regionId('cn-hangzhou')
                ->asDefaultClient();
    
    try {
        // Access product APIs
        $request = Ecs::v20140526()->describeRegions();
        
        // Set options/parameters and execute request
        $result = $request->withResourceType('type') // API parameter
                          ->withInstanceChargeType('type') // API parameter
                          ->client('client1') // Specify the client for send
                          ->debug(true) // Enable the debug will output detailed information
                          ->connectTimeout(0.01) // Throw an exception when Connection timeout 
                          ->timeout(0.01) // Throw an exception when timeout 
                          ->request(); // Execution request
    
        // Can also Set by passing in an array
        $options = [
                       'debug'           => true,
                       'connect_timeout' => 0.01,
                       'timeout'         => 0.01,
                       'query'           => [
                           'ResourceType' => 'type',
                           'InstanceChargeType' => 'type',
                       ],
                   ];
        
        // Settings priority
        $result2 = Ecs::v20140526()
                      ->describeRegions($options)
                      ->options([
                                    'query' => [
                                        'Key'      => 'I will overwrite this value in constructor',
                                        'new'      => 'I am new value',
                                    ],
                                ])
                      ->options([
                                    'query' => [
                                        'Key' => 'I will overwrite the previous value',
                                        'bar' => 'I am new value',
                                    ],
                                ])
                      ->debug(false) // Overwrite the true of the former
                      ->request();
        
    } catch (ClientException $exception) {
        echo $exception->getMessage(). PHP_EOL;
    } catch (ServerException $exception) {
        echo $exception->getMessage() . PHP_EOL;
        echo $exception->getErrorCode(). PHP_EOL;
        echo $exception->getRequestId(). PHP_EOL;
        echo $exception->getErrorMessage(). PHP_EOL;
    }

    Issues

    Opening an Issue, Issues not conforming to the guidelines may be closed immediately.

    Changelog

    Detailed changes for each release are documented in the release notes.

    Contribution

    Please make sure to read the Contributing Guide before making a pull request.

    References

    License

    Apache-2.0

    Copyright (c) 2009-present, Alibaba Cloud All rights reserved.

    Visit original content creator repository https://github.com/aliyun/openapi-sdk-php
  • Multiclass-Brain-Tumor-Classification-using-TensorFlow

    Multiclass Brain Tumor Classification using TensorFlow

    Introduction

    This is a project which uses deep learning algorithm to classify the type of tumor present in the brain MRI image. The model is only able to detect three type of tumors as of now i.e. glioma, meningioma and pituitary.

    Dataset used in this project

    The dataset used in this project is taken from kaggle: https://www.kaggle.com/datasets/masoudnickparvar/brain-tumor-mri-dataset

    Models used in this project

    1. Our own CNN model
    2. VGG19
    3. InceptionV3
    4. resnet101
    5. MobileNetV3
    6. Ensemble Learning Model based on our own CNN model and VGG19

    Out of the all the above models, resnet101 proved to be the most effective one with a training accuracy of around 95.99% and testing accuracy of around 92.41%

    About the web application of the deep learning model

    The deep learning model of this project is connected with a frontend webapp created with the help of NextJS via FastAPI for real time prediction. The frontend of the project is deployed on Vercel and the backend of the project is deployed on HuggingFace.

    Links

    1. Live Preview: https://multiclass-brain-tumor-classification.vercel.app/
    2. Backend FastAPI link of the model: https://som11-multiclass-brain-tumor-classification.hf.space/
    3. Swagger documentation of the FastAPI of the deep learning model: https://som11-multiclass-brain-tumor-classification.hf.space/docs

    Warning

    While the model of this project can classify brain tumors correctly, but in some cases, the model may misclassify tumors or fail to detect them altogether, therefore, it is strongly advised not to rely solely on the output of this model.

    Visit original content creator repository
    https://github.com/somenath203/Multiclass-Brain-Tumor-Classification-using-TensorFlow

  • Extended-Kalman-Filter

    Extended Kalman Filter Project Starter Code

    Self-Driving Car Engineer Nanodegree Program

    In this project you will utilize a kalman filter to estimate the state of a moving object of interest with noisy lidar and radar measurements. Passing the project requires obtaining RMSE values that are lower than the tolerance outlined in the project rubric.

    This project involves the Term 2 Simulator which can be downloaded here

    This repository includes two files that can be used to set up and install uWebSocketIO for either Linux or Mac systems. For windows you can use either Docker, VMware, or even Windows 10 Bash on Ubuntu to install uWebSocketIO. Please see the uWebSocketIO Starter Guide page in the classroom within the EKF Project lesson for the required version and installation scripts.

    Once the install for uWebSocketIO is complete, the main program can be built and run by doing the following from the project top directory.

    1. mkdir build
    2. cd build
    3. cmake ..
    4. make
    5. ./ExtendedKF

    Tips for setting up your environment can be found in the classroom lesson for this project.

    Note that the programs that need to be written to accomplish the project are src/FusionEKF.cpp, src/FusionEKF.h, kalman_filter.cpp, kalman_filter.h, tools.cpp, and tools.h

    The program main.cpp has already been filled out, but feel free to modify it.

    Here is the main protocol that main.cpp uses for uWebSocketIO in communicating with the simulator.

    INPUT: values provided by the simulator to the c++ program

    [“sensor_measurement”] => the measurement that the simulator observed (either lidar or radar)

    OUTPUT: values provided by the c++ program to the simulator

    [“estimate_x”] <= kalman filter estimated position x
    [“estimate_y”] <= kalman filter estimated position y
    [“rmse_x”]
    [“rmse_y”]
    [“rmse_vx”]
    [“rmse_vy”]


    Other Important Dependencies

    Basic Build Instructions

    1. Clone this repo.
    2. Make a build directory: mkdir build && cd build
    3. Compile: cmake .. && make
      • On windows, you may need to run: cmake .. -G "Unix Makefiles" && make
    4. Run it: ./ExtendedKF

    Editor Settings

    We’ve purposefully kept editor configuration files out of this repo in order to
    keep it as simple and environment agnostic as possible. However, we recommend
    using the following settings:

    • indent using spaces
    • set tab width to 2 spaces (keeps the matrices in source code aligned)

    Code Style

    Please (do your best to) stick to Google’s C++ style guide.

    Generating Additional Data

    This is optional!

    If you’d like to generate your own radar and lidar data, see the
    utilities repo for
    Matlab scripts that can generate additional data.

    Project Instructions and Rubric

    Note: regardless of the changes you make, your project must be buildable using
    cmake and make!

    More information is only accessible by people who are already enrolled in Term 2
    of CarND. If you are enrolled, see the project resources page
    for instructions and the project rubric.

    Hints and Tips!

    • You don’t have to follow this directory structure, but if you do, your work
      will span all of the .cpp files here. Keep an eye out for TODOs.

    • Students have reported rapid expansion of log files when using the term 2 simulator. This appears to be associated with not being connected to uWebSockets. If this does occur, please make sure you are conneted to uWebSockets. The following workaround may also be effective at preventing large log files.

      • create an empty log file
      • remove write permissions so that the simulator can’t write to log
    • Please note that the Eigen library does not initialize VectorXd or MatrixXd objects with zeros upon creation.

    Call for IDE Profiles Pull Requests

    Help your fellow students!

    We decided to create Makefiles with cmake to keep this project as platform
    agnostic as possible. Similarly, we omitted IDE profiles in order to ensure
    that students don’t feel pressured to use one IDE or another.

    However! We’d love to help people get up and running with their IDEs of choice.
    If you’ve created a profile for an IDE that you think other students would
    appreciate, we’d love to have you add the requisite profile files and
    instructions to ide_profiles/. For example if you wanted to add a VS Code
    profile, you’d add:

    • /ide_profiles/vscode/.vscode
    • /ide_profiles/vscode/README.md

    The README should explain what the profile does, how to take advantage of it,
    and how to install it.

    Regardless of the IDE used, every submitted project must
    still be compilable with cmake and make.

    How to write a README

    A well written README file can enhance your project and portfolio. Develop your abilities to create professional README files by completing this free course.

    Visit original content creator repository
    https://github.com/arnabuchiha/Extended-Kalman-Filter

  • Gauntlet-of-Chaos

    layout title permalink
    home
    The Gauntlet of Chaos
    /

    The Gauntlet of Chaos

    This pack is focused on surviving the harsh environment in a modded hardcore scenario.
    There are multiple dangers in the form of natural disasters, new mobs, dungeons and bosses.
    In multiplayer, players can be rescued within a time limit if downed. Upon death, a corpse is left behind. Extra lives can be earned through progress.
    Follow the Quest Book (with completely custom built quests), and take on the Gauntlet of Chaos, as you beat each boss in the pack to restore order to the world.
    Includes some light magic and tech mods, as well as custom ship building for travel.

    Note: Still designing. Everything is subject to change.

    Looking for a Download?

    [![Download button]({{ site.baseurl }}/assets/downloadbutton.png ‘Download modpack’)]({{ site.github.releases_url }}){:target=”_blank”}

    Relevant links

    • For an overview of the included mods, check out the Mod list
    • Follow current progress on the TODO list
    • Download the pack [here]({{ site.github.releases_url }})
    • Find code [here]({{ site.github.repository_url }})

    Tweaked Settings

    • Controls and Keybinds
    • Physics Mod
      • Disabled collapse setting, to avoid the aggressive structural integrity implementation.
      • Maxed out stiffness at 5000, and set collision to false on all trapdoors, to fix their weird behavior.
    • Better Animations Collection
      • Disabled Wobbly Creepers since they looks a bit silly.
    • Hardcore Questing Mode
      • Added custom logo on frontpage. (Might want to replace with more appropriate art at some point)
      • Custom quest lines and rewards.
    • Vanilla
      • Set GUI scale to 2 (Better default size).
      • Set music volume to 10% by default.
      • Swapped sprint and sneak controls.
      • Disabled auto jumping.
      • Skipped multiplayer warning.
      • Added servers to server list.
    • Shaders and Resource Packs
      • Complementary Unbound shaders enabled by default.
      • Weather2 Retextured enabled by default.
    • Weather2
      • Disabled tornados and cyclones for now.
        Need to make sure it isn’t too destructive.
    • Lucky Block
      • Disabled “Luck Crafting”.
      • Disabled crafting of Lucky Blocks using Craft Tweaker.
      • Disabled natural generation

    Running a server

    To run a server, follow the directions for using packwiz, in the “Using a Modpack with a server” section of the Packwiz Installer Tutorial{:target=”_blank”}.
    If you use docker or podman, you can refer to the example docker-compose file{:target=”_blank”}, which uses the itzg/minecraft-server{:target=”_blank”} image.

    Building the modpack

    Requirements

    • Packwiz{:target=”_blank”} for managing the included mods and files.
    • Git LFS{:target=”_blank”} for handling larger files like internal .jar mod files.

    How to build

    • After adding or updating internal files like configs, run packwiz refresh to update the index. The index should be updated and committed after each change on the master branch.
    • Run packwiz serve to host a local webserver, serving the mod files for local testing.

    Building the webpage locally

    Requirements

    • Jekyll{:target=”_blank”} for building GitHub pages site locally.

    How to build

    • Run bundle install to install any missing dependency gems.
    • Run bundle exec jekyll serve to build and serve the Ruby site locally.

    Releasing updates

    The .github/workflows/static.yml file defines a GitHub Actions workflow, which builds the site and hosts it along with all mod files on GitHub Pages.
    This workflow is configured to automatically publish on new commits to the master branch.

    Visit original content creator repository
    https://github.com/MaverickMartyn/Gauntlet-of-Chaos

  • quotes_statistics

    С приложением можно ознакомиться по адресу: https://quotestats.netlify.app

    Available Scripts

    In the project directory, you can run:

    npm start

    Runs the app in the development mode.
    Open http://localhost:3000 to view it in the browser.

    The page will reload if you make edits.
    You will also see any lint errors in the console.

    npm run build

    Builds the app for production to the build folder.
    It correctly bundles React in production mode and optimizes the build for the best performance.

    The build is minified and the filenames include the hashes.
    Your app is ready to be deployed!

    See the section about deployment for more information.

    1. Условие:
      необходимо создать веб-приложение, которое максимально быстро считает
      статистические параметры по котировкам с биржи.
      Для этого необходимо создать интерфейс который содержит кнопки “Старт” и “Статистика”.
      По нажатию на “Старт” должно происходить подключение к эмулятору котировок по адресу
      вебсокета wss://trade.trademux.net:8800/?password=1234 для получения котировок онлайн.
      При
      нажатии на кнопку “Статистика” отображает на странице такие статистические значения:
      среднее,
      стандартное отклонение,
      моду (при мультимодности достаточно только одну моду),
      медиану,
      количество потерянных котировок если такие есть,
      время расчетов.
      Расчеты должны
      осуществляться по всем полученным данным от момента старта до текущего момента нажатия
      кнопки “Статистика”, кнопку можно нажимать сколько угодно раз для получения новых
      результатов на текущее время.
      Формат “котировки” json, поля : {id : idкотировки, value : значениекотировки}
      Технические требования:
      • Приложение должно быть максимально оптимизировано по скорости работы.
      • Время между нажатием Старт и Статистика может быть очень большим (несколько
      дней)
      • Интерфейс должен быть удобен для использования.
      • Стиль кнопок должен быть:
      бордер ровно 1пкс черный,
      фон кнопки серый,
      при
      наведении мыши на кнопку фон должен становится белым,
      при клике на кнопку фон
      должен становится желтым
      (использовать для этого только CSS / SCSS).
      • Принятые числа отображать не нужно.
      Уровни сложности задания:
      junior уровень: посчитать только среднее и стандартное отклонение
      Более высокий уровень: посчитать также моду и медиану
      2.
      Условие:
      Написать “пингователь” любого сервера на JavaScript, который покажет
      примерное время пинга до сервера указанного в поле ввода.
      Технические требования:
      • стиль кнопок должен быть:
      бордер ровно 1пкс черный,
      фон кнопки серый,
      при
      наведении мыши на кнопку фон должен становится белым,
      при клике на кнопку фон
      должен становится желтым
      (использовать для этого только CSS / SCSS).
      • стиль полей ввода должен быть:
      бордер ровно 1пкс черный,
      фон белый,
      при наведении
      мыши на поле ввода фон должен становится серым,
      при клике на поле фон должен
      становится желтым
      (использовать для этого только CSS / SCSS)
      Задания делать на ReactJS.

    Visit original content creator repository
    https://github.com/ZhivotenkoAlex/quotes_statistics

  • chn-iplist

    chn-iplist

    数据源

    IPv4:17mon/china_ip_listgaoyifan/china-operator-ip

    IPv6: APNIC Delegated List

    使用由 mosdns 项目启发的合并优化脚本生成列表文件以在路由器上使用,并以此制作 Shadowrocket、Quantumult、acl、v2rayNG、v2rayN、pac、NekoRay/NekoBox、Loon、RouterOS、v2rayA/dae 规则和 v2ray/xray 配置内嵌规则,包含 chn-ip 列表及少量广告屏蔽规则。每15天自动更新一次。

    可订阅规则:

    ios android 其他
    Shadowrocket acl (no ban ads) chnroute ipv4与ipv6 | ipv4 | ipv6
    Quantumult(X) (no chn-ip) pac (默认 socks5 localhost:1080)
    Loon v2rayN

    特殊规则集

    屏蔽 RULE-SEThttps://raw.githubusercontent.com/PaPerseller/chn-iplist/master/ruleset/reject-special.list
    直连 RULE-SEThttps://raw.githubusercontent.com/PaPerseller/chn-iplist/master/ruleset/direct-special.list
    代理 RULE-SEThttps://raw.githubusercontent.com/PaPerseller/chn-iplist/master/ruleset/proxy-special.list
    AI DOMAIN-SEThttps://raw.githubusercontent.com/PaPerseller/chn-iplist/master/ruleset/proxy-ai.list

    需手动更新:

    v2rayN(G)

    规则集 复制后在应用路由设置内点击“从剪贴板导入规则集”。可直接于 v2rayN 中订阅。

    v2ray/xray 配置内嵌规则

    规则文本加入配置文件 routing 对应区域。

    v2rayA/dae 分流规则

    规则文本替换入原有规则。

    RouterOS 中部署

    分别执行以下命令或将其保存为一个 script:

    /tool fetch url="https://hub.gitmirror.com/https://raw.githubusercontent.com/PaPerseller/chn-iplist/master/cn.rsc"
    /import file-name=cn.rsc
    /file remove [find name="cn.rsc"]
    

    PS.

    1. Shadowrocket、Loon 等有 ipv6 开关的,若服务器不支持 ipv6 且连接失败,请设为仅 ipv4。额外提供前缀为 IP-CIDRIP-CIDR6 两种远程 ipv6(no-resolve) 规则。
    2. Loon 配置文件为简洁配置,适用于自建节点。
    3. 对于已支持在线更新 geoip 数据的软件,本规则不再内置 cn-ip 列表。
    4. 为避免 Shadowrocket 配置在线更新时覆盖自定义规则,提供此精简配置模块;新建模块,复制内容后按需修改保存,切勿通过 URL 添加以防被重置,仅在需要自定义规则时使用。
    5. ROS 下载 cn.rsc 推荐 CDN 加速地址以提高下载成功率。
    6. sing-box 配置基于个人使用及反馈,仅供参考。因其配置语法或格式常变,本项目减少相关更新频率,不保证可用性。并注意,sing-box 虽集成丰富,但对部分协议的支持和跟进有限,选其作为主力工具前应仔细研究、斟酌考虑。
    7. v2raya 若使用 xray-core,建议参考 v2raya 官方文档 使用生命周期钩子脚本 python 版 shell 版将 domainMatcher 值设为 hybrid,若服务器已启用 tcpMptcp,则脚本中可选启用客户端 tcpMptcp。

    致谢

    Visit original content creator repository
    https://github.com/PaPerseller/chn-iplist

  • BallotBox

    Ballot Box

    A Lightning Web Component App for carrying out Voting among a Team. Exposed as a Public Site in Salesforce

    App Highlights

    This fun App provisions an Admin to create a Team with relevant Candidates who can Vote among themselves on Titles- All built on Salesforce!

    This App, when exposed as a public Salesforce Site, allows Users to cast their Vote using their configured Email Id in the Candidate records, without any Login hassle!

    The pre-built Voting rules are –

    • Voter can cast only one Vote per Title
    • Voter cannot vote for oneself in any of the Titles
    • Few Titles may have a pre-filtered list of Nominees, others will display all the Team Members

    Our recommendation is to share the Public Salesforce Site URL with the Users all at once to ensure Simultaneous Votes are being cast. After submitting their Vote, voters can see the Live Ballot Result charts against each Title. These get polled every 4 seconds and updates the charts accordingly in real-time, as shown below-

    Along with above result sharing, Salesforce Admin can also view the results in a Wall of Fame Ballot Box Dashboard as shown below –


    Installation & Site Setup

    The Setup steps are as below-

    1. Either Install this Unmanaged Package into your Salesforce Org, or follow below Deployment Steps.
    2. In App Launcher, select the Ballot Box app to view the Tab contents and create a Team record first, followed by Titles and Candidates. Remember to create Team Candidate records with a Unique Email ID that they will use in the Public Site to determine their voter identity.
    3. Create Data Records – Team , Team Candidates, Team Titles as shown below-

    1. If needed, you can create few Nominee records under the Titles so that only they show up as options during Voting and not All the Team Candidates. If no nominees created, then by default, All Candidates will be in the options list for That Title.
    2. You can preview how your configured data looks to an end user (Voter with a Candidate email) in the Vote Now! tab.
    3. As an Admin, Configure the Salesforce Site in your Salesforce Org as instructed separately below.

    Site Setup

    1. As a Salesforce Admin, Navigate to Setup-> Sites
    2. If you do not already have a domain name, you’ll be prompted to register a domain name first for your Site.

    You can enter your preferred value (say myballotbox) & check availability for your domain name and register it. If you already have a domain name, click on New button.

    1. On the New Site form, give it a Site label & name (say MyBallotBoxSite) and in the Default Web Address, form your site URL (say votenow)
    2. Mark the Active checkbox True and for the Active Site Home Page, search and select wbb_votepage Visualforce page. This page contains the created LWC to be used for Site
    3. Keep all other settings as default and Save your new Site. Based on your values, Your site URL will look something like this- https:// myballotbox-developer-edition.na##.force.com/votenow
    4. On the created Site, click on Public Access Settings to grant access to your Site’s Guest Profile.
    5. Under Profile’s Apex Class Access, grant access to wbb_VoteController Class
    6. Under Profile’s Visualforce Page Access, grant access to wbb_votepage VF page
    7. Under Profile’s Object Settings, give Read, View All access for Candidate, Nominee, Team & Title Objects. Grant All Read FLS.
    8. Under Profile’s Object Settings, give Read, Create, Edit for Vote Object. Grant All Read & Edit FLS.
    9. Preview your Site and try casting Votes as guest users now with the appropriate Candidate Email.
    10. Once the Site and Records are configured, you can share the Site Link with Voters and let the fun begin ! ✨

    Deployment

    If you are unable to Install this Unmanaged Package, then you can manually deploy the contents of this repository in your Developer Edition Org or a Sandbox-

    1. Clone this repository in your local machine:

      git https://github.com/sfwiseguys/BallotBox
      cd BallotBox
      
    2. Authorize your org and provide it with an alias (example mydevorg in the command below):

      sfdx force:auth:web:login -s -a mydevorg
      
    3. Run this command in a terminal to deploy this app in your Org

      sfdx force:source:deploy -p force-app
      
    4. If your org isn’t already open, open it now using this command:

      sfdx force:org:open -u mydevorg
      
      
    5. Post deployment, you can configure the Salesforce Site manually and set up the Data Records as instructed above and let the voting begin!


    Authors


    Support

    Reach out at one of the following places!


    License

    This project is licensed under the MIT License – see the LICENSE.md file for details

    Visit original content creator repository https://github.com/sfwiseguys/BallotBox