A powerful and friendly heuristic search library implemented in Java.
What’s Hipster4j?
The aim of Hipster4j is to provide an easy to use yet powerful and flexible type-safe Java library for heuristic search.
Hipster relies on a flexible model with generic operators that allow you to reuse and change the behavior of the algorithms very easily. Algorithms are also implemented in an iterative way, avoiding recursion. This has many benefits: full control over the search, access to the internals at runtime or a better and clear scale-out for large search spaces using the heap memory.
You can use Hipster4j to solve from simple graph search problems to more advanced state-space search problems where the state space is complex and weights are not just double values but custom defined costs.
Features
The current version of the library comes with some very well-known and wide used search algorithms. We’re working to add more algorithms soon:
Search algorithms:
Uninformed search:
DFS: Depth-First-Search.
BFS: Breadth-First-Search.
Dijkstra’s algorithm.
Bellman-Ford.
Informed search:
A star (A*).
IDA star (IDA*), Iterative Deepening A*.
AD star (AD*): Anytime Dynamic A*.
Local search:
Hill-Climbing.
Enforced-Hill-Climbing.
Multiobjective search
Multiobjective LS algorithm. Original paper: Martins, E. D. Q. V., & Santos, J. L. E. (1999). “The labeling algorithm for the multiobjective shortest path problem”. Departamento de Matematica, Universidade de Coimbra, Portugal, Tech. Rep. TR-99/005 (see an example)
If you don’t find the algorithm or the feature you are looking for, please consider contributing to Hipster!. You can open a new issue or better fork this repository and create a pull request with your contribution.
Getting started
The easiest way to use Hipster is adding it as a dependency with your favourite dependency manager.
Maven users can include the library using the following snippet:
Snapshots
You can use the latest (unstable) version of Hipster under development. Just add the following dependency into your pom.xml:
<!-- Use sonatype oss public for snapshots -->
<repositories>
<repository>
<id>sonatype-oss-public</id>
<url>https://oss.sonatype.org/content/groups/public/</url>
<snapshots>
<enabled>true</enabled>
</snapshots>
</repository>
</repositories>
<dependencies>
<!-- Add this dependency under your pom.xml <dependencies> section to add all the dependencies of Hipster to your project. Add hipster-core instead of hipster-all for basic functionality.-->
<dependency>
<groupId>es.usc.citius.hipster</groupId>
<artifactId>hipster-all</artifactId>
<version>1.0.2-SNAPSHOT</version>
</dependency>
</dependencies>
Releases
Current stable release is v1.0.1. See the milestones to check the current development status.
dependencies>
<!-- Add this dependency under your pom.xml <dependencies> section to add all the dependencies of Hipster to your project. Add hipster-core instead of hipster-all for core functionality.-->
<dependency>
<groupId>es.usc.citius.hipster</groupId>
<artifactId>hipster-all</artifactId>
<version>1.0.1</version>
</dependency>
</dependencies>
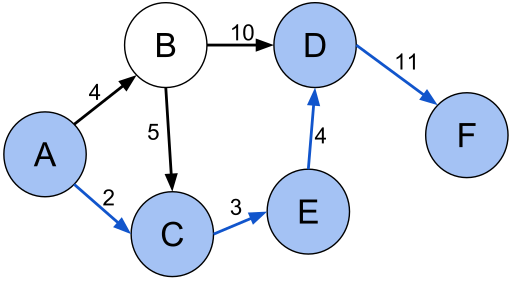
Although Hipster is graph agnostic, we include some useful classes to create a graph or a
directed graph and the search problem. We create a graph using the GraphBuilder class and then
we use the GraphSearchProblem to create the required components to solve it using Dijkstra’s algorithm:
// Create a simple weighted directed graph with Hipster where// vertices are Strings and edge values are just doublesHipsterDirectedGraph<String,Double> graph =
GraphBuilder.<String,Double>create()
.connect("A").to("B").withEdge(4d)
.connect("A").to("C").withEdge(2d)
.connect("B").to("C").withEdge(5d)
.connect("B").to("D").withEdge(10d)
.connect("C").to("E").withEdge(3d)
.connect("D").to("F").withEdge(11d)
.connect("E").to("D").withEdge(4d)
.createDirectedGraph();
// Create the search problem. For graph problems, just use// the GraphSearchProblem util class to generate the problem with ease.SearchProblemp = GraphSearchProblem
.startingFrom("A")
.in(graph)
.takeCostsFromEdges()
.build();
// Search the shortest path from "A" to "F"System.out.println(Hipster.createDijkstra(p).search("F"));
Output result:
`Total solutions: 1
Total time: 6 ms
Total number of iterations: 6
But that’s not all. Hipster comes with different problem examples
that illustrate how Hipster can be used to solve a wide variety of problems (not only graph search).
What’s next?
If you want to learn how to solve a problem by searching with Hipster, check the wiki and the JavaDoc documentation.
We also suggest you to check this presentation for a quick introduction.
License & Citation
This software is licensed under the Apache 2 license, quoted below.
Copyright 2013 Centro de Investigación en Tecnoloxías da Información (CITIUS),
University of Santiago de Compostela (USC).

Licensed under the Apache License, Version 2.0 (the "License");
you may not use this file except in compliance with the License.
You may obtain a copy of the License at

   http://www.apache.org/licenses/LICENSE-2.0

Unless required by applicable law or agreed to in writing, software
distributed under the License is distributed on an "AS IS" BASIS,
WITHOUT WARRANTIES OR CONDITIONS OF ANY KIND, either express or implied.
See the License for the specific language governing permissions and
limitations under the License.
Citation
This library was presented in the “9th Iberian Conference on Information Systems and Technologies (CISTI), 2014”. If you use this library in your research projects, we encourage you to please cite our work:
Rodriguez-Mier, P., Gonzalez-Sieira, A., Mucientes, M., Lama, M. & Bugarin, A. (2014). Hipster: An Open Source Java Library for Heuristic Search. 9th Iberian Conference on Information Systems and Technologies (CISTI).
@inproceedings{RodriguezMier2014,
  author = {Rodriguez-Mier, Pablo and Gonzalez-Sieira, Adrian and Mucientes, Manuel and and Lama, Manuel and Bugarin, Alberto},
  booktitle = {9th Iberian Conference on Information Systems and Technologies (CISTI 2014)},
  month = jun,
  volume = 1,
  title = {{Hipster: An Open Source Java Library for Heuristic Search}},
  pages = {481--486},
  isbn = "978-989-98434-2-4"
  address = "Barcelona",
  year = {2014}
}
SSH URLs provide access to a Git repository via SSH, a secure protocol. If you have a SSH key registered in your Github account, clone the project using this command:
git clone git@github.com:LauraBeatris/foodfy.git
Install dependencies
yarn install
Create your environment variables based on the examples of .env.example
cp .env.example .env
After copying the examples, make sure to fill the variables with new values.
🏃 Getting Started
Running with docker-compose
In order to prepare the database and also run the application, set your environment variables and then execute docker-compose
docker-compose up
With this command, the port seted in your environment PORT variable will be available to access the application.
Manually setup
You may prefer to manually configure the database and the application.
Install Postgres to create a database or if you have Docker in your machine, fill the environment values related to database configurations and the run the following commands in order to create a postgres container.
docker-compose up postgres
Execute the follow command to create tables, relationships and procedures:
yarn db:create
To start, run the seeds provided in Seeds in order to populate the database with an initial data.
yarn run:seeds
Run the following command in order to start the application in a development environment:
yarn dev
📮 Faq
Question: What are the technologies used in this project?
Answer: The tecnologies used in this project are NodeJS + Express Framework to handle the server, Nunjucks to develop amazing views & SCSS to handle the styles architecture and a better maintenance than normal CSS.
Question: How the multi language support is handled by the server?
Answer: This application handle multi language support with the help of a library called i18n-node. It has a middleware that gather language settings of visitors and then persist translations from JSON files related with a specific locale.
The locale is storaged as a cookie named foodfy:locale and that can be changed by passing a query string with the value ?lang=pt
Question: Are all kind of users able to create and update chefs or recipes?
Answer: The application has two kind of users: Visitors and Administrators. As a administrator, you’re able to create, update and view all the data related to recipes, chefs and also other users. Visitors can also access the admin platform but they don’t have access to the views responsable to create and update data.
🐛 Issues
Feel free to file a new issue with a respective title and description on the the Foodfy repository. If you already found a solution to your problem, i would love to review your pull request! Have a look at our contribution guidelines to find out about the coding standards.
🎉 Contributing
Check out the contributing page to see the best places to file issues, start discussions and begin contributing.
📕 License
Released in 2020.
This project is under the MIT license.
Idle time is duration the user is remaining inactive on the web page. During idle time, user does nothing on the web page, he/she may even away from the computer.
Many web apps, such as banking, gaming, etc. need to detect if the user is idle to increase performance, security, etc.
For high risky web apps, 2-3 minutes inactivity is risky, such as, finance apps, personal password vault apps, etc.
For low risky web apps, sometimes 15-20 minutes inactivity is OK., such as, news apps, blog apps, etc.
Also, many web apps, need to have some calls to the backend or need to establish communication channels to backend, but when user is idle, it doesn’t a requirement anymore. So, if the web app can detect the user is idle, then it can close communication channel and stop calling backend services to free-up resources on the backend side.
How to detect if the user is idle
When user is on the page, he/she usually use peripherals to interact with the page, such as, keyboard, mouse, touch screen, etc.
It’s possible to attach couple of Events from DOM API and reset the timer if one of them triggered. If nothing happened in the past for example 20 seconds, we can conclude that the user is idle.
Start by creating npm project with executing following command in your favorite Terminal (my favorite is Microsoft Terminal 😀)
npm init --force
It’s possible to develop code in Typescript and transpile the code to Javascript with webpack. In order to prepare the project for that, let’s add couple of DevDependencies;
Finally, it’ll be needed to produce and emit events to notify the page that user is inactive for certain amount of time, let’s add rxjs as a final dependency;
npm install rxjs
Now, we’re ready to develop code.
Since we’re good software engineers, we ❤ reusable code.
Now, we need a mechanism to prevent developers to instantiate the class more than 1 time. We’re going to handle this requirement by implementing Singleton Design Pattern;
That’s it for the IdleTimeOut component, continue with creating index.html file under src folder with following content;
<!DOCTYPE html><htmllang="en"><head><metacharset="UTF-8"><metaname="viewport" content="width=device-width, initial-scale=1.0"><title>Budapest - Detect if the user is idle</title></head><body><span>Idle time: </span><spanid="idle_time"></span></body></html>
Now, we can continue with creating index.ts file under src folder.
First of all, we need to importIdleTimeOut component;
We can call Reset() method and reset the idle timer programmatically;
IdleTimeOut.Current.Reset();
Also, we can attach to OnTick event and decide the actions, such as, when everything is fine, when to logout, etc.
IdleTimeOut.Current.OnTick.subscribe(seconds=>{console.log(IdleTimeOut.Current);if(seconds<=4){$idle_time.innerText='everything is fine! 😀';}elseif(seconds>20){document.location.href="https://github.com/logout";}else{$idle_time.innerText=`page has not been used for ${seconds} seconds`;}});
An intelligent interface project targeted towards educating people of different ages about when and why to use antibiotic medication.
This will be done by educating users through the use of a simple to use chat-bot which will answer varied questions relating to antibiotics and its use.
Antibiotic overuse breeds treatment resistance. This is a global problem that is rapidly increasing and threatens our ability to treat common infectious diseases.
According to the World Health Organisation: “Antimicrobials – including antibiotics, antivirals, antifungals and antiparasitics – are medicines used to prevent and treat infections in humans, animals and plants.”
Excessive antibiotic use leads to heightened drug resistance, impacting treatment efficacy and complicating infection management, posing severe health risks.
Antimicrobial Resistance (AMR) generates drug-resistant organisms globally, limiting treatment options, inflating healthcare costs, and elevating risks during medical procedures, necessitating urgent prevention and treatment strategies.
Proposed Solution
Antibio Advisor, a web app tailored for individuals 18 or older but available for all. Our web app offers an array of vital features: an intelligent chatbot for medical guidance, an interactive map to locate pharmacies and general practitioners, and a comprehensive term guide.
Prioritising user awareness, our platform provides essential information in the form of a FAQs page, an informative Quiz and a prescription info page.
The web app features mentioned above needed to be implemented in such a manner that they are easily accessible and usable. This was facilitated through a variety of different features such as:
Web Page Demo which guides the user on proper usage of applicable web pages.
Dynamic page size applicable for use with computers, mobile devices and tablets.
Colourful and simple interface to ensure easy navigation.
Elderly individuals were also considered through the use of a large font to ensure ease of use.
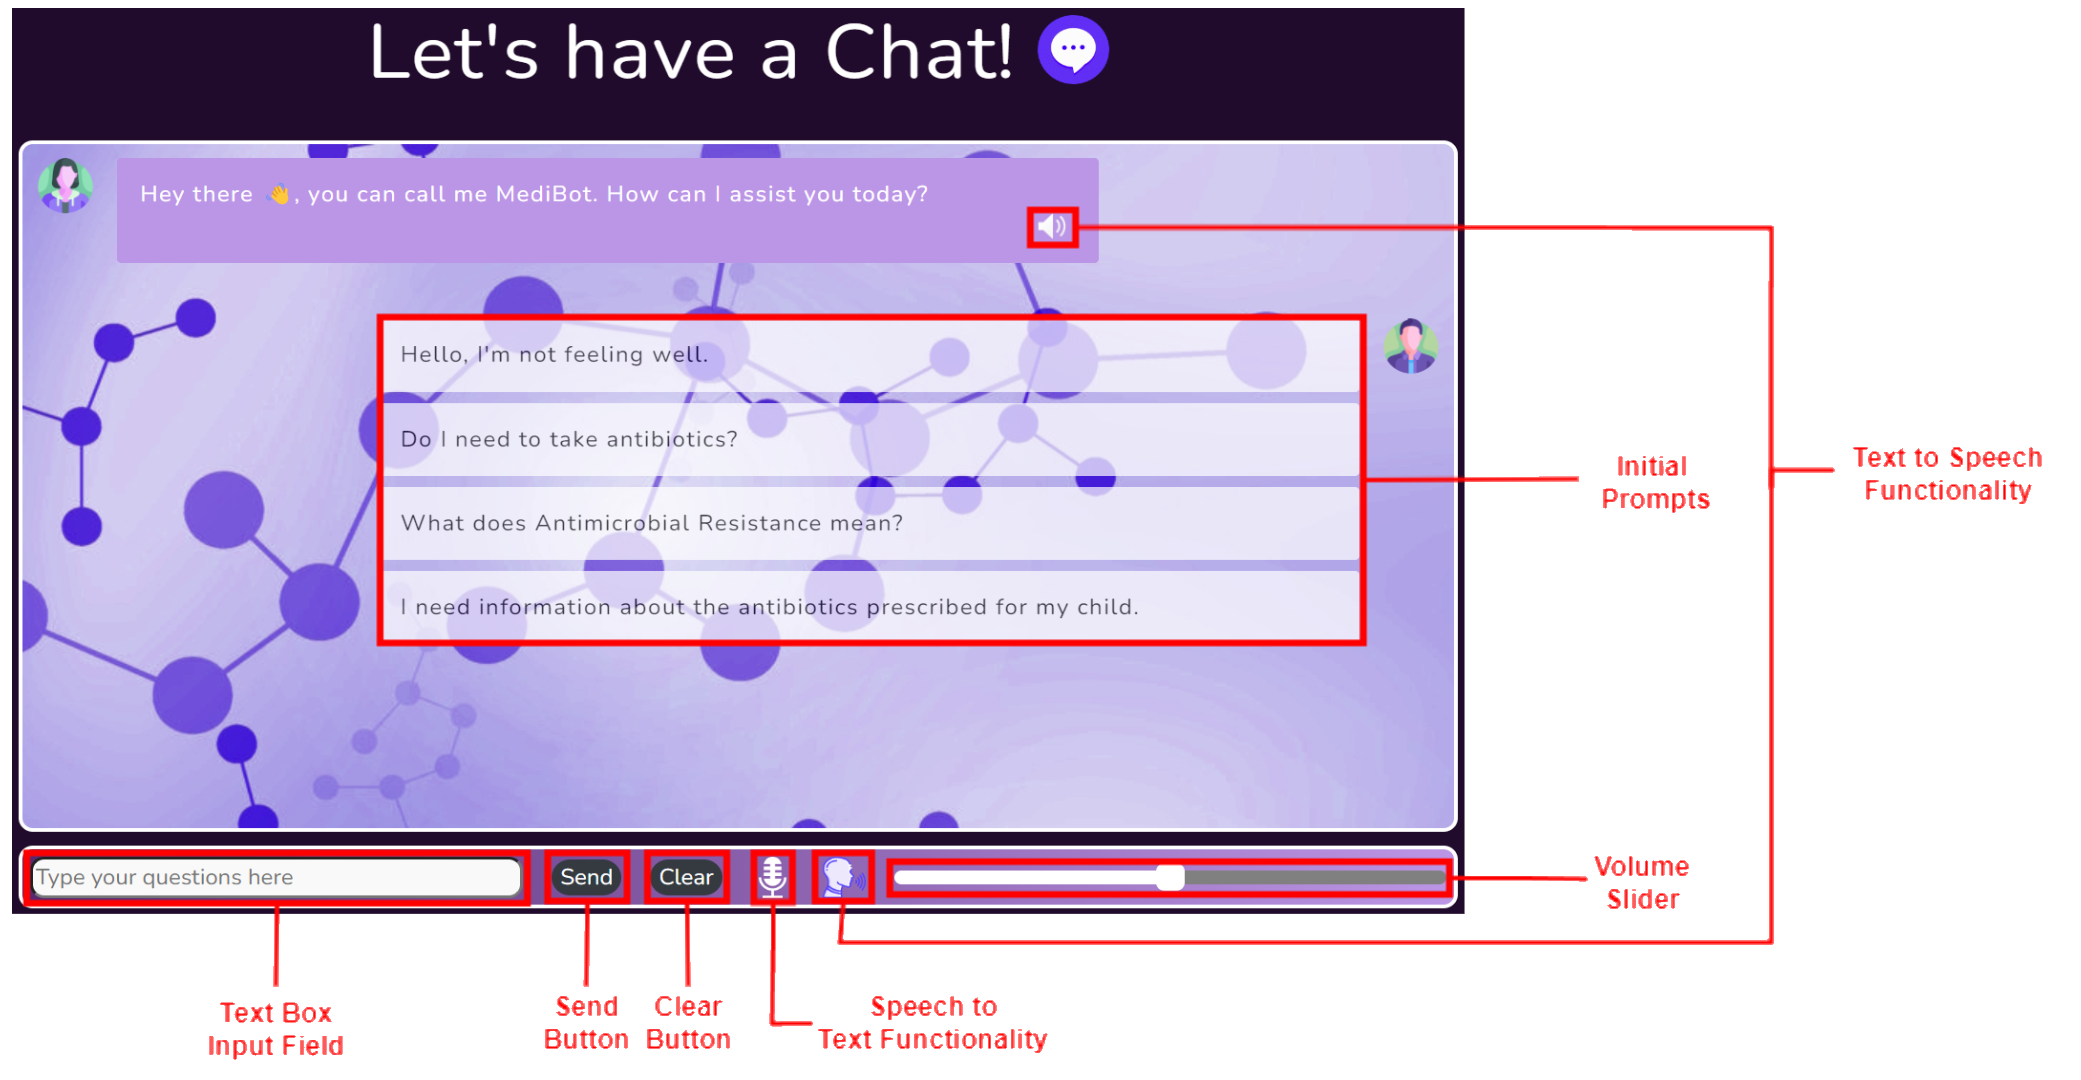
Chatbot
As outlined above the chatbot has a myriad of different features ranging from:
Set of initial prompts aimed at providing the user with a possible conversation starter.
Clear button allowing the user to clear the current conversation and start afresh.
Speech to text button allowing to use voice to communicate with the chatbot directly.
Text to Speech button and volume slider allowing users to have messages read out loud.
These features and the general chatbot layout was selected whilst keeping the possible users in mind to ensure a pleasant user experience. Additionally the UIs adaptability to different screen sizes maintains the ease of use of the chatbot and its features.
FAQ
The FAQ page is composed of a variety of relevant questions sorted according to relevant age groups these being General, Adult, Child, Elderly. This is done as certain knowledge is more applicable to certain age demographics. Additionally the FAQ can be sorted in accordance with the symptoms these being General, Cough, Rash, Skin Condition.
Further adding to the intractability of the webpage each question only displays the answer when selected by the user. This can be seen in the image showcased in this slide.
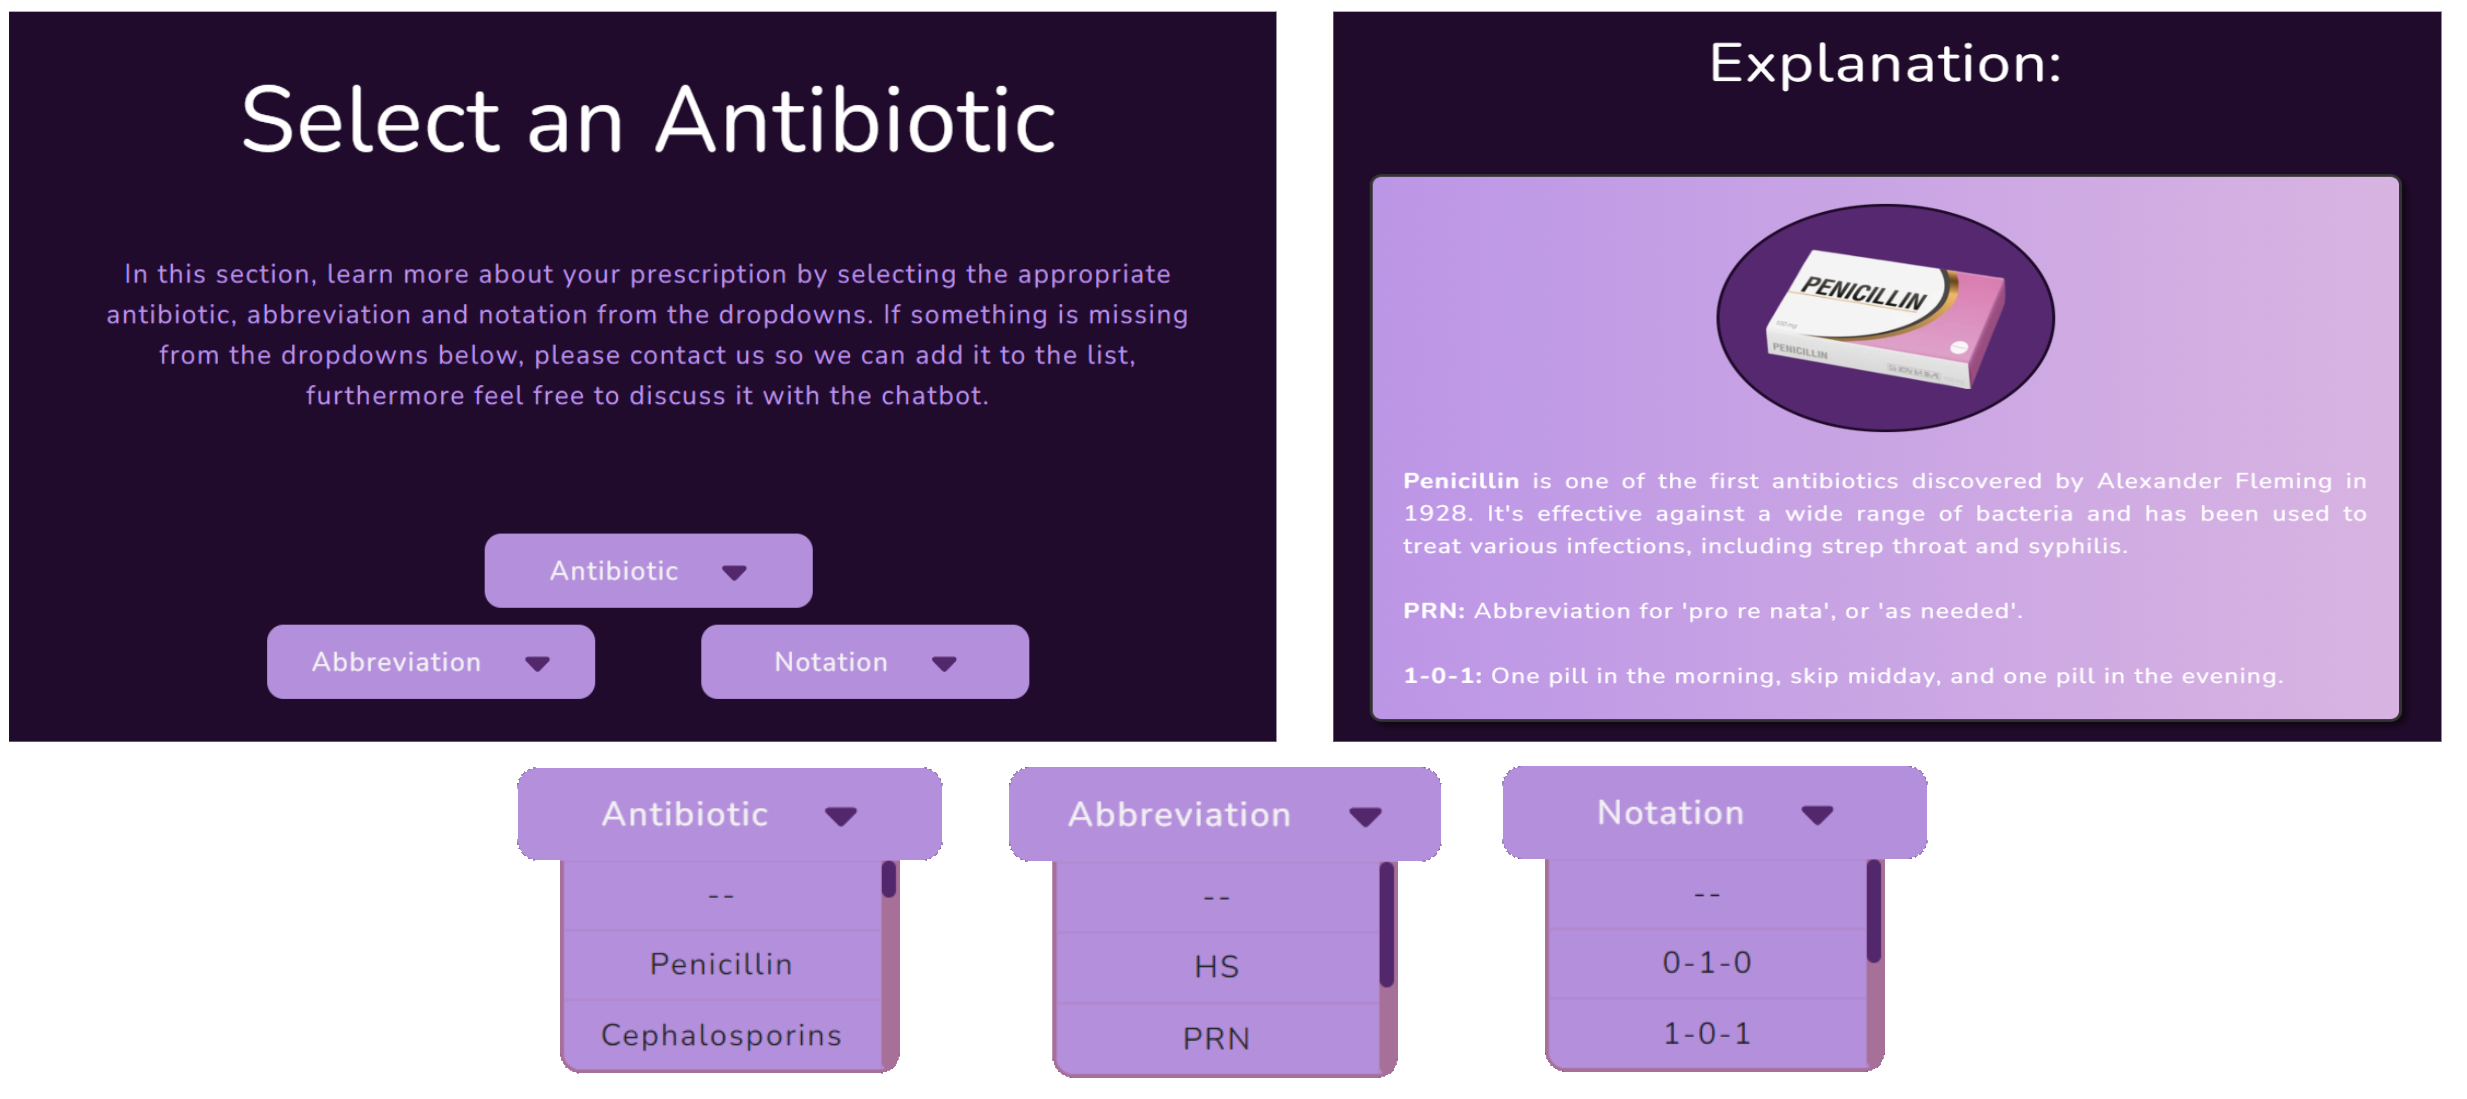
Prescription Info
The main components of the Prescription Info page showcased here consist of three dropdowns relating to the antibiotic name, abbreviations and notations used by doctors when prescribing medicine.
These dropdowns when appropriately selected provide the user with explanations regarding their antibiotics and the relevant dosages as denoted by a medical professionals prescription notation.
The dropdowns in addition to a sample explanation can be seen below.
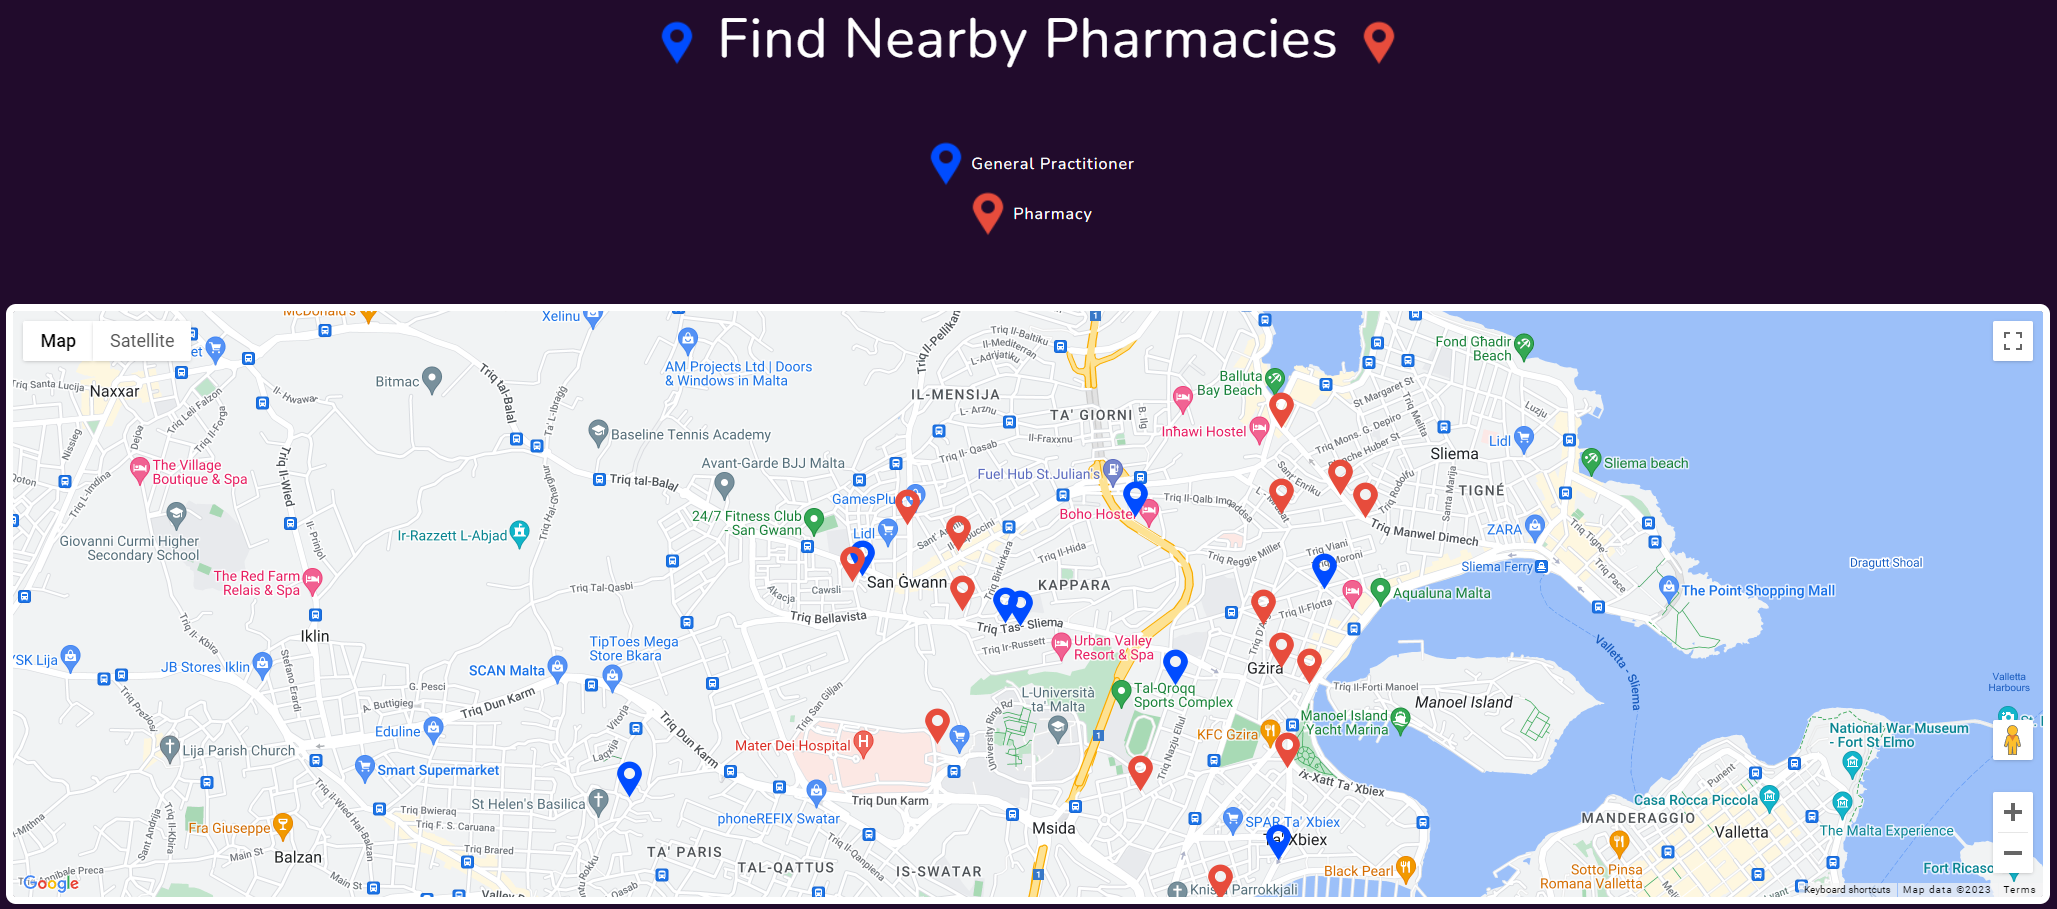
Map
The map was designed to showcase the users nearest pharmacies and general practitioners, this was carried out to provide the user with all the required information they might require to purchase, enquire or return unused antibiotics. In the map the blue markers represent general practitioners and the red markers represent pharmacies.
Learn More
The Learn More page similar to the FAQ page provides the user with a further degree of general information on the topic of AMR in contrast to the specific information presented in the FAQ page.
This page contains an informative video alongside an interactive carousel composed of several infographics and informative paragraphs.
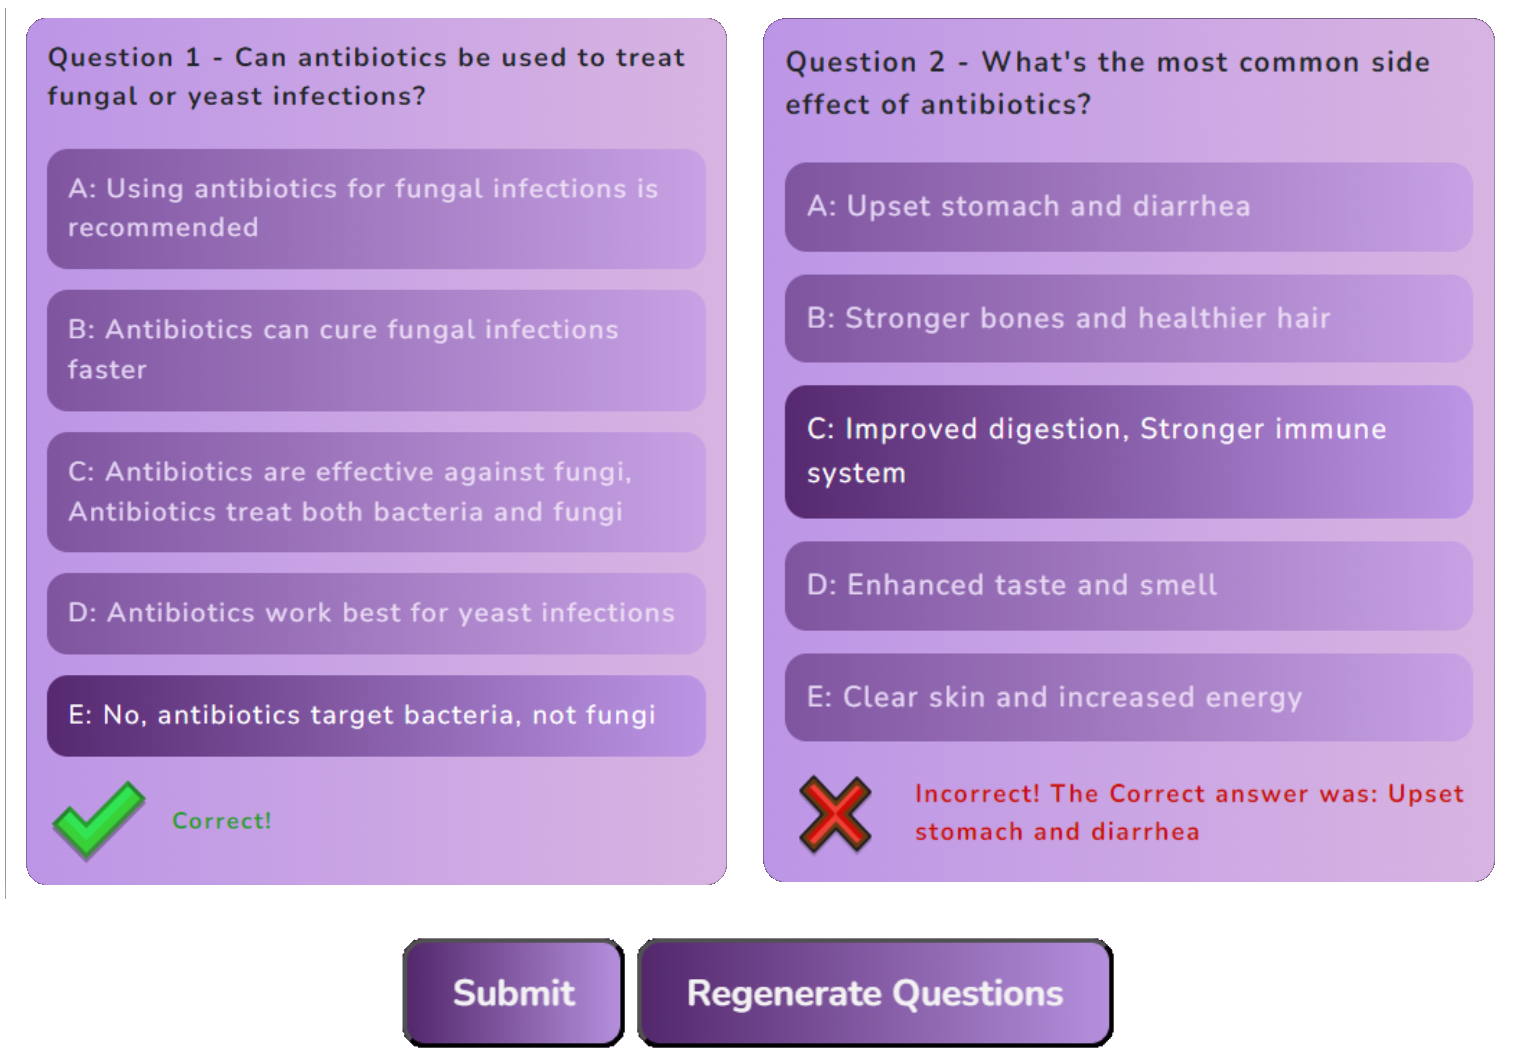
Quiz
The webapp also includes a quiz web page which compiles four questions from a possible set. This provides users a fun and engaging manner by which they can test their knowledge on AMR. Upon submitting the quiz users are provided with the correct answer where applicable in addition to a score showcased below. Furthermore the quiz can be regenerated multiple times and additional question can easily be added through the editing of a simple .json file.
Ethical Considerations
The website is not intended to replace medical advice, and the chatbot is not a substitute for a doctor. The chatbot is intended to provide general information and guidance on antibiotics and their use. Additionally, a disclaimer is provided on the chatbot page to ensure that users are aware of the chatbot’s limitations.
Moreover, no user data is stored or kept, ensuring that no chatbot history or personal information is stored on the platform or any cloud storage system.
Mobile Functionality
The web app is designed to be used on a variety of different devices ranging from mobile phones to tablets and computers. This is achieved through the use of a dynamic page size which adapts to the screen size of the device being used. This ensures that the web app is usable on a variety of different devices and maintains the ease of use of the web app.
Interactable Design
The web app offers feedback to the user in the form of different bot expressions. This is achieved through the use of different images which are displayed depending on the current state of the demo bot.
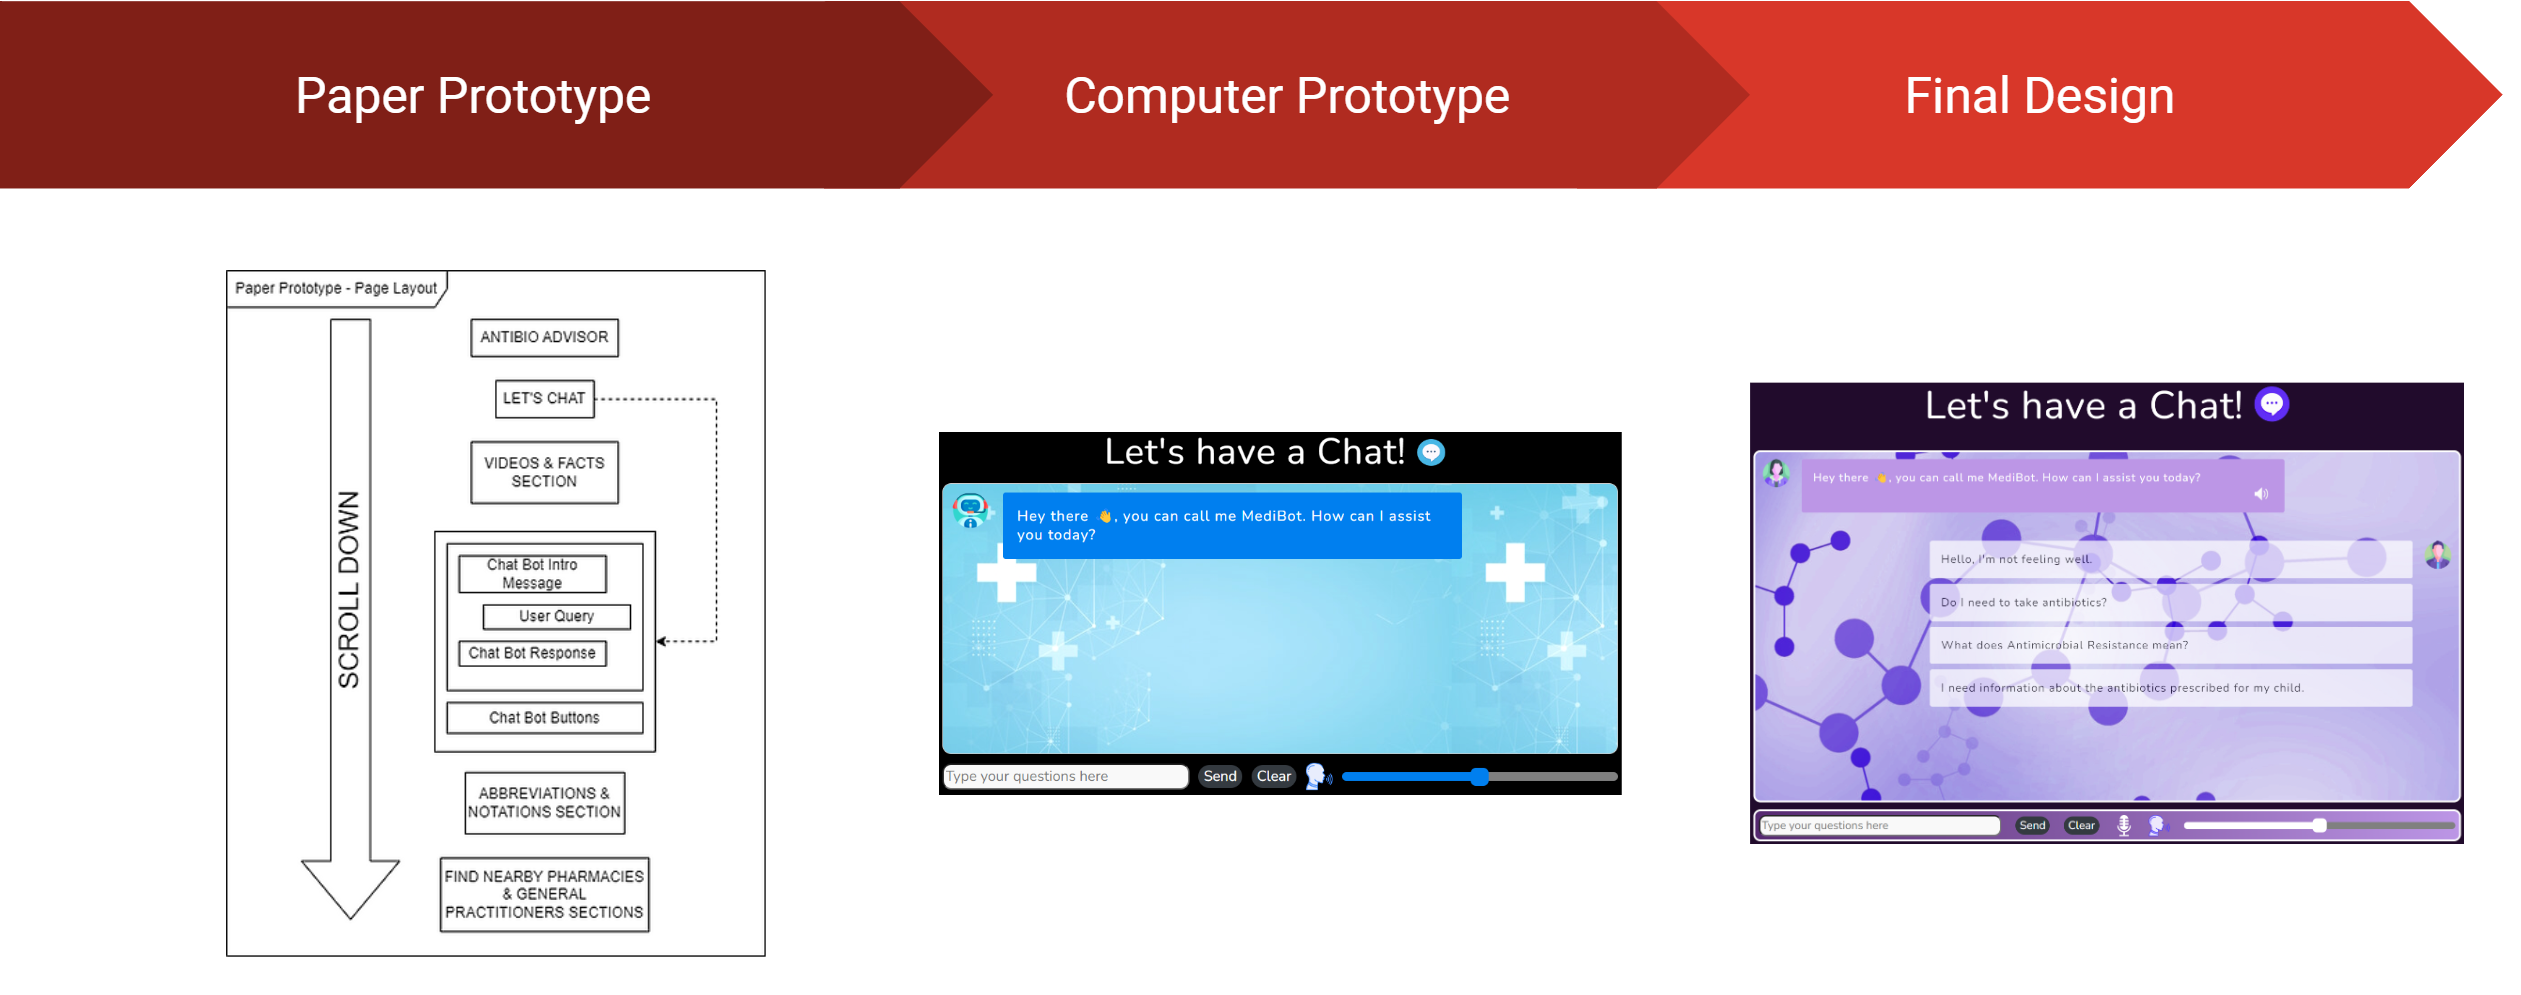
A Good Design takes a lot of Effort, Feedback and Time
The design of the web app was a long and arduous process which required a lot of effort and feedback. The design process was broken down into 3 main stages:
Paper Prototyping – This stage involved the creation of a paper prototype which was used to gather feedback from potential users. This feedback was then used to improve the design of the web app.
Computer Prototyping – This stage involved the creation of a computer prototype which was used to gather feedback in the form of recommendations and improvements. This feedback was then used to improve the design of the web app. Additionally, in this stage improvements from the previous stage were implemented into the design.
Final Design – This stage involved the creation of the final design which utilised the feedback gathered from the previous stages to create a final design which was then implemented into the web app.
Libraries used
The following libraries were used in the development of the web app:
If you used this project prior to 2025-11-11, it’s been redesigned. I realised that making this a library was over-engineered. The amount of code it took to invoke it was almost as much as the code in the project itself, and it still wasn’t flexible enough for people’s needs. It’s now a template that’s designed to be copied and fiddled with to make it work for your website.
hakyll-flakes
This repo is a template that reflects how I build my hakyll website using Nix.
To use it, copy the flake.nix into your own project or adapt it to fit with what you already have in your flake.nix. There isn’t much code, and I recommend you read through it to get an idea of what it does.
You can take inspiration also from the rest of the repository if it’s helpful, though it was mostly just generated with hakyll-init so that it constituted a complete example.
If you want to start a fresh project, it may be useful to run nix flake init -t github:radvendii/hakyll-flakes in an empty directory, though it just copies the whole repo in there.
Before you start, you will probably want to change the name in flake.nix and package.yaml to something more personalized than my-website.
The outputs of flake.nix are designed to be used in the following ways:
nix build .#website (or just nix build) goes through the whole process and produces a result/ symlink with your compiled static website inside.
nix build .#builder this builds the website builder, your hakyll-based site.hs file. You can find it at result/bin/<project name>.
nix run -- watch This will compile and run your website builder, creating the _site directory and loading the website at localhost:8000. It will also rebuild the website if you change the files (but not if you change site.hs)
nix develop – this will provide you with the inputs you need to build the website in your $PATH. Also gives you what you need to set up the haskell LSP for your editor with all of your haskell packages available.
phenOncoX – crossmapped phenotype ontologies for cancer
Overview
An ontological definition of disease enables each type of disease to be
singularly classified in a formalized structure. By intention, the use of
disease ontology terms should facilitate a cross-link of information between
separate disease-related knowledge resources for a given domain.
In order to integrate such knowledge resources, there is henceforth a need
to cross-link or map the entries across disease ontologies to the extent it
is possible.
phenOncoX is an R data package that attempts to address this challenge.
In short, phenOncoX provides a global cross-mapped set of phenotype
ontology terms attributed to cancer phenotypes.
The mapping established within phenOncoX is semi-manually curated,
using OncoTree as the starting point
for a list of UMLS phenotype terms per cancer
subtype/primary site. Next, phenOncoX appends a number of phenotypes
attributed to heritable cancer conditions. Furthermore, each cancer subtype
entry in OncoTree is expanded with additional subtypes that are found in
the UMLS child-parent hierarchy of disease terms.
For each entry in the final list of phenotype terms, we make cross-mappings
with phenotype terms from EFO, DO, and
the ICD10 classification.
As of early December 2025, the following ontology versions are used to create the mapping:
OncoTree (2025_10_03)
Experimental Factor Ontology v3.84.0 (2025-11-17)
Disease Ontology (v2025-11-25)
IMPORTANT NOTE: The mapping established by phenOncoX attempts
to be comprehensive, but we acknowledge that the presence of missing or
erroneous cross-references might still occur.
This guide will teach how you can store multiple variables inside a single variable, with the use of some functions. This way you can exceed the amount of maximum amount of variables by storing much information inside a variable.
In this guide we’ll learn to setup some basic economy commands along with other useful commands a normal bot would have (levelling up, shop with buy, balance, deposit and withdraw + bank limit).
I’m looking forward to see people actually understanding what this Guide is, so I will do my best to explain how everything based on “TextSplit” Variables works.
This is the very beginning of using a Textsplit variable.
For this, first of all you have to use the $textSplit function to split the values of a variable.
You’ll have to make a variable named anything preferable to you. This will be the variable we’ll use to make multiple variables. This is how the function would look like, when splitting the values inside the variable:
$textSplit[$getVar[VARIABLE;$authorID];.]
Since the variable we’re using will have multiple variables stored, this is how the default value should look:
This is how the value should look like, with each variables getting split by .
Each 0 represent each variable, so let’s just memorize what each variable is.
The first two zeroes are “money” and “bank”.
The next two zeroes are “bank limit” and “xp” (xp of user).
The rest of the zeroes are “req-exp” (required exp) and “level” (current level).
So now we have made 6 variables, we can now modify the values, and use it accordingly.
If you ever want to add more variables, just add . (the splitter to split the values) and then add values for each variable. Remember to keep an eye on the values because since we’re using Global variables, the maximum limit is 499 characters.
$editSplitText
This is how we modify each values once a variable is split using $textSplit. This is how the function is used:
This sets the value of the “money” variable to “1000”. So now we have the “money” variable with value “1000”.
An Index is a number that tells you which part of a split you want to use/modify.
Since “money” is 1, “bank” is 2, “bank-limit” is 3 and so on, each split has a number.
Value
The Value of an index is the text you want to replace with.
The example for this can be seen above this section.
$joinSplitText
$joinSplitText joins the split text with whatever you specify inside the value. Usage:
Never forget to use $joinSplitText inside $setVar. Make sure the joiner inside the argument should be whatever you’re splitting the variable with, or it would throw an error later.
For example:
$textSplit[$getVar[VARIABLE;$authorID];.]
$editSplitText[1;200] $c[setting value for "money" as 200.]
$setVar[VARIABLE;$joinSplitText[.];$authorID]
Always remember to use $joinSplitText inside $setVar with what you’re splitting the variable with.
$splitText
$splitText returns the value of the Index set inside the arguments. For example:
$textSplit[I-Love-Anime;-]
$splitText[2]
It will return: Love.
This will be pretty useful when using TextSplit Variables and to return values of a specific Index.
Now let’s try retrieveing the Value of our variable we created before:
Now that we’ve learned some functions of $textSplit and it’s relatives, let’s now try making the commands using these.
Balance Command
This is how a simple Balance code would look like:
$textSplit[$getVar[VARIABLE;$mentioned[1;yes]];.]
$if[$splitText[3]==0]
$editSplitText[3;1000]
$c[set the current bank limit value to 1000 if the value is 0. (thats the default, you can change it)]
$setVar[VARIABLE;$joinSplitText[.];$authorID]
$endif
Balance: $$numberSeparator[$splitText[1]]
Bank: $$numberSeparator[$splitText[2]]/$$numberSeparator[$splitText[3]]
This command shows how much balance and Bank balance you have, along with Bank Capacity.
I also set if so that the current value of maximum bank limit is 0, it will be set to 1000 (you can change this value, or set in manually through the app and remove that part of the code).
Always remember to use:
$textSplit[$getVar[VARIABLE;$authorID];.]
At the top of your code wherever you use TextSplit Variables, so the bot understands what variable to be split and to be retrieved.
Deposit Command
Now let’s see how we can make a Deposit command with TextSplit Usage. For this, start off with $textSplit:
$nomention
$textSplit[$getVar[VARIABLE;$authorID];.]
$if[$splitText[3]==0]
$editSplitText[3;1000]
$c[set the current bank limit value to 1000 if the value is 0. (thats the default, you can change it)]
$setVar[VARIABLE;$joinSplitText[.];$authorID]
$endif
$onlyIf[$isNumber[$message]==true;You can only deposit money in numbers.]
$onlyIf[$message!=;Include how much do you want to deposit.]
$onlyIf[$message<=$splitText[1];Your amount should not exceed how much money you have!]
$onlyIf[$message>0;Your amount should be greater than 0.]
$onlyIf[$splitText[2]<$splitText[3];Your maximum Bank Limit reached. You cannot deposit anymore.]
$onlyIf[$splitText[2]!=$splitText[3];Your maximum Bank Limit reached. You cannot deposit anymore.]
$onlyIf[$splitText[1]>0;You don't have any money in balance to deposit.]
$onlyIf[$message<=$splitText[3];You cannot exceed your bank limit.]
$onlyIf[$sum[$splitText[2];$message]<=$splitText[3];You cannot exceed the bank limit.]
$reply
$allowUserMentions[]
$username, you deposited **$$message** into the bank.
$editSplitText[2;$sum[$splitText[2];$message]]
$editSplitText[1;$sub[$splitText[1];$message]]
$setVar[VARIABLE;$joinSplitText[.];$authorID]
$c[always remember to use joinSplitText after setting values.]
That’s it, pretty easy right? The withdraw command is easy too. Just like this, vice versa and not much limiters related to bank limit, since we’re not gonna need that for withdrawing.
Withdraw Command
A simple withdraw command would look like this:
$nomention
$textSplit[$getVar[VARIABLE;$authorID];.]
$if[$splitText[3]==0]
$editSplitText[3;1000]
$c[set the current bank limit value to 1000 if the value is 0. (thats the default, you can change it)]
$setVar[VARIABLE;$joinSplitText[.];$authorID]
$endif

$onlyIf[$message!=;Include how much do you want to withdraw.]
$onlyIf[$splitText[2]>0;You don't have any money in the bank to withdraw.]
$onlyIf[$message<=$splitText[2];You cannot withdraw more than you have in the bank.]
$onlyIf[$message>0;Your amount should be greater than 0.]
$onlyIf[$isNumber[$message]==true;Your amount should be in numbers.]
$username, you withdrawn **$$message** from the bank.

$editSplitText[1;$calculate[$splitText[1]+$message]]
$editSplitText[2;$calculate[$splitText[2]-$message]]
$setVar[VARIABLE;$joinSplitText[.];$authorID]
Just that’s it, now you have a working withdraw, deposit and balance command with bank limit all in a single variable!
Now, let’s learn how we can make Levelling System with the rest of the variables we made before.
Now let’s see how we can make a Level Up checker, that checks if the user has reached X amount of exp, so that the user will advance to the next level, using the variables made inside the main variable.
Level Up Checker
This checks if the User has exceeded the amount of “Required XP” variable, and if they did, they are advanced to the next level.
$nomention
$textSplit[$getVar[VARIABLE;$authorID];.]
$if[$splitText[6]==0] $c[Since the default value is set 0, let's check if it's 0, the level is set to 1, and Required EXP is set to the amount you want. For me, I'm setting "100" as the Level 1 required EXP.]
$editSplitText[6;1]
$editSplitText[5;100] $c[required EXP set to 100 now.]
$setVar[VARIABLE;$joinSplitText[.];$authorID] $c[saving the variable]
$endif
$c[I'm also going to copy paste the "bank limit" checker below so it checks if it's 0, it sets to 1000. You can defaultly change the values of these variables right in the app so you don't want to put these lines of code everytime you make a command.]
$if[$splitText[3]==0]
$editSplitText[3;1000]
$c[set the current bank limit value to 1000 if the value is 0. (thats the default, you can change it)]
$setVar[VARIABLE;$joinSplitText[.];$authorID]
$endif
$if[$splitText[4]>=$splitText[5]]
$c[if XP reaches or goes more than Required EXP]
$editSplitText[6;$sum[$splitText[6];1]] $c[Increases Level by 1 each time user levels up.]
$editSplitText[4;0] $c[EXP set to 0 once leveled up.]
$editSplitText[5;$sum[$splitText[5];100]] $c[Required XP set to +100 while every time user levels up.]
$setVar[VARIABLE;$joinSplitText[.];$authorID]
$endif
That’s it, it was this simple. If you don’t want to always copy paste the “bank limit” and Level checker everytime when making a new command, you can defaultely set the values to whatever you want in the app, so you don’t want to get annoyed, like this:
In this image, I’ve set default values of Bank Limit to 1000, Required EXP to 100 and Level to 1, so I don’t want to copy paste the code to manually check it.
That’s it, now let’s focus on the final command: Shop Command.
Shop Command
For this, we have to make a seperate variable for adding the following items:
Apple
Banana
Watermelon
Orange
Mango
These are some example items that I’m going to add in the shop, you can customize or rename these items to what you want. This is just for an example as this is a Guide. So now, I’m going to create a new variable named “ITEMS” with the Value set the following:
There are 5 variables, with them being seperated again with .
Since there are 5 fruits that are being added in the shop, 5 variables with each having a seperator as . between them.
TO REMEMBER:
DO NOT add the seperator at the beginning of the Variable Value (Before the first variable) and at the end of the variable (After the last variable), unless you’re planning to make empty valued variables.
This is how the code looks like, with adding basic embed examples:
$nomention
$reply
$allowUserMentions[]
$title[Shop]
$description[

Mango: $30
Apple - $50
Banana - $60
Orange - $90
Watermelon - $120]
$footer[$username]
$addTimestamp
$color[00ff00] $c[adding color for a clean shop]
There. Since it’s a pretty visual code and there’s nothing to be done in it, there’s only a title, description, color and a timestamp put in the code, not too much detail. You can make the shop command anyway you like.
Buy Command
This is a basic buy command that checks if the item exists in the shop, and if not then it outputs an error message.
$nomention
$reply
$allowUserMentions[]
$textSplit[$getVar[VARIABLE;$authorID];.]
$var[money;$splitText[1]]
$onlyIf[$message!=;What do you want to buy from the Shop?]
$if[$toLowercase[$message]==mango]
$onlyIf[$var[money]>=30;You need $30 to buy a Mango.] $c[checking if the user has money.]
$username, you bought a **Mango** for **$30**.
$textSplit[$getVar[ITEMS;$authorID];.]
$editSplitText[1;$sum[$splitText[1];1]] $c[Increases 1 per each purchase.]
$setVar[ITEMS;$joinSplitText[.];$authorID] $c[saving it]
$textSplit[$getVar[VARIABLE;$authorID];.]
$editSplitText[1;$sub[$splitText[1];30]] $c[Removing $30 from User's balance.]
$setVar[VARIABLE;$joinSplitText[.];$authorID] $c[saving the variable.]

$elseif[$toLowercase[$message]==apple]
$onlyIf[$var[money]>=50;You need $50 to buy an Apple.] $c[checking if the user has money.]
$username, you bought an **Apple** for **$50**.
$textSplit[$getVar[ITEMS;$authorID];.]
$editSplitText[2;$sum[$splitText[2];1]] $c[Increases 1 per each purchase.]
$setVar[ITEMS;$joinSplitText[.];$authorID] $c[saving it]
$textSplit[$getVar[VARIABLE;$authorID];.]
$editSplitText[1;$sub[$splitText[1];50]] $c[Removing $50 from User's balance.]
$setVar[VARIABLE;$joinSplitText[.];$authorID] $c[saving the variable.]

$elseif[$toLowercase[$message]==banana]
$onlyIf[$var[money]>=60;You need $60 to buy a Banana.] $c[checking if the user has money.]
$username, you bought a **Banana** for **$60**.
$textSplit[$getVar[ITEMS;$authorID];.]
$editSplitText[3;$sum[$splitText[3];1]] $c[Increases 1 per each purchase.]
$setVar[ITEMS;$joinSplitText[.];$authorID] $c[saving it]
$textSplit[$getVar[VARIABLE;$authorID];.]
$editSplitText[1;$sub[$splitText[1];60]] $c[Removing $60 from User's balance.]
$setVar[VARIABLE;$joinSplitText[.];$authorID] $c[saving the variable.]

$elseif[$toLowercase[$message]==orange]
$onlyIf[$var[money]>=90;You need $90 to buy an Orange.] $c[checking if the user has money.]
$username, you bought an **Orange** for **$90**.
$textSplit[$getVar[ITEMS;$authorID];.]
$editSplitText[4;$sum[$splitText[4];1]] $c[Increases 1 per each purchase.]
$setVar[ITEMS;$joinSplitText[.];$authorID] $c[saving it]
$textSplit[$getVar[VARIABLE;$authorID];.]
$editSplitText[1;$sub[$splitText[1];90]] $c[Removing $90 from User's balance.]
$setVar[VARIABLE;$joinSplitText[.];$authorID] $c[saving the variable.]

$elseif[$toLowercase[$message]==watermelon]
$onlyIf[$var[money]>=120;You need $120 to buy a Watermelon.] $c[checking if the user has money.]
$username, you bought a **Watermelon** for **$120**.
$textSplit[$getVar[ITEMS;$authorID];.]
$editSplitText[5;$sum[$splitText[5];1]] $c[Increases 1 per each purchase.]
$setVar[ITEMS;$joinSplitText[.];$authorID] $c[saving it]
$textSplit[$getVar[VARIABLE;$authorID];.]
$editSplitText[1;$sub[$splitText[1];120]] $c[Removing $120 from User's balance.]
$setVar[VARIABLE;$joinSplitText[.];$authorID] $c[saving the variable.]

$else
Couldn't find the item you're looking for.
$endif
This is a basic buy command with the existing items I added in my shop command. You can replace my Items with your Items and Price, since the Shop and Buy Command are pretty self explanatory. If you ever felt like making an advance Server Shop Setup that the Shop can be customized for each server, I had posted a wiki in the Official BDFD Server. You can integrate those codes with this to make this more better.
With this method, you can make over 50 variables in a single variable (55 to be exact), with each variable holding approximately 8 characters long values.
I guess that’s it, thank you for following the whole Guide, and those who read the whole Guide until here, you’re a real one. Whole Guide done by: kitten_tenacious
If you ever face any error, please DM me or create a forum in Support then ping me. I hope you understand this Guide, because this can be a pretty save for your variables.
This package exports a single dropcap function that is used to create dropped capitals. The function takes one or two positional arguments, and several optional keyword arguments for customization:
Parameter
Type
Description
Default
height
integer, length, auto
The height of the dropped capital.
2
justify
boolean, auto
Whether the text should be justified.
auto
gap
length
The space between the dropped capital and the text.
0pt
hanging-indent
length
The indent of lines after the first.
0pt
overhang
length, relative, ratio
How much the dropped capital should hang into the margin.
0pt
depth
integer, length
The space below the dropped capital.
0pt
transform
function, none
A function to be applied to the dropped capital.
none
..text-args
How to style the text of the dropped capital.
Some parameters allow values of different types for maximum flexibility:
If height is given as an integer, it is interpreted as a number of lines. If given as auto, the dropped capital will not be scaled and remain at its original size.
If overhang has a relative part, it is resolved relative to the width of the dropped capital.
If depth is given as an integer, it is interpreted as a number of lines.
The transform function takes the extracted or passed dropped capital and returns the content to be shown.
If two positional arguments are given, the first is used as the dropped capital, and the second as the text. If only one argument is given, the dropped capital is automatically extracted from the text.
Extraction
If no explicit dropped capital is passed, it is extracted automatically. For this to work, the package looks into the content making up the first paragraph and extracts the first letter of the first word. This letter is then split off from the rest of the text and used as the dropped capital. There are some special cases to consider:
If the first element of the paragraph is a box, the whole box is used as the dropped capital.
If the first element is a list or enum item, it is assumed that the literal meaning of the list or enum syntax was intended, and the number or bullet is used as the dropped capital.
Affixes, such as punctuation, super- and subscripts, quotes, and spaces will also be detected and stay with the dropped capital.
Paragraph Splitting
To wrap the text around the dropped capital, the paragraph is split into two parts: the part next to the dropped capital and the part after it. As Typst doesn’t natively support wrapping text around an element, this package splits the paragraph at word boundaries and tries to fit as much in the first part as possible. This approach comes with some limitations:
The paragraph is split at word boundaries, which makes hyphenation across the split impossible.
Some elements cannot be properly split, such as containers, lists, and context expressions.
The approach uses a greedy algorithm, which might not always find the optimal split.
If the split happens at a block element, the spacing between the two parts might be off.
To determine whether an elements fits into the first part, the position of top edge of the element is crucial. If the top edge is above the baseline of the dropped capital, the element is considered to be part of the first part. This means that elements with a large height will be part of the first part. This is done to avoid gaps between the two parts of the paragraph.
Styling
In case you wish to style the dropped capital more than what is possible with the arguments of the text function, you can use a transform function. This function takes the extracted or passed dropped capital and returns the content to be shown. The function is provided with the context of the dropped capital.
Note that when using em units, they are resolved relative to the font size of the dropped capital. When the dropped capital is scaled to fit the given height parameter, the font size is adjusted so that the bounds of the transformed content match the given height. For that, the top-edge and bottom-edge parameters of text-args are set to bounds by default.
Example
#import"@preview/droplet:0.3.1": dropcap#setpar(justify: true)
#dropcap(
height: 3,
gap: 4pt,
hanging-indent: 1em,
overhang: 8pt,
font: "Curlz MT",
)[
*Typst* is a new markup-based typesetting system that is designed to be as
_powerful_ as LaTeX while being _much easier_ to learn and use. Typst has:
- Built-in markup for the most common formatting tasks
- Flexible functions for everything else
- A tightly integrated scripting system
- Math typesetting, bibliography management, and more
- Fast compile times thanks to incremental compilation
- Friendly error messages in case something goes wrong
]
A database of Chinese Poetry in json format
with both Chinese and English versions.
Why do I want to maintain this database?
Mainly inspired by the highly-stared repository chinese-poetry, the author of which aims
to provide chinese users a quick way to get
exposed to traditional Chinese culture.
Then, it occurs to me why not maintain a similar
database, but in English? According to my experience, I notice that
a lot of native English speakers like to pick some Chinese culture sentences
during their conversation. To enrich their understanding of Chinese culture,
this repository is born.
The repository focuses
on offering developers who are native English speakers and
interested in traditional Chinese culture an original database
which can be used in their projects, forming an mysterious beauty from
ancient China.
How does this repository work?
The repository is written in json format, and organized the
document tree as dynasties-works.
Id format: *-****
eg. 1-0001
The first number: 1->Tang dynasty, 2->Song dynasty, 3->Qing dynasty)
Directories
.
├── index
├── English
    ├── title
    ├── dynasty
    ├── author
    └── content
├── Chinese
    ├── title
    ├── dynasty
    ├── author
    └── content
└── tag
By the way,the repository is still constructing.
A concrete example:
[
    {
    "index": "1-0001",

    "English":{
      "title":"Home-Coming",
      "dynasty":"Tang",
      "author": "He Zhizhang",
      "content":[
      "Oh, I return to the homeland I left while young,",
      "Thinner has grown my hair, though I speak the same tongue.",
      "My children, whom I meet, do not know who am I,",
      "Where are you from, dear sir?\" they ask with beaming eyes."
      ]
      },


    "Chinese":{
      "title":"回乡偶书",
      "dynasty":"唐",
      "author":"贺知章",
      "content":[
      "少小离家老大回,",
      "乡音无改鬓毛衰。",
      "儿童相见不相识,",
      "笑问客从何处来。"
      ]
      },

     "tags": [
     "homesick"
     ]
    }


 ]
Tag Classification
Age
Ambition
Autumn
Border
Class
Dream
Farewell
Friendship
Frustration
History
Homesick
Honor
Landscape
Love
Longing
Military
Mountain
Music
Night
Optimism
Reunion
Sadness
Season
Silence
Solitude
Spring
Summer
Voyage
Windy
Wine
Winter
License
Chinese_Poetry_Bilingual is published under the
Apache License, Version 2.0.
An utility to convert between available currencies for a given date. This repository provides a Ruby library for obtaining Foreign Exchange (FX) rates and a Ruby on Rails (RoR) web application.
Exchange Rate Library
The code is allocated at web/lib/exchange_rate and it is packaged as a Ruby gem. If you want to test it, please run:
  cd web/lib/exchange_rate
  rake test
The different end-points to interact with the library are:
Method
Description
ExchangeRate.init
Fetches an XML file from a remote source specified at ExchangeRate.configuration.url_historical; parses it according to an XSD defined at http://www.ecb.int/vocabulary/2002-08-01/eurofxref; and persists the data pulled into a sqlite database allocated at ExchangeRate.configuration.dbname. Note, if the database is already populated, the above steps are ignored.
ExchangeRate.update
Feeds the database with new data from a remote source specified at ExchangeRate.configuration.url_daily. This method unlike ExchangeRate.init populates the database with new rates unless data for a given data/currency already exist. It becomes useful to be called within a scheduler cron on a daily basis.
ExchangeRate.reset
Destroys the database configured at ExchangeRate.configuration.dbname.
ExchangeRate.at({date, amount, from, to})
Returns an exchange rate from currency ‘from’ to currency ‘to’ for a given date. If keyword date is missing, it defaults to Date.today. Similarly, if amount keyword is not given, it defaults to 1. The keywords from and to are expected to be strings (e.g. USD, GBP, PLN, etc).
Configuration of the library
Should you want to change the default configuration options, below are the available variables that may be modified:
ExchangeRate.configure do |c|
  c.url_historical = 'foo'  # An URL to retrieve an historical (e.g. 90 days data) XML file for currencies/rates
  c.url_daily = 'bar' # An URL to retrieve a daily XML file for currencies/rates
  c.temp_file = '/tmp/foo.xml'  # A path for where the XML file will be cached for parsing/persisting
  c.dbname = 'db/bar.sqlite3' # A relative path for where the database will be allocated
end
Web application
A RoR application is used to interact with the ExchangeRate library. Currently, only one controller (e.g. exchange_rates_controller.rb) is provided with the following actions:
Method
Description
exchange_rates#index
Asks the ExchangeRate library for the available Currencies and renders an HTML form located at web/app/views/exchange_rates/index.html.erb) together with a JS file. The JS file (app/assets/javascripts/exchangeRatesIndex.js) performs client-side validations and handles network responses to exchange_rates#at.
exchange_rates#at
Interacts with ExchangeRate.at through the parameters provided by the web client and returns a JSON string with a result key for a valid conversion or a detail message if any error is encountered (ArgumentError, RuntimeError, etc).
Cron
There is set up a cronjob at the OS level that runs ExchangeRate.update method every day at 16:00 (UTC) and persists new data in the database for the library, if not already present there. See exchange-rate-cron and exchange-rate-cron.sh for specification details.
How to install it
This utility runs on an isolated environment using Docker. If you have Docker installed locally, please type:
docker build -t ubuntu-sqlite3-rails .
to build an Ubuntu OS image together with all the dependencies needed to run this code.
How to run it
In order to run the app, please make sure that the image has been built successfully and afterwards you should be able to type:
docker run --rm -it -v "$PWD/web":/usr/src/app -p 3000:3000 ubuntu-sqlite3-rails
which runs a container in an interactive mode that is auto-destroyed whenever is terminated. Note that a volume is mounted within the container to easy changing any code within web folder without needing to re-build the image. The web interface should be accessible through http://localhost:3000/exchange_rates.