contour-auth-multi-tenant is an Envoy-compatible authorization server that builds upon the foundation of contour-authserver.
contour-authserver implements the Envoy external authorization
GRPC protocol (both v2 and v3). contour-authserver has two authorization
backends that are selected by subcommands.
contour-auth-multi-tenant adds multi-tenancy feature to contour-authserver and improves its performance to make it production-ready.
Key Features:
Multi-Tenancy Support: One of the standout features of contour-auth-multi-tenant is its built-in support for multi-tenancy. This allows us to securely manage and isolate authorization scopes for different tenants within a single instance.
Enhanced Performance: contour-auth-multi-tenant has meticulously been optimized to deliver outstanding performance under heavy loads. This ensures that your application’s authorization layer can handle requests efficiently, without introducing bottlenecks or delays.
htpasswd
Usage:
Run a htpasswd basic authentication server

Usage:
  contour-authserver htpasswd [OPTIONS]

Flags:
      --address string             The address the authentication endpoint binds to. (default ":9090")
      --auth-realm string          Basic authentication realm. (default "default")
  -h, --help                       help for htpasswd
      --metrics-address string     The address the metrics endpoint binds to. (default ":8080")
      --selector string            Selector (label-query) to filter Secrets, supports '=', '==', and '!='.
      --tls-ca-path string         Path to the TLS CA certificate bundle.
      --tls-cert-path string       Path to the TLS server certificate.
      --tls-key-path string        Path to the TLS server key.
      --watch-namespaces strings   The list of namespaces to watch for Secrets.
htpasswd Secrets
The htpasswd backend implements HTTP basic authentication
against a set of Secrets that contain htpasswd formatted data.
The htpasswd data must be stored in the auth key, which is compatible
with ingress-nginx auth-file Secrets.
The htpasswd backend only accesses Secrets that are
annotated with auth.contour.snappcloud.io/type: basic.
Secrets that are annotated with the auth.contour.snappcloud.io/realm
will only be used if the annotation value matches the value of the --auth-realm flag.
The auth.contour.snappcloud.io/realm: * annotation explicitly marks
a Secret as being valid for all realms.
This is equivalent to omitting the annotation.
When it authenticates a request, the htpasswd backend injects the Auth-Username and Auth-Realm headers, which contain the
authenticated user name and the basic authentication realm respectively.
The --watch-namespaces flag specifies the namespaces where the htpasswd backend will discover Secrets.
If this flag is empty, Secrets from all namespaces will be used.
The --selector flag accepts a label selector that can be
used to further restrict which Secrets the htpasswd backend will consume. (Use it for lower resource consumption and better performance as it reduce reconcile loops dramatically if there are lots of secrets)
htpasswd Multi-Tenancy Support
While contour-authserver matches the provided credential in the Authorization header against all the Secrets, contour-auth-multi-tenant offers a more refined approach. It matches the provided credential against a user-defined Secret, enabling precise control over authorization scopes.
To leverage the multi-tenancy feature of contour-auth-multi-tenant, include a secret reference in your Envoy CheckRequest. Specify the reference in the request’s context, using secretRef as the key and the namespace/secretName format for the value.
Here is a sample HTTPProxy instance in which htpasswd is supported. Please notice that defining an authPolicy is a necessity in order to be able to use the specified secret.
The ExtensionService does not necessarily need to be in the same namespace as the configuration provides the namespace option.
It has been supposed that the service listens on root path / and port 80.
htpasswd Secret Configuration
It is important to note that the procedure of matching Secrets occures by comparing the existing Secrets’ labels with Contour Authserver’s secretSelector. In addition, it is worth mentioning that the key auth should be present while using the label.
The default value for secretSelector is auth.contour.snappcloud.io/type=basic which can be modified to a desirable one following the mentioned format.
example:
auth.contour.sample.label/type=basic
OIDC
Usage:
Run a oidc authentication server

Usage:
  contour-authserver oidc [OPTIONS]

Flags:
      --config string              Path to config file ( yaml format )
  -h, --help                       help for htpasswd
      --tls-ca-path string         Path to the TLS CA certificate bundle.
      --tls-cert-path string       Path to the TLS server certificate.
      --tls-key-path string        Path to the TLS server key.
Oidc configuration can be specified with configmaps.
Please visit DexIDP for more detail.
## The following entries are the variables  accepted by the Contour OIDC module.
## server address and port
address: ":9443"

## OIDC issuer URL
issuerURL: "http://<path to your SSO server>"

## App redirect path ( usually point back to app url)
redirectURL: "https://<path to your applications>"
redirectPath: "/callback"
allowEmptyClientSecret: false
scopes:
- openid
- profile
- email
- offline_access
usernameClaim: "nickname"
emailClaim: ""
serveTLS: false
clientID: "<your client id>"
clientSecret: "<your client secret>"
Request Headers
Both authorization backends emit the Auth-Handler header, which
publishes the name of the backend that approved or rejected the
authorization.
The authorization context is also reflected into HTTP headers
prefixed with Auth-Context-. Note that This can generate malformed
HTTP headers. The testserver backend always creates the context
headers, but the htpasswd backend only does so for authenticated
requests (i.e. the origin server gets them bu the client never
does.)
Deploying contour-auth-multi-tenant
The recommended way to deploy contour-auth-multi-tenant is to use the Kustomize deployment YAML. This will deploy services for htpasswd and oidc backends. For developer deployments, Skaffold seems to work reasonably well.
Releasing contour-auth-multi-tenant
Maintainers who need to release a new version of contour-auth-multi-tenant
can follow the following steps:
# Ensure that you have a Github token either in $GITHUB_TOKEN or in ~/.config/goreleaser/github_token.# Ensure that goreleaser is installed.# Tag the release.
$ ./hack/make-release-tag.sh $OLDVERS$NEWVERS# Push the release tag to Github.
$ git push origin $NEWVERS# Build and release binaries and Docker images.
$ make release
# Log in with your GitHub account and token to push the images.
$ docker login -u <GitHub username>
$ docker push ghcr.io/projectcontour/contour-authserver:$NEWVERS
$ docker push ghcr.io/projectcontour/contour-authserver:latest
# Log out.
$ docker logout
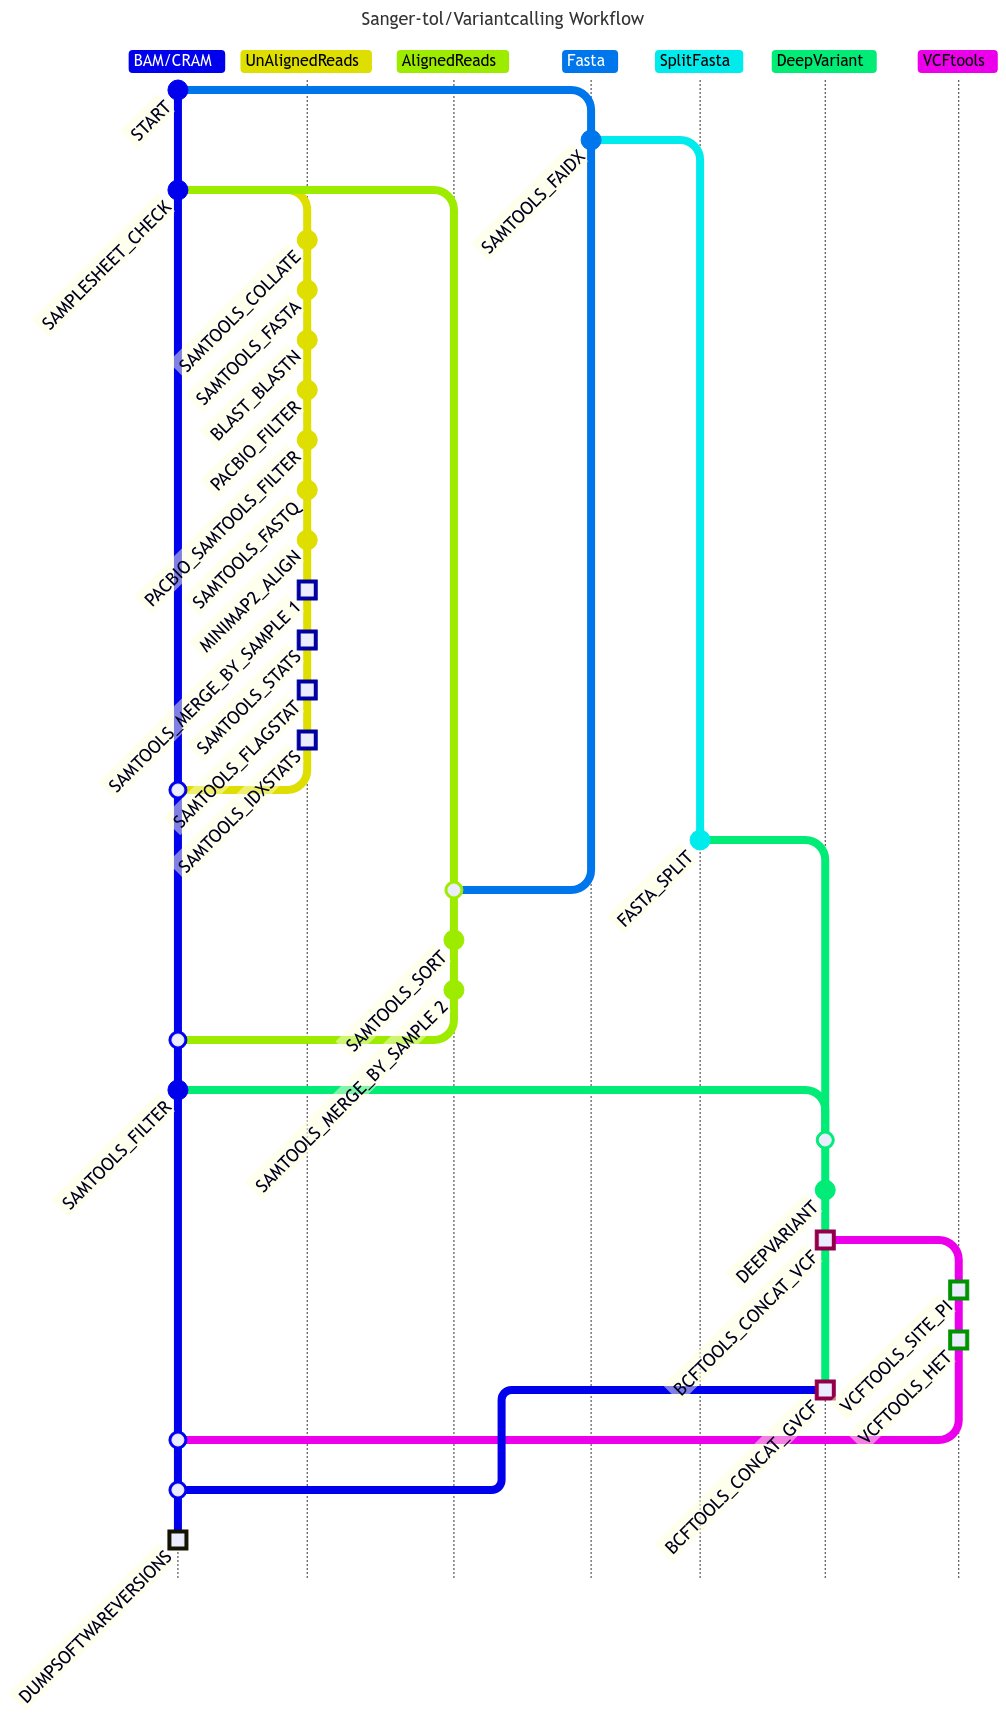
sanger-tol/variantcalling is a bioinformatics best-practice analysis pipeline for variant calling using DeepVariant for PacBio data.
The pipeline is built using Nextflow, a workflow tool to run tasks across multiple compute infrastructures in a very portable manner. It uses Docker/Singularity containers making installation trivial and results highly reproducible. The Nextflow DSL2 implementation of this pipeline uses one container per process which makes it much easier to maintain and update software dependencies. Where possible, these processes have been submitted to and installed from nf-core/modules in order to make them available to all nf-core pipelines, and to everyone within the Nextflow community!
On release, automated continuous integration tests run the pipeline on a full-sized dataset on the LSF infrastructure. This ensures that the pipeline runs on LSF, has sensible resource allocation defaults set to run on real-world datasets, and permits the persistent storage of results to benchmark between pipeline releases and other analysis sources.
Pipeline summary
The pipeline takes aligned or unaligned PacBio sample reads (CRAM/BAM files) from a CSV file and the reference file in FASTA format, and then uses DeepVariant tool to make variant calling.
Steps involved:
Split fasta file into smaller files, normally one sequence per file unless the sequences are too small.
Align the reads if not aligned.
Merge input BAM/CRAM files together if they have the same sample names.
Filter out reads using the -F 0x900 option to only retain the primary alignments.
Run DeepVariant using filtered BAM/CRAM files against each of split fasta files.
Merge all VCF and GVCF files generated by DeepVariant by sample together for each input BAM/CRAM file.
Run VCFtools to calculate heterozygosity and per site nucleotide diversity.
Install any of Docker, Singularity (you can follow this tutorial), Podman, Shifter or Charliecloud for full pipeline reproducibility (you can use Conda both to install Nextflow itself and also to manage software within pipelines. Please only use it within pipelines as a last resort; see docs).
Download the pipeline and test it on a minimal dataset with a single command:
# for aligned reads
nextflow run sanger-tol/variantcalling -profile test,YOURPROFILE --outdir <OUTDIR># for unaligned reads
nextflow run sanger-tol/variantcalling -profile test_align,YOURPROFILE --outdir <OUTDIR>
Note that some form of configuration will be needed so that Nextflow knows how to fetch the required software. This is usually done in the form of a config profile (YOURPROFILE in the example command above). You can chain multiple config profiles in a comma-separated string.
The pipeline comes with config profiles called docker, singularity, podman, shifter, charliecloud and conda which instruct the pipeline to use the named tool for software management. For example, -profile test,docker.
Please check nf-core/configs to see if a custom config file to run nf-core pipelines already exists for your Institute. If so, you can simply use -profile <institute> in your command. This will enable either docker or singularity and set the appropriate execution settings for your local compute environment.
If you are using singularity, please use the nf-core download command to download images first, before running the pipeline. Setting the NXF_SINGULARITY_CACHEDIR or singularity.cacheDir Nextflow options enables you to store and re-use the images from a central location for future pipeline runs.
If you are using conda, it is highly recommended to use the NXF_CONDA_CACHEDIR or conda.cacheDir settings to store the environments in a central location for future pipeline runs.
For further information or help, don’t hesitate to get in touch on the Slack #pipelines channel. Please create an issue on GitHub if you are not on the Sanger slack channel.
Citations
If you use sanger-tol/variantcalling for your analysis, please cite it using the following doi: 10.5281/zenodo.7890527
An extensive list of references for the tools used by the pipeline can be found in the CITATIONS.md file.
This pipeline uses code and infrastructure developed and maintained by the nf-core community, reused here under the MIT license.
The nf-core framework for community-curated bioinformatics pipelines.
Philip Ewels, Alexander Peltzer, Sven Fillinger, Harshil Patel, Johannes Alneberg, Andreas Wilm, Maxime Ulysse Garcia, Paolo Di Tommaso & Sven Nahnsen.
Tools to link entities and concepts in text to Wikidata items and to
extract useful information from the Wikidata knowledge graph
Entities play an important role in text and are often used to describe what the text is about. One approach we evaluated was to find entity mentions in a report or document, link these to corresponding entities in the Wikidata knowledge graph, and use their information to improve the search.
Document entities
We use SpaCy to process text in a report or document and identify the named entity mentions along with their type. The standard SpaCy pipelines for most common languages come with a named entity recognition module that has been trained to identify the relatively limited set of Ontonotes types \cite{hovy2006ontonotes}. While it works reasonably well, it does miss some named entities and often assign the wrong type to entities that are found.
SpaCy’s predefined pipelines also do not do coreference, i.e., identifying a set of entity mentions, nominal mentions and pronouns that refer to the same entity. This can be important for many subsequent tasks, such as noting how often an entity was mentioned in a document. We experimented with the addition of a simple coference tool that recognized name shortening (e.g., “Joe Biden” and “Biden”) and abbreviations (e.g., “World Health Organization” and “WHO”) for coreference.
The Ontonotes named entities refer to a instance of type, such as an individual person or organization, a specific location, or a nationality. We also experimented with identifying potential mentions of concepts that might be linkable, such as “letter bomb”, “lava flow” or “potentially hazardous asteroid”. Our strategy was simple: look for a nominal compound possible preceded by an adjective.
Wikidata entities
Wikidata is a collaboratively edited multilingual knowledge graph that is intended to provide common data for Wikipedia sites and other applications. It currently has about one billion facts on about 100 million items. It has a web interface to support exploration and editing by people, a set of APIs to access its information programmatically, and a SPARQL endpoint for querying RDF model of the knowledge graph. Wikidata’s ontology has very fine-grained type system with more than two-million types and a much smaller set of properties, currently about NNNNN in number.
Wikidata is inherently multilingual and draws on data from more Wikipedia sites in nearly 300 different languages. It gives each item a identifier beginning with the letter Q like Q64780099 (the Human Language Technology Center of Excellence), and each property an id beginning with the letter P, for example P31, which is the property “instance of” that links an item with one of its immediate types and P279 that links a type to one of its immediate super–types.
A powerful and friendly heuristic search library implemented in Java.
What’s Hipster4j?
The aim of Hipster4j is to provide an easy to use yet powerful and flexible type-safe Java library for heuristic search.
Hipster relies on a flexible model with generic operators that allow you to reuse and change the behavior of the algorithms very easily. Algorithms are also implemented in an iterative way, avoiding recursion. This has many benefits: full control over the search, access to the internals at runtime or a better and clear scale-out for large search spaces using the heap memory.
You can use Hipster4j to solve from simple graph search problems to more advanced state-space search problems where the state space is complex and weights are not just double values but custom defined costs.
Features
The current version of the library comes with some very well-known and wide used search algorithms. We’re working to add more algorithms soon:
Search algorithms:
Uninformed search:
DFS: Depth-First-Search.
BFS: Breadth-First-Search.
Dijkstra’s algorithm.
Bellman-Ford.
Informed search:
A star (A*).
IDA star (IDA*), Iterative Deepening A*.
AD star (AD*): Anytime Dynamic A*.
Local search:
Hill-Climbing.
Enforced-Hill-Climbing.
Multiobjective search
Multiobjective LS algorithm. Original paper: Martins, E. D. Q. V., & Santos, J. L. E. (1999). “The labeling algorithm for the multiobjective shortest path problem”. Departamento de Matematica, Universidade de Coimbra, Portugal, Tech. Rep. TR-99/005 (see an example)
If you don’t find the algorithm or the feature you are looking for, please consider contributing to Hipster!. You can open a new issue or better fork this repository and create a pull request with your contribution.
Getting started
The easiest way to use Hipster is adding it as a dependency with your favourite dependency manager.
Maven users can include the library using the following snippet:
Snapshots
You can use the latest (unstable) version of Hipster under development. Just add the following dependency into your pom.xml:
<!-- Use sonatype oss public for snapshots -->
<repositories>
<repository>
<id>sonatype-oss-public</id>
<url>https://oss.sonatype.org/content/groups/public/</url>
<snapshots>
<enabled>true</enabled>
</snapshots>
</repository>
</repositories>
<dependencies>
<!-- Add this dependency under your pom.xml <dependencies> section to add all the dependencies of Hipster to your project. Add hipster-core instead of hipster-all for basic functionality.-->
<dependency>
<groupId>es.usc.citius.hipster</groupId>
<artifactId>hipster-all</artifactId>
<version>1.0.2-SNAPSHOT</version>
</dependency>
</dependencies>
Releases
Current stable release is v1.0.1. See the milestones to check the current development status.
dependencies>
<!-- Add this dependency under your pom.xml <dependencies> section to add all the dependencies of Hipster to your project. Add hipster-core instead of hipster-all for core functionality.-->
<dependency>
<groupId>es.usc.citius.hipster</groupId>
<artifactId>hipster-all</artifactId>
<version>1.0.1</version>
</dependency>
</dependencies>
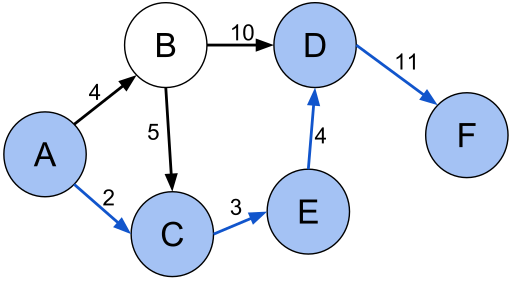
Although Hipster is graph agnostic, we include some useful classes to create a graph or a
directed graph and the search problem. We create a graph using the GraphBuilder class and then
we use the GraphSearchProblem to create the required components to solve it using Dijkstra’s algorithm:
// Create a simple weighted directed graph with Hipster where// vertices are Strings and edge values are just doublesHipsterDirectedGraph<String,Double> graph =
GraphBuilder.<String,Double>create()
.connect("A").to("B").withEdge(4d)
.connect("A").to("C").withEdge(2d)
.connect("B").to("C").withEdge(5d)
.connect("B").to("D").withEdge(10d)
.connect("C").to("E").withEdge(3d)
.connect("D").to("F").withEdge(11d)
.connect("E").to("D").withEdge(4d)
.createDirectedGraph();
// Create the search problem. For graph problems, just use// the GraphSearchProblem util class to generate the problem with ease.SearchProblemp = GraphSearchProblem
.startingFrom("A")
.in(graph)
.takeCostsFromEdges()
.build();
// Search the shortest path from "A" to "F"System.out.println(Hipster.createDijkstra(p).search("F"));
Output result:
`Total solutions: 1
Total time: 6 ms
Total number of iterations: 6
But that’s not all. Hipster comes with different problem examples
that illustrate how Hipster can be used to solve a wide variety of problems (not only graph search).
What’s next?
If you want to learn how to solve a problem by searching with Hipster, check the wiki and the JavaDoc documentation.
We also suggest you to check this presentation for a quick introduction.
License & Citation
This software is licensed under the Apache 2 license, quoted below.
Copyright 2013 Centro de Investigación en Tecnoloxías da Información (CITIUS),
University of Santiago de Compostela (USC).

Licensed under the Apache License, Version 2.0 (the "License");
you may not use this file except in compliance with the License.
You may obtain a copy of the License at

   http://www.apache.org/licenses/LICENSE-2.0

Unless required by applicable law or agreed to in writing, software
distributed under the License is distributed on an "AS IS" BASIS,
WITHOUT WARRANTIES OR CONDITIONS OF ANY KIND, either express or implied.
See the License for the specific language governing permissions and
limitations under the License.
Citation
This library was presented in the “9th Iberian Conference on Information Systems and Technologies (CISTI), 2014”. If you use this library in your research projects, we encourage you to please cite our work:
Rodriguez-Mier, P., Gonzalez-Sieira, A., Mucientes, M., Lama, M. & Bugarin, A. (2014). Hipster: An Open Source Java Library for Heuristic Search. 9th Iberian Conference on Information Systems and Technologies (CISTI).
@inproceedings{RodriguezMier2014,
  author = {Rodriguez-Mier, Pablo and Gonzalez-Sieira, Adrian and Mucientes, Manuel and and Lama, Manuel and Bugarin, Alberto},
  booktitle = {9th Iberian Conference on Information Systems and Technologies (CISTI 2014)},
  month = jun,
  volume = 1,
  title = {{Hipster: An Open Source Java Library for Heuristic Search}},
  pages = {481--486},
  isbn = "978-989-98434-2-4"
  address = "Barcelona",
  year = {2014}
}
SSH URLs provide access to a Git repository via SSH, a secure protocol. If you have a SSH key registered in your Github account, clone the project using this command:
git clone git@github.com:LauraBeatris/foodfy.git
Install dependencies
yarn install
Create your environment variables based on the examples of .env.example
cp .env.example .env
After copying the examples, make sure to fill the variables with new values.
🏃 Getting Started
Running with docker-compose
In order to prepare the database and also run the application, set your environment variables and then execute docker-compose
docker-compose up
With this command, the port seted in your environment PORT variable will be available to access the application.
Manually setup
You may prefer to manually configure the database and the application.
Install Postgres to create a database or if you have Docker in your machine, fill the environment values related to database configurations and the run the following commands in order to create a postgres container.
docker-compose up postgres
Execute the follow command to create tables, relationships and procedures:
yarn db:create
To start, run the seeds provided in Seeds in order to populate the database with an initial data.
yarn run:seeds
Run the following command in order to start the application in a development environment:
yarn dev
📮 Faq
Question: What are the technologies used in this project?
Answer: The tecnologies used in this project are NodeJS + Express Framework to handle the server, Nunjucks to develop amazing views & SCSS to handle the styles architecture and a better maintenance than normal CSS.
Question: How the multi language support is handled by the server?
Answer: This application handle multi language support with the help of a library called i18n-node. It has a middleware that gather language settings of visitors and then persist translations from JSON files related with a specific locale.
The locale is storaged as a cookie named foodfy:locale and that can be changed by passing a query string with the value ?lang=pt
Question: Are all kind of users able to create and update chefs or recipes?
Answer: The application has two kind of users: Visitors and Administrators. As a administrator, you’re able to create, update and view all the data related to recipes, chefs and also other users. Visitors can also access the admin platform but they don’t have access to the views responsable to create and update data.
🐛 Issues
Feel free to file a new issue with a respective title and description on the the Foodfy repository. If you already found a solution to your problem, i would love to review your pull request! Have a look at our contribution guidelines to find out about the coding standards.
🎉 Contributing
Check out the contributing page to see the best places to file issues, start discussions and begin contributing.
📕 License
Released in 2020.
This project is under the MIT license.
Idle time is duration the user is remaining inactive on the web page. During idle time, user does nothing on the web page, he/she may even away from the computer.
Many web apps, such as banking, gaming, etc. need to detect if the user is idle to increase performance, security, etc.
For high risky web apps, 2-3 minutes inactivity is risky, such as, finance apps, personal password vault apps, etc.
For low risky web apps, sometimes 15-20 minutes inactivity is OK., such as, news apps, blog apps, etc.
Also, many web apps, need to have some calls to the backend or need to establish communication channels to backend, but when user is idle, it doesn’t a requirement anymore. So, if the web app can detect the user is idle, then it can close communication channel and stop calling backend services to free-up resources on the backend side.
How to detect if the user is idle
When user is on the page, he/she usually use peripherals to interact with the page, such as, keyboard, mouse, touch screen, etc.
It’s possible to attach couple of Events from DOM API and reset the timer if one of them triggered. If nothing happened in the past for example 20 seconds, we can conclude that the user is idle.
Start by creating npm project with executing following command in your favorite Terminal (my favorite is Microsoft Terminal 😀)
npm init --force
It’s possible to develop code in Typescript and transpile the code to Javascript with webpack. In order to prepare the project for that, let’s add couple of DevDependencies;
Finally, it’ll be needed to produce and emit events to notify the page that user is inactive for certain amount of time, let’s add rxjs as a final dependency;
npm install rxjs
Now, we’re ready to develop code.
Since we’re good software engineers, we ❤ reusable code.
Now, we need a mechanism to prevent developers to instantiate the class more than 1 time. We’re going to handle this requirement by implementing Singleton Design Pattern;
That’s it for the IdleTimeOut component, continue with creating index.html file under src folder with following content;
<!DOCTYPE html><htmllang="en"><head><metacharset="UTF-8"><metaname="viewport" content="width=device-width, initial-scale=1.0"><title>Budapest - Detect if the user is idle</title></head><body><span>Idle time: </span><spanid="idle_time"></span></body></html>
Now, we can continue with creating index.ts file under src folder.
First of all, we need to importIdleTimeOut component;
We can call Reset() method and reset the idle timer programmatically;
IdleTimeOut.Current.Reset();
Also, we can attach to OnTick event and decide the actions, such as, when everything is fine, when to logout, etc.
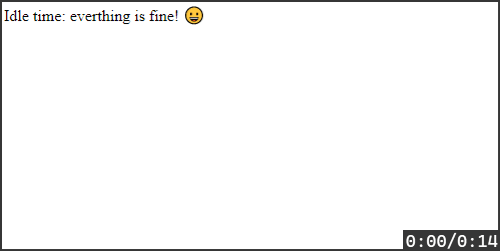
IdleTimeOut.Current.OnTick.subscribe(seconds=>{console.log(IdleTimeOut.Current);if(seconds<=4){$idle_time.innerText='everything is fine! 😀';}elseif(seconds>20){document.location.href="https://github.com/logout";}else{$idle_time.innerText=`page has not been used for ${seconds} seconds`;}});
An intelligent interface project targeted towards educating people of different ages about when and why to use antibiotic medication.
This will be done by educating users through the use of a simple to use chat-bot which will answer varied questions relating to antibiotics and its use.
Antibiotic overuse breeds treatment resistance. This is a global problem that is rapidly increasing and threatens our ability to treat common infectious diseases.
According to the World Health Organisation: “Antimicrobials – including antibiotics, antivirals, antifungals and antiparasitics – are medicines used to prevent and treat infections in humans, animals and plants.”
Excessive antibiotic use leads to heightened drug resistance, impacting treatment efficacy and complicating infection management, posing severe health risks.
Antimicrobial Resistance (AMR) generates drug-resistant organisms globally, limiting treatment options, inflating healthcare costs, and elevating risks during medical procedures, necessitating urgent prevention and treatment strategies.
Proposed Solution
Antibio Advisor, a web app tailored for individuals 18 or older but available for all. Our web app offers an array of vital features: an intelligent chatbot for medical guidance, an interactive map to locate pharmacies and general practitioners, and a comprehensive term guide.
Prioritising user awareness, our platform provides essential information in the form of a FAQs page, an informative Quiz and a prescription info page.
The web app features mentioned above needed to be implemented in such a manner that they are easily accessible and usable. This was facilitated through a variety of different features such as:
Web Page Demo which guides the user on proper usage of applicable web pages.
Dynamic page size applicable for use with computers, mobile devices and tablets.
Colourful and simple interface to ensure easy navigation.
Elderly individuals were also considered through the use of a large font to ensure ease of use.
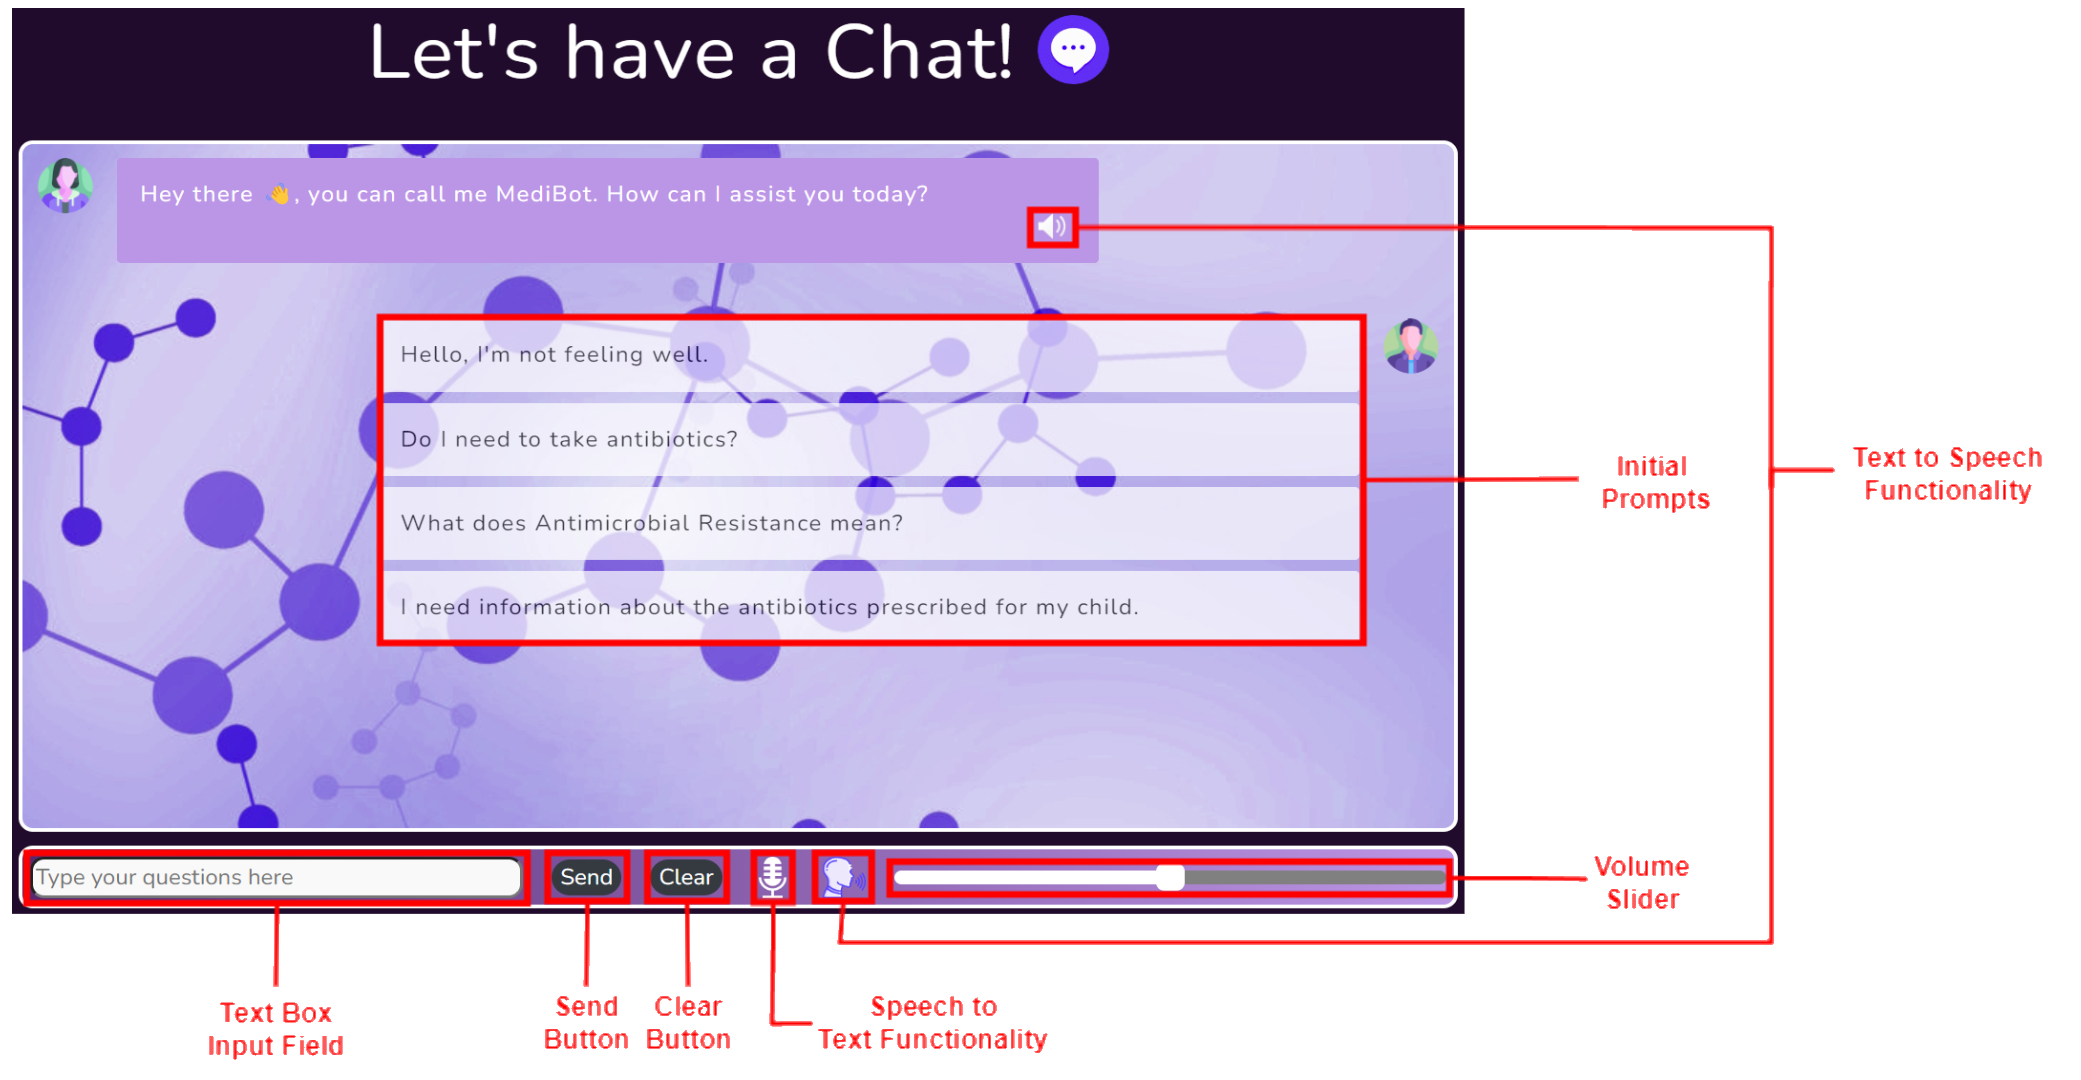
Chatbot
As outlined above the chatbot has a myriad of different features ranging from:
Set of initial prompts aimed at providing the user with a possible conversation starter.
Clear button allowing the user to clear the current conversation and start afresh.
Speech to text button allowing to use voice to communicate with the chatbot directly.
Text to Speech button and volume slider allowing users to have messages read out loud.
These features and the general chatbot layout was selected whilst keeping the possible users in mind to ensure a pleasant user experience. Additionally the UIs adaptability to different screen sizes maintains the ease of use of the chatbot and its features.
FAQ
The FAQ page is composed of a variety of relevant questions sorted according to relevant age groups these being General, Adult, Child, Elderly. This is done as certain knowledge is more applicable to certain age demographics. Additionally the FAQ can be sorted in accordance with the symptoms these being General, Cough, Rash, Skin Condition.
Further adding to the intractability of the webpage each question only displays the answer when selected by the user. This can be seen in the image showcased in this slide.
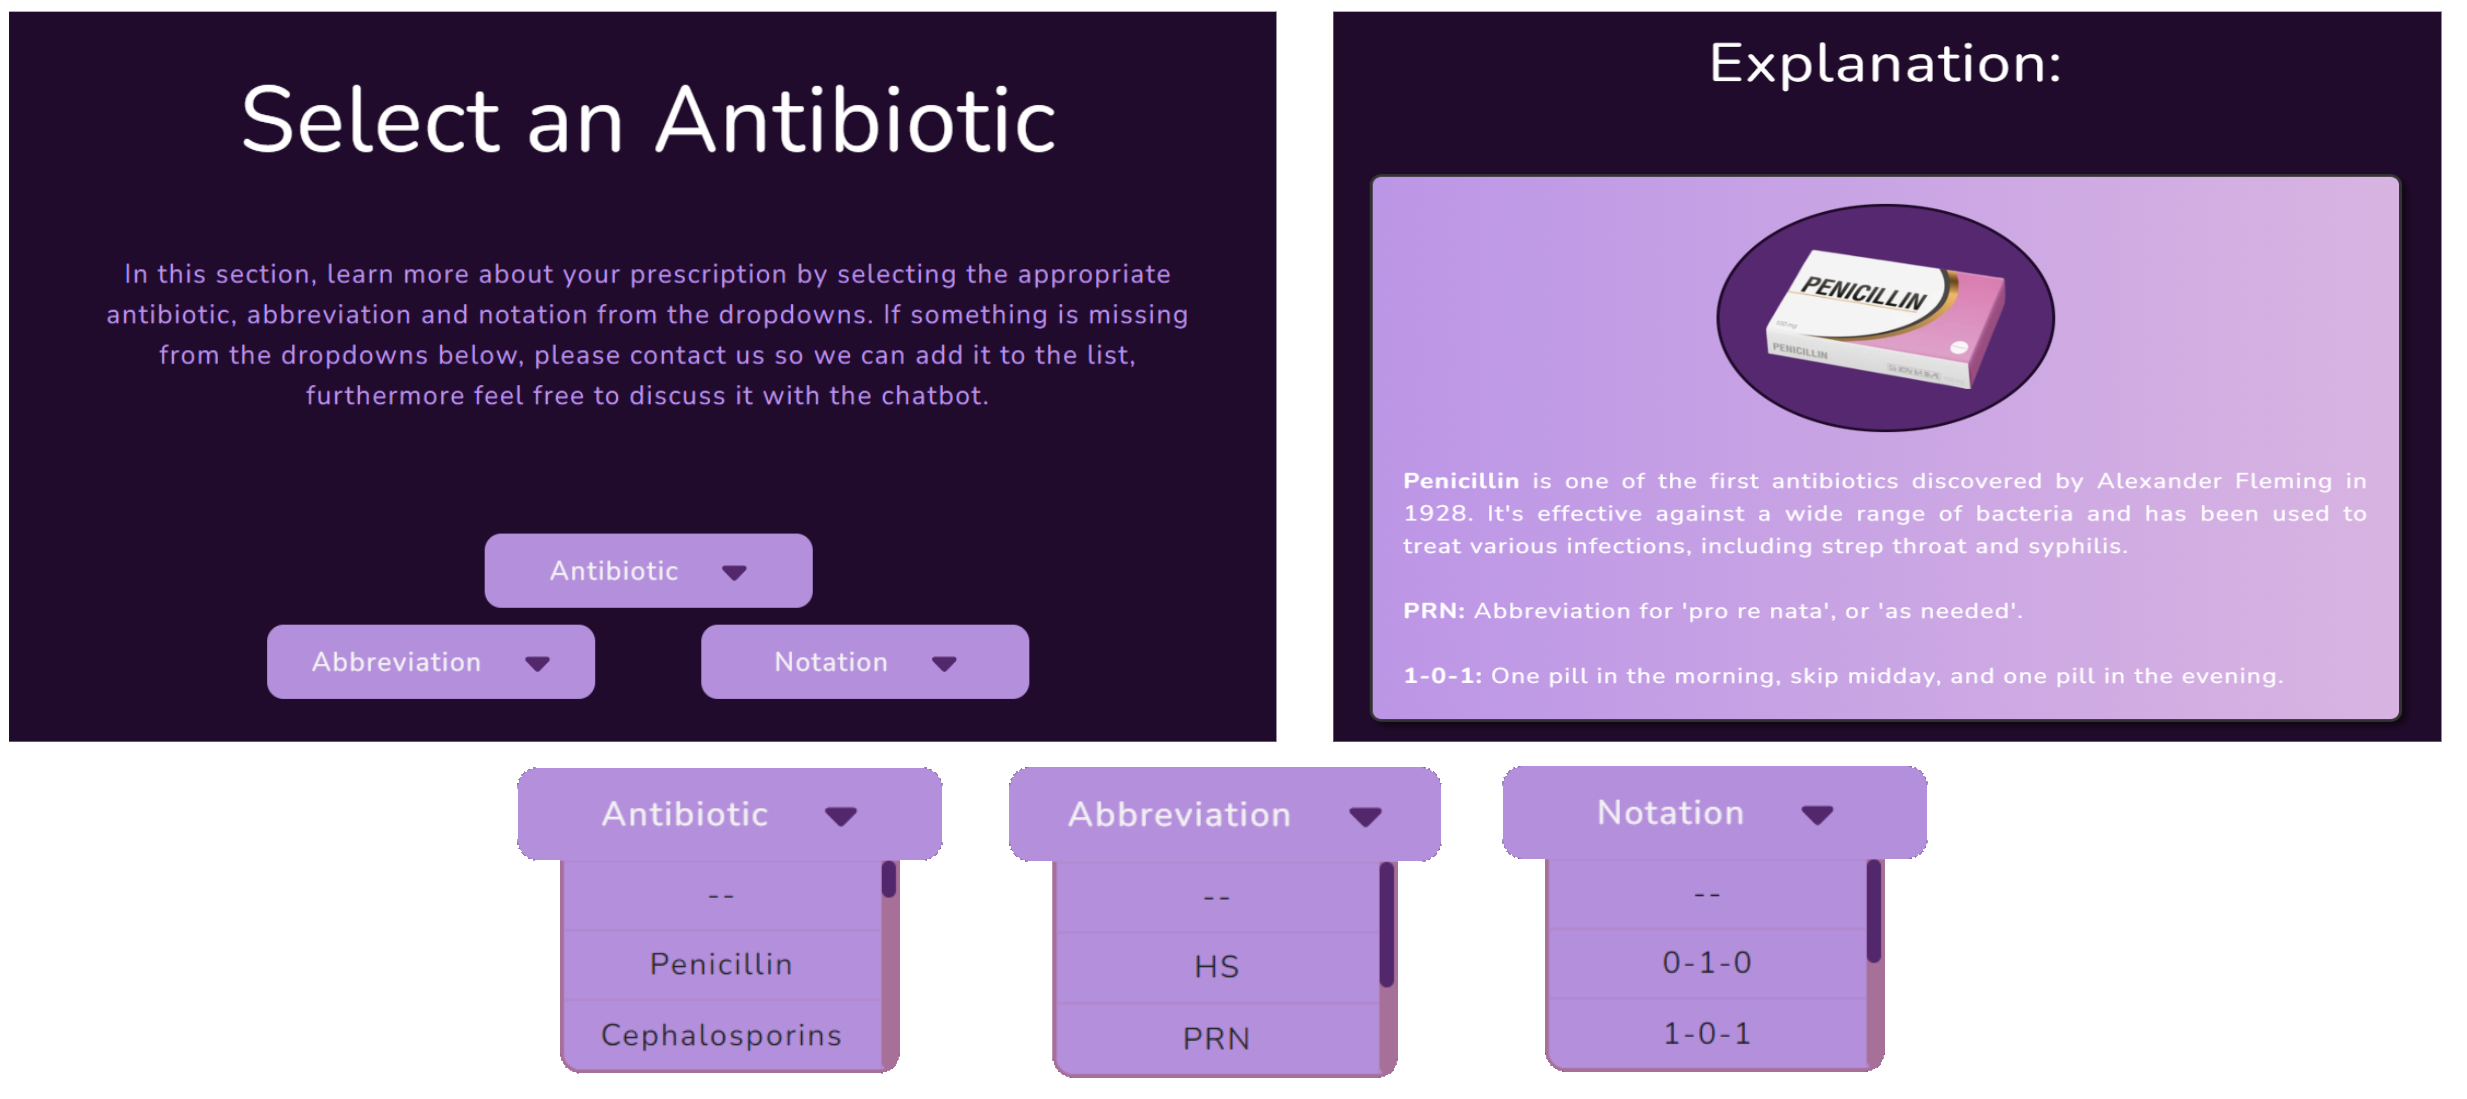
Prescription Info
The main components of the Prescription Info page showcased here consist of three dropdowns relating to the antibiotic name, abbreviations and notations used by doctors when prescribing medicine.
These dropdowns when appropriately selected provide the user with explanations regarding their antibiotics and the relevant dosages as denoted by a medical professionals prescription notation.
The dropdowns in addition to a sample explanation can be seen below.
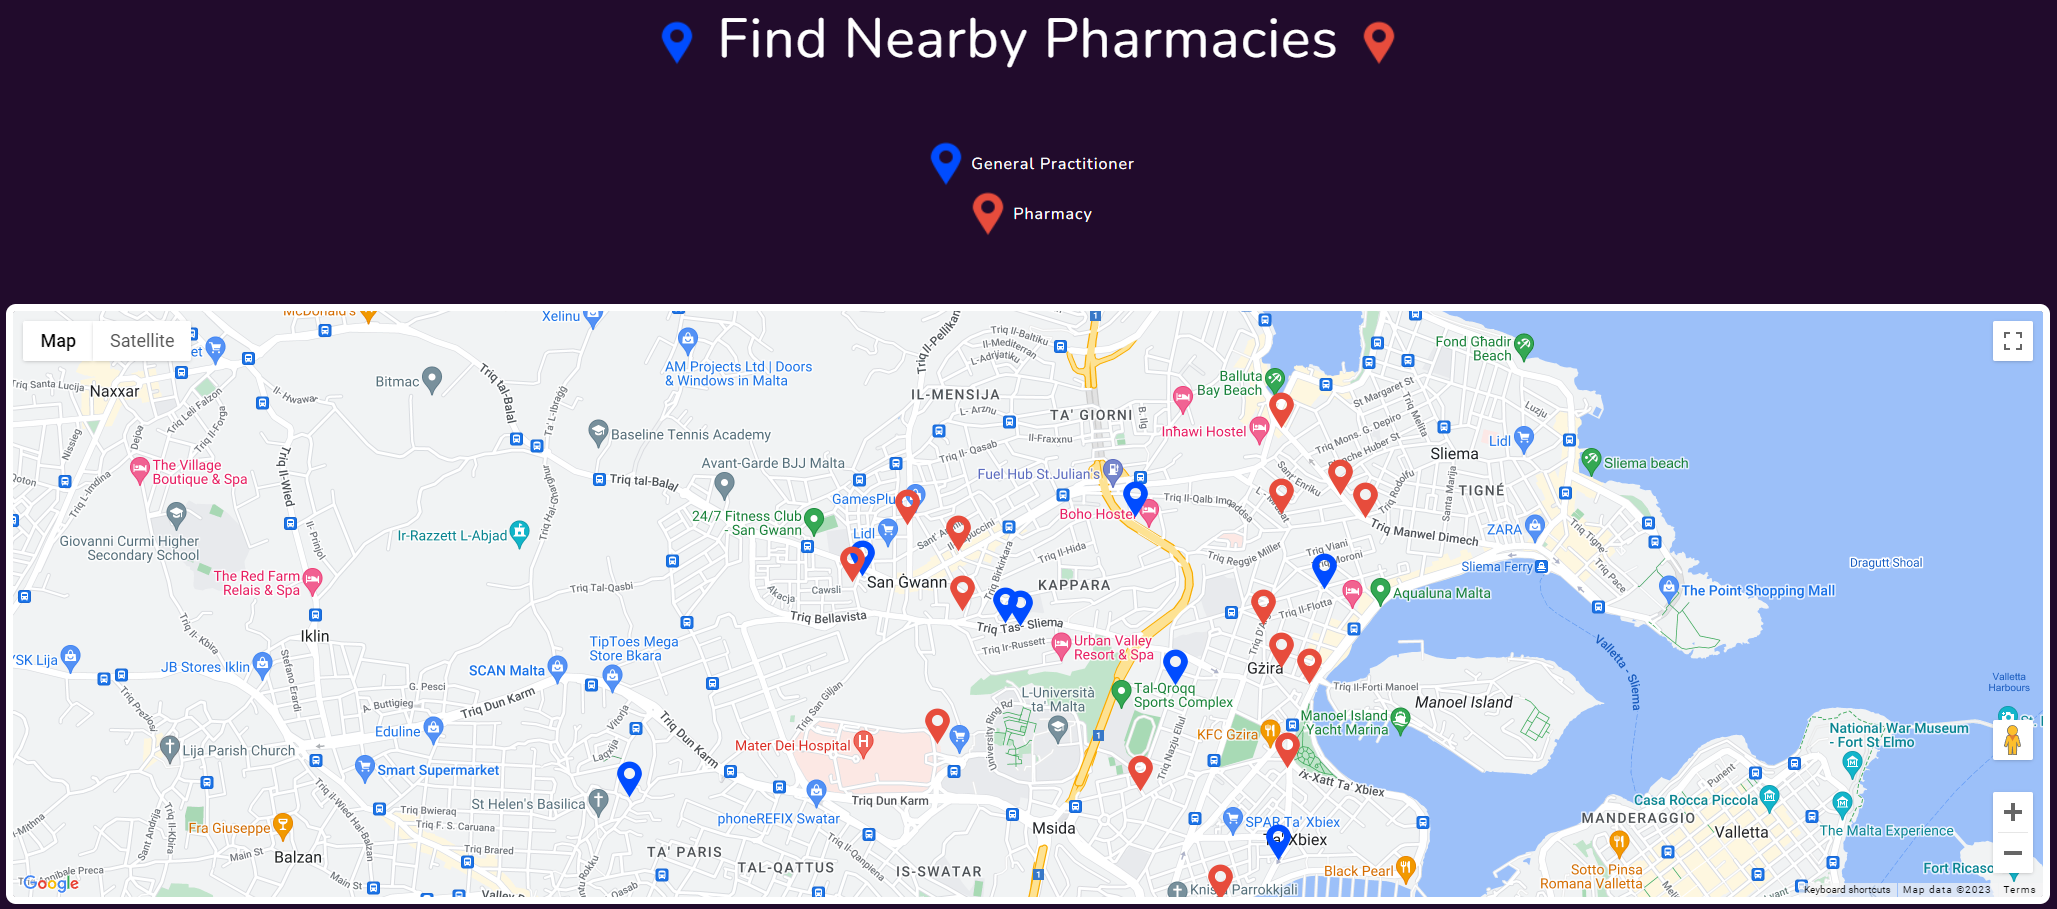
Map
The map was designed to showcase the users nearest pharmacies and general practitioners, this was carried out to provide the user with all the required information they might require to purchase, enquire or return unused antibiotics. In the map the blue markers represent general practitioners and the red markers represent pharmacies.
Learn More
The Learn More page similar to the FAQ page provides the user with a further degree of general information on the topic of AMR in contrast to the specific information presented in the FAQ page.
This page contains an informative video alongside an interactive carousel composed of several infographics and informative paragraphs.
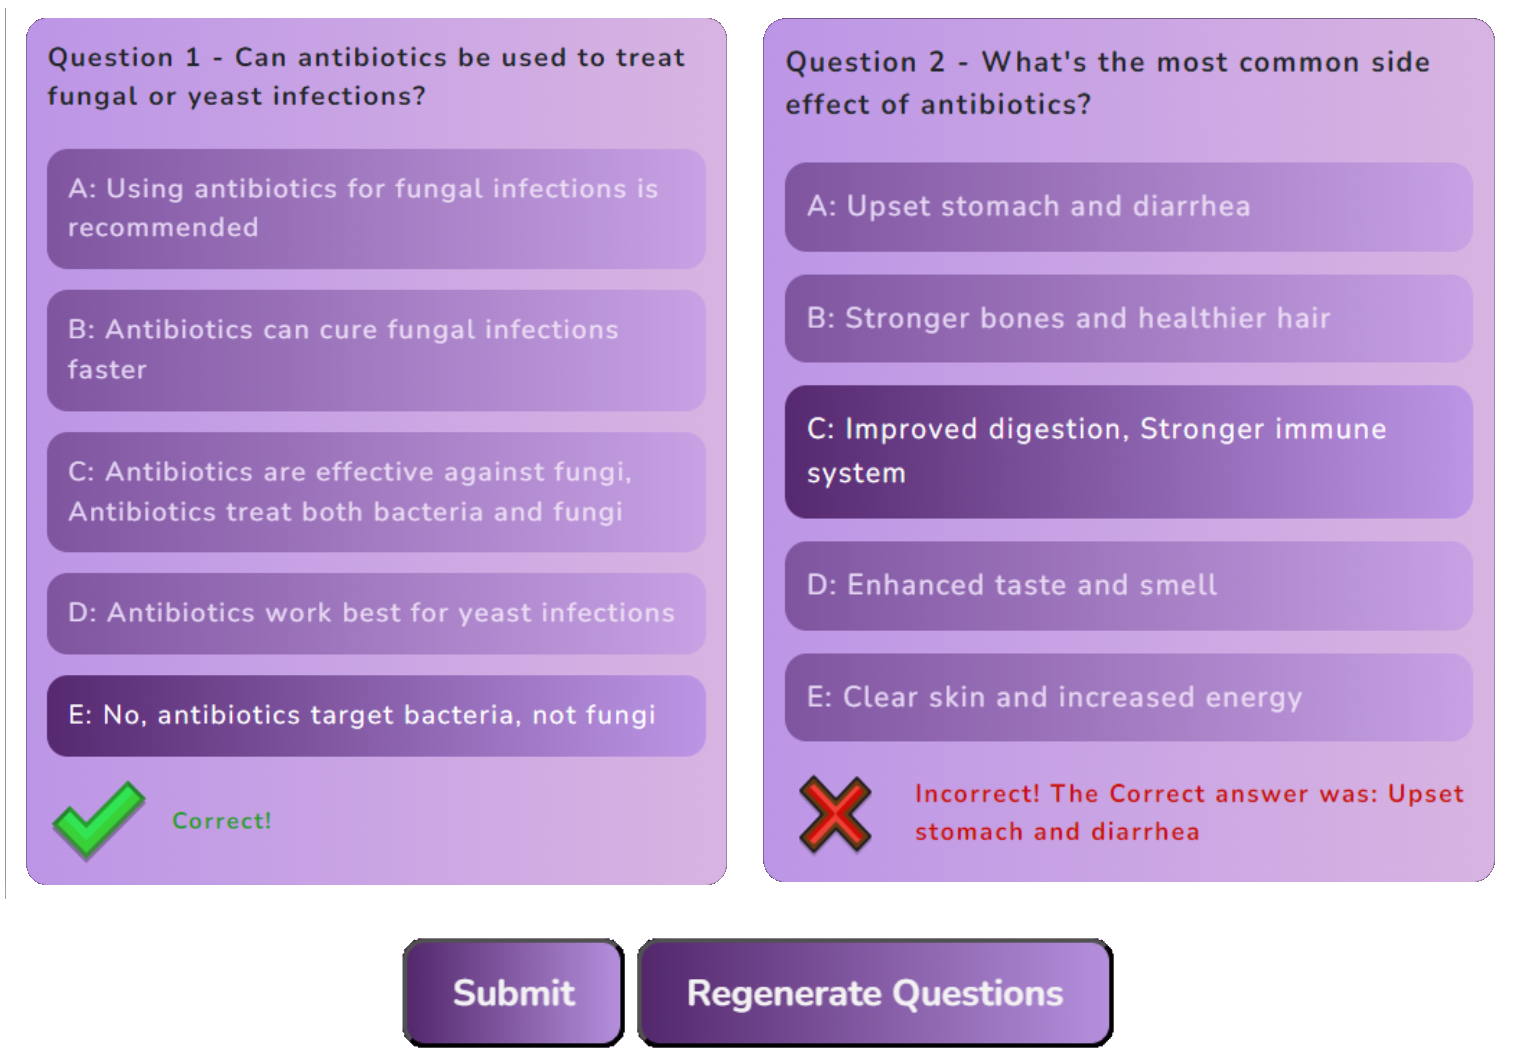
Quiz
The webapp also includes a quiz web page which compiles four questions from a possible set. This provides users a fun and engaging manner by which they can test their knowledge on AMR. Upon submitting the quiz users are provided with the correct answer where applicable in addition to a score showcased below. Furthermore the quiz can be regenerated multiple times and additional question can easily be added through the editing of a simple .json file.
Ethical Considerations
The website is not intended to replace medical advice, and the chatbot is not a substitute for a doctor. The chatbot is intended to provide general information and guidance on antibiotics and their use. Additionally, a disclaimer is provided on the chatbot page to ensure that users are aware of the chatbot’s limitations.
Moreover, no user data is stored or kept, ensuring that no chatbot history or personal information is stored on the platform or any cloud storage system.
Mobile Functionality
The web app is designed to be used on a variety of different devices ranging from mobile phones to tablets and computers. This is achieved through the use of a dynamic page size which adapts to the screen size of the device being used. This ensures that the web app is usable on a variety of different devices and maintains the ease of use of the web app.
Interactable Design
The web app offers feedback to the user in the form of different bot expressions. This is achieved through the use of different images which are displayed depending on the current state of the demo bot.
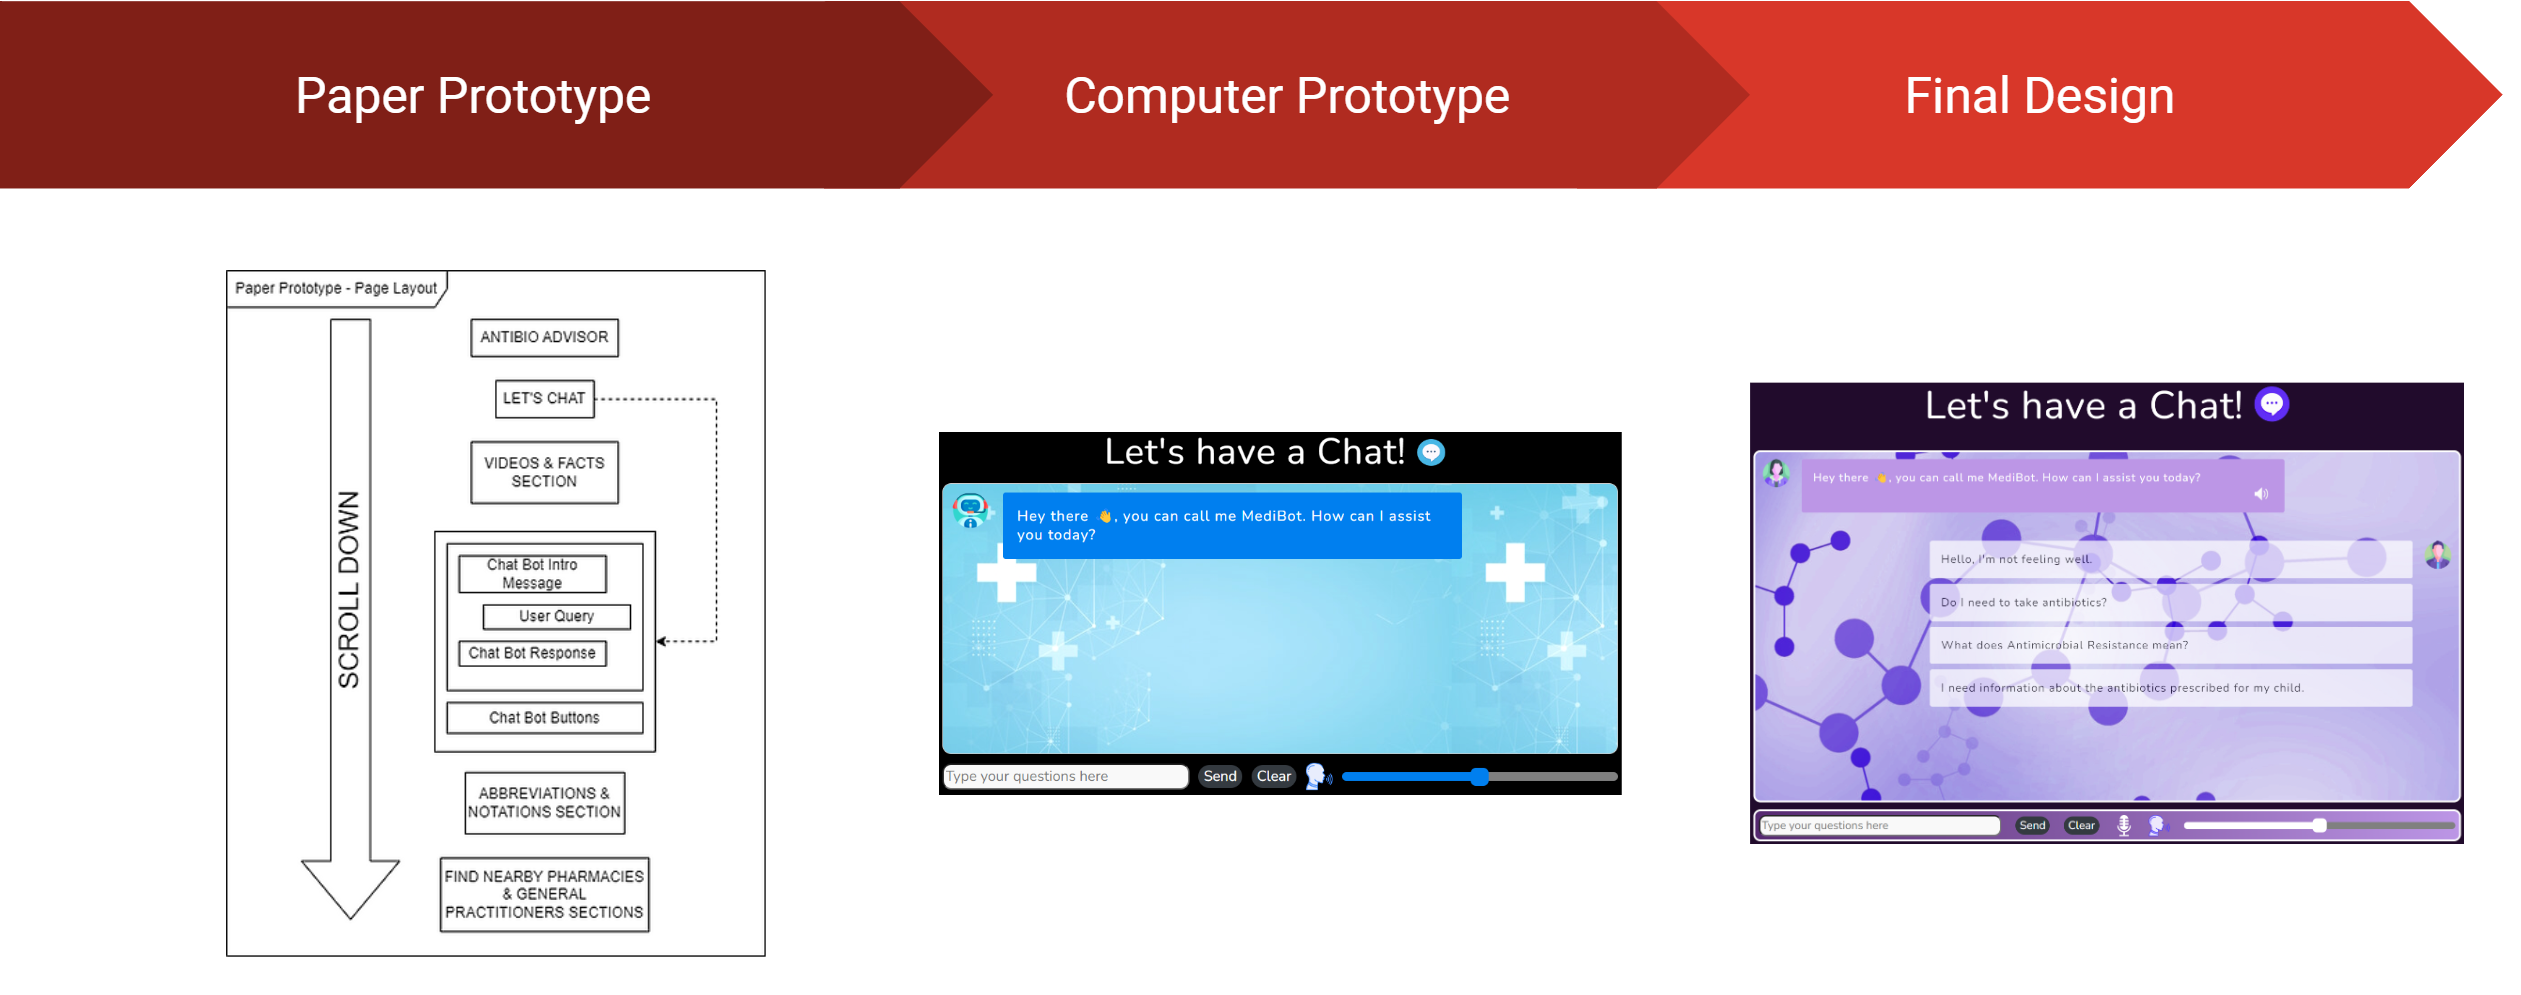
A Good Design takes a lot of Effort, Feedback and Time
The design of the web app was a long and arduous process which required a lot of effort and feedback. The design process was broken down into 3 main stages:
Paper Prototyping – This stage involved the creation of a paper prototype which was used to gather feedback from potential users. This feedback was then used to improve the design of the web app.
Computer Prototyping – This stage involved the creation of a computer prototype which was used to gather feedback in the form of recommendations and improvements. This feedback was then used to improve the design of the web app. Additionally, in this stage improvements from the previous stage were implemented into the design.
Final Design – This stage involved the creation of the final design which utilised the feedback gathered from the previous stages to create a final design which was then implemented into the web app.
Libraries used
The following libraries were used in the development of the web app:
If you used this project prior to 2025-11-11, it’s been redesigned. I realised that making this a library was over-engineered. The amount of code it took to invoke it was almost as much as the code in the project itself, and it still wasn’t flexible enough for people’s needs. It’s now a template that’s designed to be copied and fiddled with to make it work for your website.
hakyll-flakes
This repo is a template that reflects how I build my hakyll website using Nix.
To use it, copy the flake.nix into your own project or adapt it to fit with what you already have in your flake.nix. There isn’t much code, and I recommend you read through it to get an idea of what it does.
You can take inspiration also from the rest of the repository if it’s helpful, though it was mostly just generated with hakyll-init so that it constituted a complete example.
If you want to start a fresh project, it may be useful to run nix flake init -t github:radvendii/hakyll-flakes in an empty directory, though it just copies the whole repo in there.
Before you start, you will probably want to change the name in flake.nix and package.yaml to something more personalized than my-website.
The outputs of flake.nix are designed to be used in the following ways:
nix build .#website (or just nix build) goes through the whole process and produces a result/ symlink with your compiled static website inside.
nix build .#builder this builds the website builder, your hakyll-based site.hs file. You can find it at result/bin/<project name>.
nix run -- watch This will compile and run your website builder, creating the _site directory and loading the website at localhost:8000. It will also rebuild the website if you change the files (but not if you change site.hs)
nix develop – this will provide you with the inputs you need to build the website in your $PATH. Also gives you what you need to set up the haskell LSP for your editor with all of your haskell packages available.